Animated templates development
Animation is an option that can be used to extend the capabilities of all existing template types. You can turn any type of template into an animated one.
Animated templates are created with the help of frame animation, and the result of processing is exported to animated GIF.
Introduction to animation in the context of the Template Creator
The mechanism of creating animated templates is based on the functionality of frame animation in Photoshop. This functionality is extended by the Template Creator capabilities: some template-specific tools and capabilities are added.
Frame animation in Photoshop allows you to configure the following layer and frame settings (these parameters can be configured differently in different frames):
- Turning visibility on and off for different layers and groups of layers.
- Changing layer position.
- Changing layer opacity.
- Changing layer blending mode.
- Adding styles to layers.
- Specifying a delay time for a frame.
You can learn more about Photoshop frame animation here.
The Template Creator is capable of extracting the following information from the frames in Photoshop, to use it in animation:
- Changing layer position.
- Turning visibility on and off for user photo region layers.
- Changing layer opacity.
- Changing layer blending mode.
- Frame delay time.
As can be seen from the lists above, the Template Creator does not support adding styles to layers.
In fact, adding styles does not work with smart objects, but this feature can be applied to graphic layers.
Besides, the Template Creator does not support the animation playback settings available in Photoshop, using its own instead.
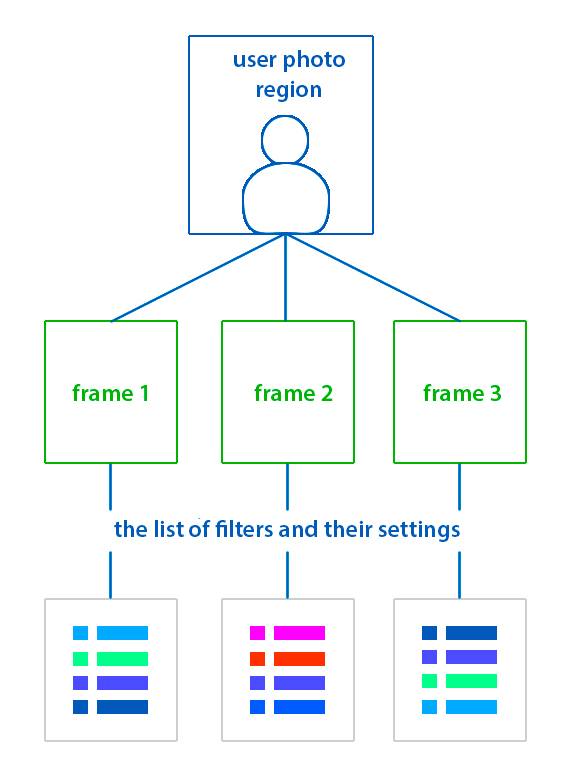
The Template Creator extends the capabilities of Photoshop frame animation via filters, dynamic masks and other settings that can be seen in the layer properties panel. These settings are local for each frame, which means that a set of filters and / or their parameters configuration for the same user photo region may differ from frame to frame. The same refers to dynamic mask settings: you can switch between frames to specify different settings for the same user photo region or graphic layer.
If you copy frames via Photoshop, frame copies lose their settings specified in the Template Creator. To copy a frame without losing its settings (filters etc.), go to the Template menu and select Duplicate frame.
Non-standard methods of animation
Sometimes an effect required for animation cannot be achieved by changing one or several animated properties from frame to frame. Let us consider these restrictions, as well as some approaches that make it possible to circumvent them.
It is enough to just use the Move tool for simply moving a smart object or a graphic layer, and that will work for each frame independently, but tools that are not explicitly animated in Photoshop will be applied to all frames at once. Actions that are obviously non-animated in Photoshop are: rotation, scaling, making minor edits to a layer graphics, masking, distortion, and a number of other actions. That is, if you apply these actions to an object in one particular frame, you automatically change this object in all frames.
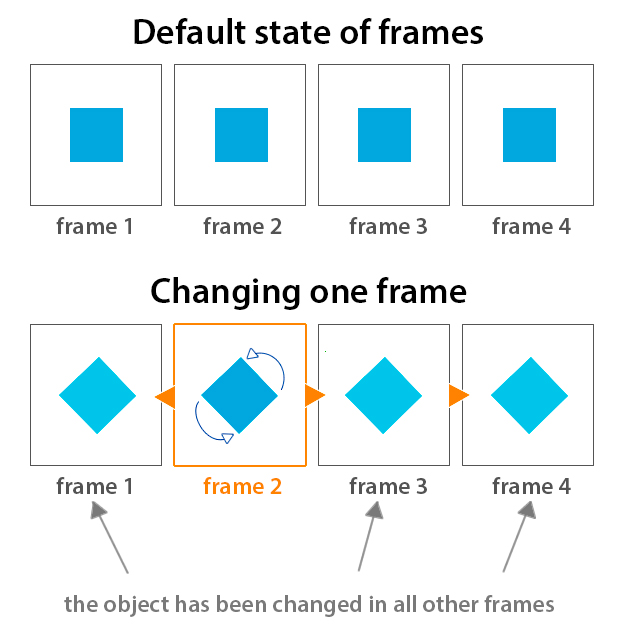
In the light of what was said above, we need a workaround to implement our ideas when we have to apply the same actions to each frame separately.
Roundabout ways to circumvent the animation rules for smart objects of user photo regions
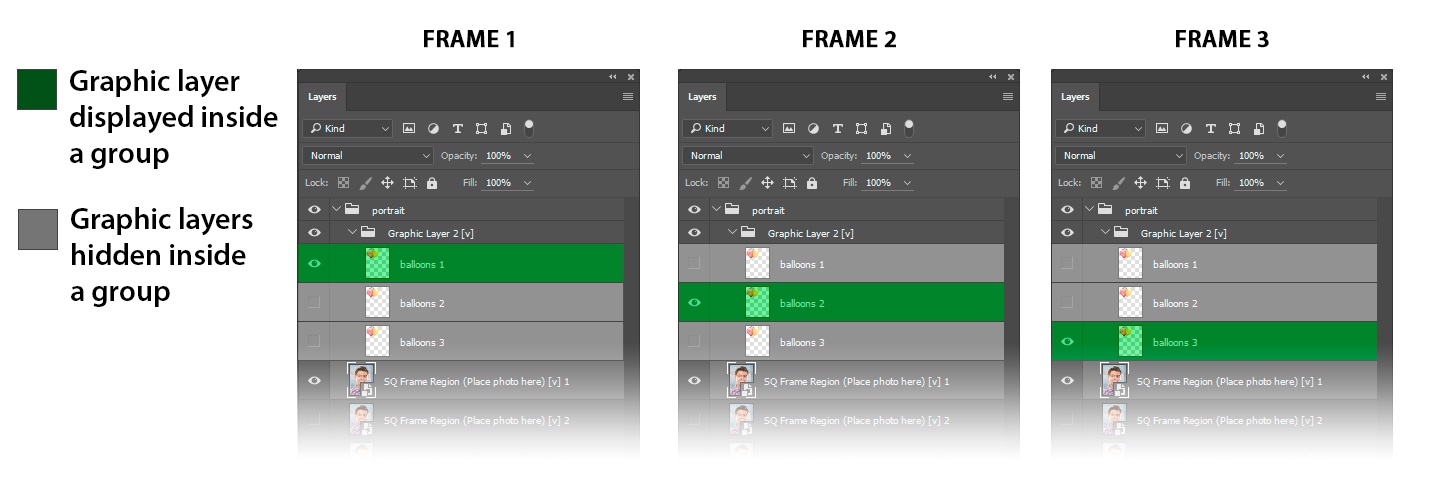
Turning visibility on and off for smart objects and graphic layers in animation works locally for each frame. This peculiarity can be used to circumvent the restrictions imposed by the fact that changes are applied automatically to all frames. To do so, you need to make copies of the smart object inside the template, so that the number of its copies corresponds to the number of frames in which it is changed.
Next, turn off all the copies of the smart object for each frame, except one. Then modify the visible copy as required to achieve the desired visual effect for this particular frame.
In the next frame, display the next user photo region and modify it as needed for this particular frame. The modified user photo region should be the only one that is visible among all its copies, and so on.

Please remember that when you work in this way, you create new user photo regions that are independent from each other. That is why filters, blending modes and other settings need to be configured and maintained separately for each particular user photo region in the Template Creator.
Roundabout ways to circumvent the animation rules for graphic layers
The technique for circumventing the animation rules for graphic layers is pretty much the same as for the smart objects. The only difference is that the subject of copying, configuring and turning visibility on/off in this case are not subgroups of graphic layers, but graphic layers contained in them (or nested subgroups with graphic layers).
Unlike in the previous approach for user photo regions, where we have to create several user photo regions for each frame, animation inside a graphic layer subgroup does not generate multiple graphic layers in the Template Creator, as the contents of a graphic layer subgroup are rasterized on the same level with the subgroup.
Other than that, this approach is the same as the one described for smart objects of user photo regions.
Actions that break animation
There are actions that can spoil animation and disable a template partially or completely:
- Undesirable selecting of the Unify layer properties button in animation frames (see help about unification options on the Adobe website);
- Undesirable selecting of the Propagate Frame 1 option (see help about the Propagate Frame 1 option on the Adobe website);
- Free transformation.
Special aspects of working with image indexes in templates for multiple user photos
In animation mode, consecutive numbering of user photos is used for user photo regions in all frames.
Therefore, if you open a test dialog for a template with multiple photos, the indexes in all used user photo regions of each frame will be calculated (used user photo regions are those that are visible in each particular frame, that is, their visibility is not turned off in the PSD document).
So, for example, in an animated template consisting of 5 frames, where one user photo region is displayed in each frame, the index order for each frame will be as follows: 0 - 1 - 2 - 1 - 0. That is, consecutive numbering of indexes is used, and indexes are retrieved from all template frames. You will need 3 different photos to test this template on several user photos.
Supported animation looping options
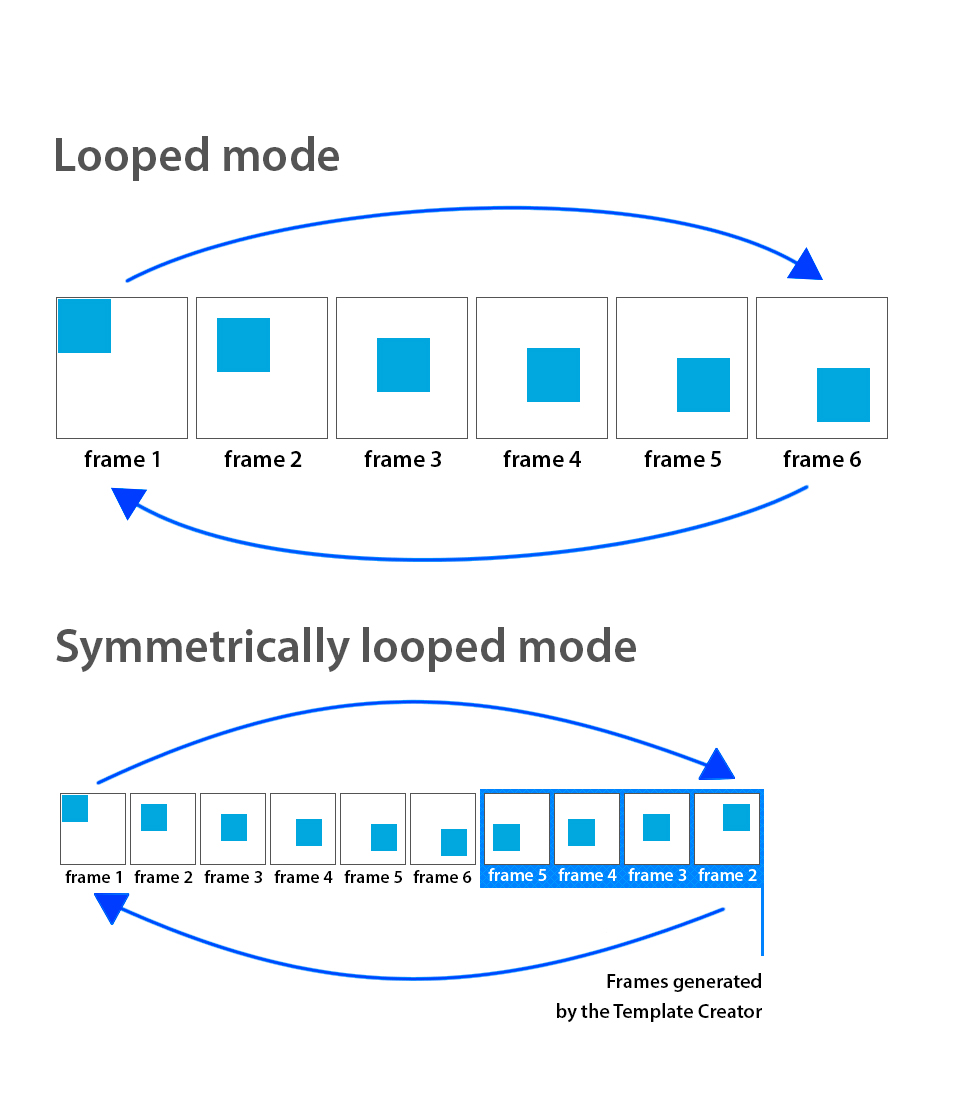
The Template Creator does not support animation playback options available in Photoshop. A template can be animated either in a looped or in a symmetrically looped mode.
The meaning of the looped mode is clear from its name. The symmetrically looped mode is an infinite loop where animation is played from beginning to end, then from end to beginning, within one iteration, while the first and last frames are not played repeatedly. In this way, frames will be played in the following order: 1, 2, 3 ... N, N-1 ... 3, 2 (where N is the number of frames in a template). In this mode, the number of frames in the resulting template increases almost twofold (the first and the last frames are not taken into consideration). Along with that, the file size almost doubles, as well.
Looping options in the Template Creator can be controlled via the Loop Animation box. If the box is not checked, animation will be played in the ordinary loop mode by default.
Color palette in animated GIF files: global and local palettes
The type of an animated GIF color palette can affect the quality of the resulting template. Each GIF file contains its own color palette - global or local. A palette is actually a table that can contain up to 256 indexes (256 colors).
In case a local palette is used, each frame has its own color palette, which can include up to 256 colors and their shades from those presented in this particular frame.
If a global palette is used, then a single color palette, containing up to 256 colors and their shades, is used for all frames in an animation.
To decide which palette to use for a template, you should consider the color data of each particular frame.
So, for example, if one of the frames is a grayscale image, another one is made in the shades of green and the third one consists of brown tones, and so on, then the average color values of the global palette will not be enough to convey the template colors accurately. In this case, a local palette should be used - it will allow to retrieve and use data from each frame.
A local palette should only be used in cases when it is necessary, as saving a separate palette for each frame can significantly increase the size of the resulting GIF file .
Below are examples showing the difference between the results you can get when exporting animated GIF files with different color palettes.
| Global palette + frames with similar colors | Global palette + frames with different colors | Local palette + frames with similar colors | Local palette + frames with different colors |
|---|---|---|---|
|

|

|

|
Limitations of animated templates
At the moment, animation works in limited mode for templates with stickers, as well as templates with stickers that contain several user photo regions (including frame templates). This means that only 'basic' and 'simple' templates of these types will work consistently with animation. In the future, animation support in different templates is going to be improved.
Below are some examples of situations when animation may work incorrectly:
- A sticker template that uses different user photos in different frames (e.g., user photo 1 in frame 1, user photo 2 in frame 2).
- A frame template that uses different user photos in different frames for the same user photo region with stickers.
- A template where a sticker is applied to a face region, and the position of the face region is animated.