×
Where are the left and the right sides of a template?
Answer:
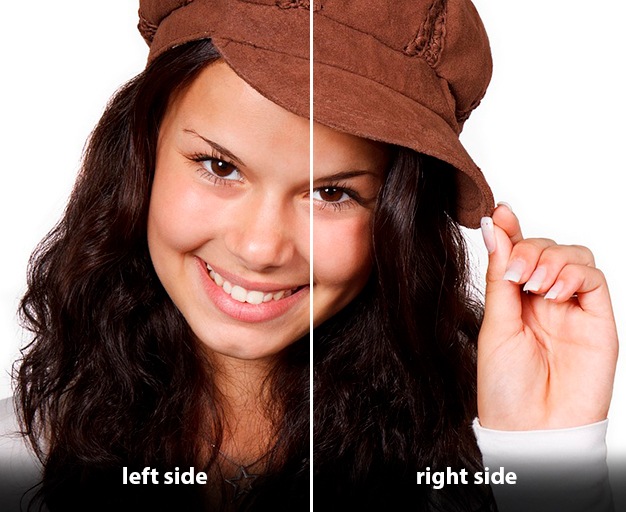
The left and the right sides of a template do not correspond to the left and the right sides of a human face in reality. The left side of a template is that which is closer to the left side of the screen, and vice versa. So, when we talk about templates, we say that the girl in the image below touches the peak of her cap with her right hand.
Why do the colors in my template, when I view it in the Template Creator, are different from those that I see in Photoshop?
Answer:
The Template Creator works only with the sRGB IEC61966-2.1 color profile (not to be confused with the ‘computer display sRGB’). To make the colors of layers in the Template Creator the same as in Photoshop, do the following:
- Specify the sRGB IEC61966-2.1 color profile in the document settings (Choose Edit → Assign Profile). Learn more about changing the color profile for a document here.
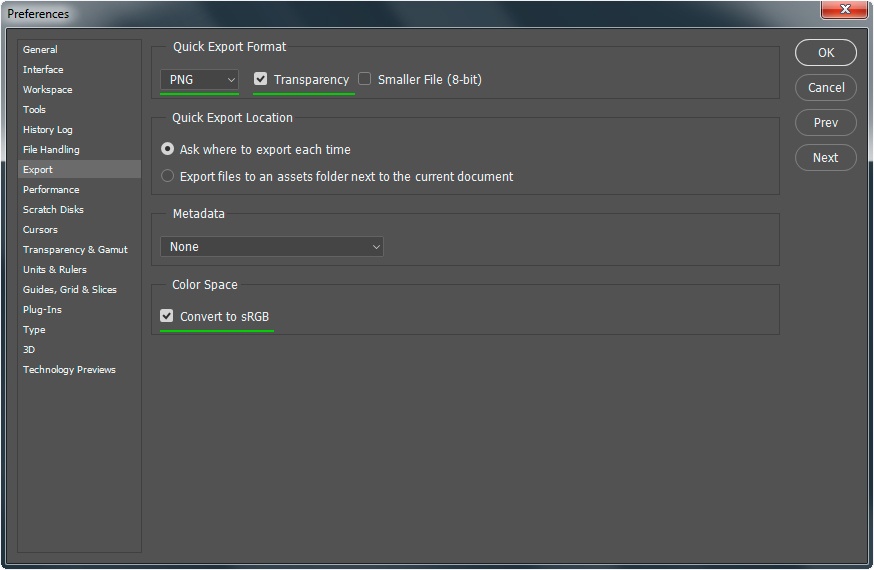
- In the export preferences dialog Edit → Preferences → Exportset the export format to PNG with transparency and convert the graphics to sRGB IEC61966-2.1.
- Optionally, you can set the sRGB IEC61966-2.1 color profile as the default profile for all documents (Edit → Color Settings).
Why does the same template with the same color profile look different (have different colors) when viewed on different PCs?
Answer:
The same template (even when it has the same color profile) can look different on different PCs because their monitors are calibrated differently. To minimize the difference in colors, refer to our calibration manual.
Why do I get ‘normal’ colors when I export a whole document directly from Photoshop, but when I export / process a test photo in the Template Creator, the colors in my template look wrong?
Answer:
The reason for this problem is that the correct color profile (sRGB IEC61966-2.1) has not been specified for this particular document.
In this case, when you export the document, its colors are converted to sRGB IEC61966-2.1. In these circumstances, when the whole document is exported, all layers are stacked with their blending modes first, after which the resulting template is converted to sRGB IEC61966-2.1 and saved to disk. When you use the Template Creator, layers are exported one by one. In this case each particular layer/group of layers is converted to sRGB IEC61966-2.1 and then exported. After that, when you process a test photo in the Template Creator, all resulting layers are stacked with their blending modes. Different sequence of operations (converting colors and stacking layers with blending modes) leads to difference in colors.
| A template exported from Photoshop The template looks the same when viewed in Photoshop |
A template exported from the Template Creator |
|---|---|
 |
 |
(Move the slider in the image below to compare the colors).
You will not have to deal with this problem if you set the sRGB IEC61966-2.1 color profile for your PSD documents.
In addition, this problem can occur if the original photo processed by the Template Creator initially has a color profile different from sRGB IEC61966-2.1. In this case, the Template Creator uses the colors of the photo as is, ignoring the original color profile. After processing, the colors in the photo will be slightly different from the original due to the fact that the original photo was viewed on a device or program that uses color profiles and displays photos in accordance with the specified color profile.
To fix this problem, before processing the photo, convert it to an sRGB IEC61966-2.1 profile using Photoshop or any other tool that takes into account the original profile of the photo when converting.
Why does it take so long to reparse a PSD document?
Answer:
There may be several reasons why it takes a long time to reparse a PSD document:
- You are using a low-end PC. Photoshop is a resource-intensive application. When it interacts with the Template Creator, it performs a lot of tasks, and some of them require high processing power.
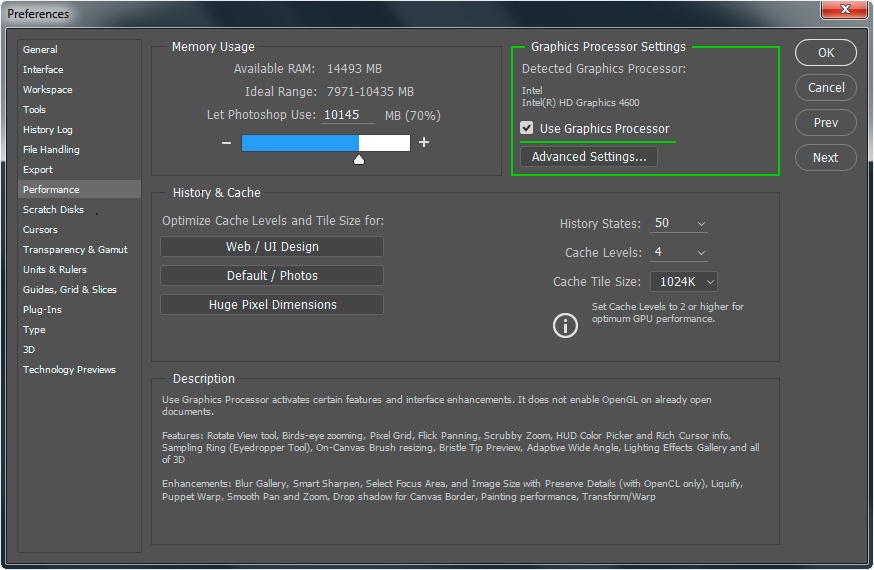
- The graphics processor is not used when Photoshop is working. To make Photoshop use the graphics processor, go Edit → Preferences → Performance and check the ‘Use Graphics Processor’ box in the performance options dialog.
 Learn more about how Photoshop uses the graphics processor here: https://helpx.adobe.com/photoshop/kb/photoshop-cc-gpu-card-faq.html
 - Your template is heavy / complicated. If a template contains a large number of layers, user photo regions and orientations, it takes a long time to reparse it.
- The document canvas is large. The larger is the canvas, the more time it will take to reparse the document.
- Your PSD document contains smart objects with large canvases. It is important to understand that the document itself may have a small-sized canvas, but its smart objects may have large canvases.
- The project contains a large number of sub-sizes.
- The zoom optimization mode is off. It takes a shorter time to reparse PSD documents on some PCs, because the canvas size is automatically downsized to 0,1% in Photoshop before a PSD document is reparsed. The zoom optimization mode is enabled by default, but if it has been disabled, it can affect the speed of reparsing.
You can also save your time by reparsing not the whole PSD document, but only the layer / layers that have been changed, providing they have already been exported to the Template Creator. This video lesson shows how to reparse one layer using the example of a user photo region.
These video lessons (part 1 and part 2) also show some time saving techniques when working with templates that contain several orientations.
Why I cannot process my own photos?
Answer:
In the local processing mode, you can only process a previously approved set of photos (read more). If you want to process photos that are not in the Template Creator whitelist, you need to disable the Local Processing option. In this case, processing will take much more time.
If you use only the set of photos installed together with the Template Creator, we advise you to download an additional set of images. It includes some hundreds of selected images, and you can process them locally in the Template Creator saving your time, as local processing is much faster.
Why do I fail to undo the recent actions in Photoshop after I have reparsed the PSD document?
Answer:
When reparsing a PSD document, the Template Creator performs operations with it that are stored in Photoshop history panel. After you have reparsed a PSD document, it can be a problem to undo your recent changes, as they are superseded by numerous operations performed by the Template Creator.
The history panel in Photoshop is able to remember a limited number of actions. If a template contains a big number of layers, the history of interaction between Photoshop and the Template Creator can supersede part of your actions from the history panel.
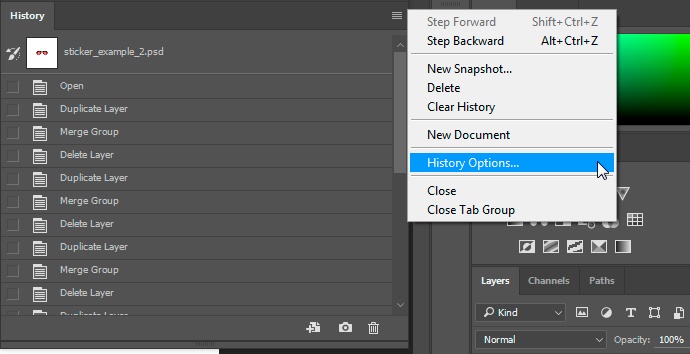
That’s why the first thing that you need to do is go to History Options and uncheck the ‘Make Layer Visibility Changes Undoable’ box. This will save your time when searching the history panel for the history state you need.
Besides, check the ‘Allow Non-Linear History’ box for convenience.
You can also increase the number of history states Photoshop saves in its History panel - this may be helpful if you’re working on a template that contains a large number of layers. To do so, go to Edit → Preferences → Performanceand set the desired number of history states in the Performance Preferences dialog. Increasing the number of history states may affect the performance of your PC.
Learn more about using the history panel in Photoshop here.
Why does the Template Creator fail to process a photo with a template containing a small sticker?
Answer:
The Template Creator cannot process stickers with a side less than 2px. In case you need to create a narrow sticker like that, this trick may be helpful: create an almost invisible background layer with a bigger size in the sticker’s group.
Why do I fail to export the face region (‘Correction color layer is missing’)?
Answer:
A face region is presented by a smart object which, in its turn, contains a correction color layer and another smart object with the face scheme. Probably, the correction color layer has been removed from the smart object of the face region. To solve the problem, open the smart object of the face region and add a ‘Correction Color’ layer there (both words in the layer name should be capitalized), then save the smart object. After that, you can reparse the PSD document.
Why do two people (e.g. me and my colleague) get different results of processing when using the same template?
Answer:
First of all, make sure that both of you use the same PSD document and project file. Reparse the whole PSD document to ensure that all changes made to the PSD have been exported to the Template Creator. Compare the results using the same test photo. Keep in mind that if your template contains several orientations, a particular template orientation will be applied automatically to a user photo. So, if different template orientations have minor differences (when one orientation includes some changes / layers / filters that are not present in another orientation), the results may vary for different photos because different template orientations are applied to them.
In case you processed the same photo, and the result is still different in colors, it is most probably that you and your colleague have different color profiles or export settings. The Template Creator exports graphics using standard Photoshop export tools and due to the export settings that have been specified in Photoshop. That is why, to avoid such discrepancies, you need to make sure that:
- both you and your colleague have the same settings (transparent PNG, sRGB IEC61966-2.1);
- the document is open with the same color profile settings;
- the color profile was not changed while you opened the document.
If another color profile is specified in Photoshop settings by default, the colors will look different when you work with the document in Photoshop, but after you export the document, they will look identical to those needed for the Template Creator.
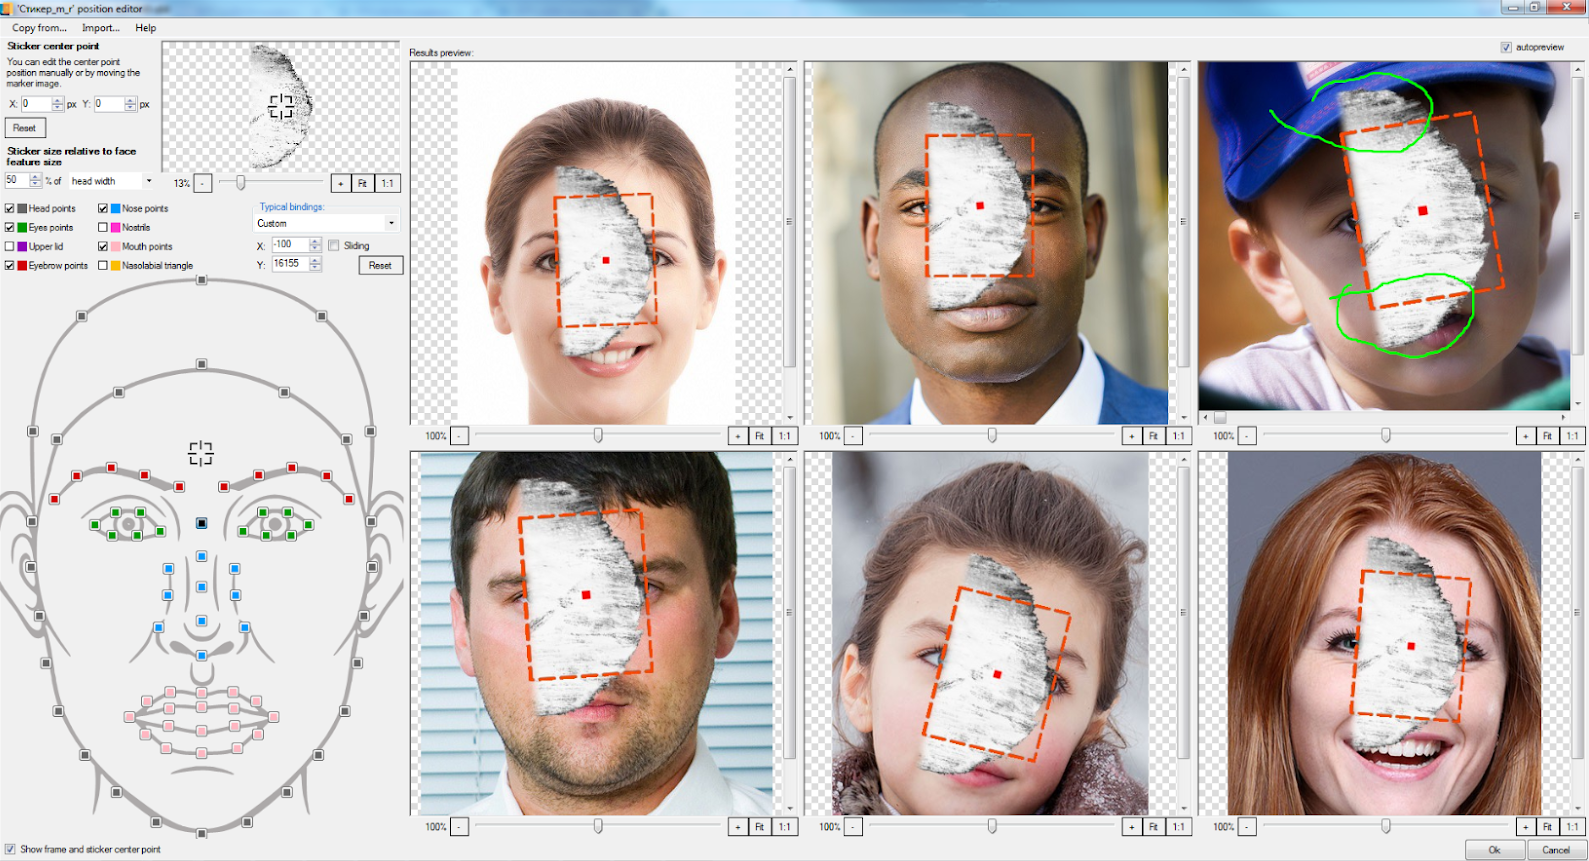
Why does a sticker’s position vary in different photos (a sticker gets positioned correctly on some faces and does not appear in its proper place on others)?
Answer:
Due to anthropological diversity of human faces, marker points are positioned differently in different faces. While positioning the sticker, you might have chosen marker points that change their position greatly in different faces. That’s why it makes sense to change one / several or all selected marker points and check your template again. Apart from the marker points, the force of attraction of a sticker center point and sticker scaling also affect the final result.
Why do I get an error message saying ‘All template orientations must contain the same number of layers’? I don't find it convenient to create several template orientations all at once.
Answer:
In order to get predictable results, the Template Creator requires that each template orientation has the same element structure. That is, if the ‘square’ orientation contains 2 user photo regions and 2 graphic layers, then all other orientations must have 2 user photo regions and 2 graphic layers, as well. However, this doesn’t mean that you have to repeat each action you’ve performed in one orientation, in all other orientations. These video lessons explain in detail how to focus on one orientation, and then transfer the results to other orientations.
Why do I get different results when applying the same filters to user photo regions?
Answer:
Make sure that you have the same order and parameters for filters in all user photo regions and make edits, if needed. Do the same thing if you get different results when applying filters in different template orientations.
To avoid this discrepancy in future, use the copying filters option (read more about filters and how to copy them here).
I tried to make some actions in Photoshop while the PSD document was being reparsed. It all broke down then.
Answer:
When the Template Creator reparses a PSD document, it interacts directly with the template PSD file, so any interference in this process can lead to unexpected results.
First of all, if you interfere in the reparsing process, it will be automatically interrupted. Besides, the Template Creator can be adding or removing auxiliary layers at the moment. If you interfere in the PSD document while it is being reparsed, you risk to corrupt it. However, if that happened, you can restore it manually.
To restore a document, delete the temporary layers created by the Template Creator during reparsing, make the layers hidden by the Template Creator visible and check and restore the DPI, if needed (to do so, go Image → Image Size or use the ALT + CTRL + C key combination).
Why does a sticker have jagged / blurred edges when I process test photos with a sticker template?
Answer:
If the initial size of a sticker is large, but a test photo is small, the sticker’s edges will look jagged due to sticker downscaling. If, vice versa, a sticker’s dimensions are noticeably smaller than the dimensions of a user photo, the sticker will look blurred because it has been stretched.
To avoid this problem, use high quality and large size stickers to be on the safe side - so that a sticker was large enough for large size user photos. To avoid the appearance of jagged edges during scaling, enable the sub-sizes mode for stickers.
How do I send a project to a colleague? Which files do I need to include?
Answer:
It is best to store your project in a separate folder. Keeping all project files and folders in one place will make it clear which files belong to a particular project. Each project can contain the following folders and files:
- ProjectName.pttp2 - the project file as such. A double click on this file opens the project.
- ProjectName.psd - the PSD document containing the template graphics in their original state. If a project has several orientations, a file name can contain a suffix with the orientation name. A project can contain from 1 up to 3 PSD documents.
- ProjectName.pttp2_resources - a folder with exported project resources. It contains layers, exported and rasterized by the Template Creator, as well as information on how they should be arranged. If the results of processing have been exported to this folder, most likely, they should be stored in the results subfolder.
Depending on your particular goal, there are two ways to save your project for sending it to a colleague.
Method 1 (basic): You send only the *.psd and *.pttp2 files. This set of files is enough to let your colleague open the project and perform all kinds of manipulations with it.
Method 2: You send only the *.pttp2 file and the ProjectName.pttp2_resources folder, where you can leave only the resources and cache subfolders, as well as the latestParseState .xml file. Be sure to reparse the PSD document by the Template Creator and save it before sending to update the information contained in these files. This method will let your colleague do only a limited set of actions with a template. NB! This method works only if you and your colleague have the same versions of the Template Creator installed. If your Template Creator versions are different, use the 1st method.
Use the 1st method when you need to send the final result to your manager, as well as when you want your colleague to be able to make edits to the template graphics.
The 2nd method is convenient when you want to test a template using a test photo or to demonstrate the result and discuss it with a colleague. In this case your colleagues won’t be able to make edits to the template graphics as they don’t have the PSD document.
Create a .zip file with the selected files prior to sending.
Why do I get an error message saying ‘Failed to load the last saved template parsing result’ when I open a project?
Answer:
You will get this error if your current version of the Template Creator is different from the version used last time to reparse and save the project.
You are likely to get this error if you:
- have just updated the version of your Template Creator;
- have received a template from a colleague whose version of the Template Creator is different from yours (older or newer).
If the project contains a PSD file, reparse it to be able to continue work. If you don’t have it (e.g. if you received only the *.pttp2 file and the resources folder from a colleague), do one of the following:
- ask your colleague to send you the PSD file;
- if your colleague has an older version of the Template Creator, ask him / her to update it and reparse / save the project;
- if you have an older version of the Template Creator, update it to synchronize your versions.
Why do faces with different skin tones look as if they do not belong there, when inserted into a facial template? How do I fix that?
Answer:
To make a template look good with faces having different skin tones, it is essential to set the correction color inside the smart object of the face region. See this video lesson for more information on this issue, or read more about it here. Please note that the correction color is available for face regions only.
Where can I store auxiliary graphics in my template, such as grids, additional layers and the like?
Answer:
Auxiliary materials for creating a template (grids, etc.) can be inserted in two places:
- on the same level with the subgroups of layers (do not combine layers with these materials into groups). Layers can be called as you like (without the SQ prefix, so that the Template Creator does not confuse the service materials with the Smart Object of the Frame Region).
- on the top level (the same level with the Portrait/Landscape, etc. groups). Here the layers can be organized in groups with names other than "Portrait", "Landscape" and "Square".
Why do I get an error message saying ‘Could not find Adobe Photoshop installed’?
Answer:
There may be several reasons why you get this error:
- You don't have Photoshop installed on your PC.
- You are using a portable version of Photoshop.
- You are using a modified Photoshop version / distribution / repack where the functionality that the Template Creator needs have been made invalid.
- Photoshop has not been installed properly, that is why the Template Creator cannot find it. In this case you need to reinstall Photoshop. As a reminder, the Template Creator is compatible with Photoshop CC 2015.5 and higher.
- You have performed numerous installations / uninstallations of different versions of Photoshop.
Here is an example of what we meant in the last point:
- You installed Photoshop CS 6.
- After that you installed Photoshop 2015.5 (or newer).
- Then you uninstalled Photoshop CS 6.
- You try to launch the Template Creator.
- You get the above mentioned error.
The easiest way to solve this problem is to do the following:
- Run the ‘correct’ version of Photoshop (2015.5 or newer) with administrator rights so that Photoshop could create the necessary registry entries;
- Close Photoshop;
- Try to launch the Template Creator again.
If these steps did not help, it is recommended to reinstall the version of Photoshop compatible with the Template Creator. Remove all other installed versions of Photoshop (if there are any) before reinstalling.
Why do I get an error message saying that ‘Installed Adobe Photoshop version in not supported’?
Answer:
The Template Creator is compatible with Photoshop СС 2015.5 or higher. To check your Photoshop version, select Help → About Photoshop in the menu.
Besides, several versions of Photoshop can be installed on your PC. Even if one of them is the correct Photoshop CC 2015.5 version (or higher), its settings might have been corrupted when another Photoshop version was installed. Uninstall all Photoshop versions and install only the correct version (CC 2015.5 or higher). You can also use the method described here.
Why do I get an error message saying ‘Template Creator Plug-In is not installed’ when I start the Template Creator?
Answer:
The Template Creator Plug-In is an auxiliary tool that binds Photoshop and the Template Creator together. You can get an error message saying ‘Template Creator Plug-In is not installed’ due to a number of reasons:
- Photoshop was not installed properly, and the Template Creator installer failed to add the plug-in into an appropriate Photoshop folder.
- The Template Creator had been installed before Photoshop (or its correct version) was installed. That is why the Template Creator installer was not able to add the plug-in into a non-existent Photoshop folder.
- The plug-in has been removed.
- Photoshop failed to load the plug-in.
To solve the problem, try one of the following:
- Restart Photoshop. This will help if the plug-in has been installed, but not loaded (because it is loaded when Photoshop starts).
- Reinstall the Template Creator and restart Photoshop.
- In Photoshop, select Help → About Photoshop from the menu. This will open a new window with a text. Find a heading saying ‘Optional and third party plug-ins’ there. If you can see the following text under the heading: ‘Pho.to Template Creator Plug-In N’ (where N is the plug-in version), this means that the plug-in has been successfully installed into Photoshop. You may also find the plug-in under the ‘Plug-ins that failed to load’ heading. As is clear from the message, in this case the plug-in failed to load.
If none of these helped, contact the developers. Please attach the text information from Help → System Info in Photoshop.
Why do I get the ‘api-ms-win-crt-runtime-l1-1-0.dll is missing’ error when trying to process a test photo?
Answer:
You get this error because your operating system is outdated and needs to be upgraded. To fix this error, you must install all important Windows updates. It means that you need to install all important updates until all of them are installed. After installing each current update and rebooting your computer (if needed), check again if there are any important updates to install and install them, if there are any.
There is also an alternative approach letting you install only those updates that are required to add the needed functionality:
If you are using the Windows 7 operating system, check if you have the Service Pack 1 installed. If you don’t have it, download the Windows service pack for your version of Windows from the Microsoft website:
https://www.microsoft.com/en-us/download/details.aspx?id=5842 and install it.
Select the OS language before downloading and download the windows6.1-KB976932-X64.exe file (for x64 architecture) or windows6.1-KB976932-X86.exe file (for x86 architecture). After Service Pack 1 has been installed, follow the steps below.
- Download the update for Universal C Runtime https://support.microsoft.com/en-us/kb/2999226 and select the version for your OS and language.
- Open the command prompt with administrator rights.
- Open your Local Disk C:\ directory.
- Create a new “tmp” folder, if it does not already exists there.
- Create another ‘tmp’ folder inside the ‘tmp’ folder (C:\tmp\tmp).
- Copy the downloaded Microsoft update into c:\tmp.
- Unpack it into the C:\tmp\tmp folder (expand -F:* c:\tmp\Windows6.1-KB2999226-x64.msu c:\tmp\tmp).
- Use the image deployment tool to install this update (dism /online /add-package /packagepath:c:\tmp\tmp\Windows6.1-KB2999226-x64.cab).
- If you still get the “api-ms-win-crt-runtime-l1-1-0.dll is missing” error when trying to process a test photo, reinstall the Microsoft Visual C++ 2015 redistributable x86 pack. It can be downloaded here: https://www.microsoft.com/en-us/download/details.aspx?id=48145 (select your language and the x86 version).
I enabled the distortion mode without distorting the user photo region and reparsed the PSD document. Why is the result of processing so different?
Answer:
If the distortion mode is disabled, the user photo region ratio is taken from the project PSD file. However, if the distortion mode has been enabled for the user photo region, its ratio is taken from the smart object of the user photo region. To fix this problem, open the smart object of the user photo region and edit the smart object canvas ratio.
I distorted a smart object using smart filters, why did it break down then?
Answer:
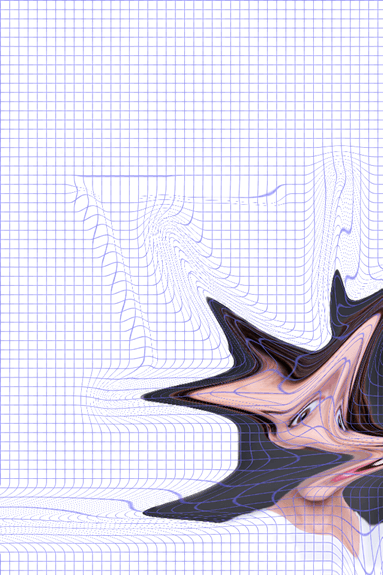
To answer this question, let us turn to theory. In most distortion filters, distortion specified with the help of a distortion grid, no matter whether this grid is visible (like in the Liquify filter) or not. Despite the fact that a smart filter is applied to a smart object in Photoshop, the grid in these filters is not attached to smart object edges, as you might expect; instead, it is attаched to the edges of the main document canvas. Thus, as an example, if you use the Liquify smart filter, the grid, together with the distorted smart object, will look as follows:
However, if you move the smart object from the bottom right corner into the middle of the canvas, you can see the distortion result change (to do so, disable and enable the filter visibility).
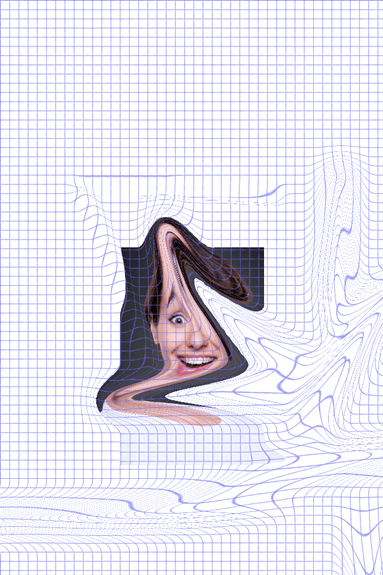
If you compare the images of the distorted smart object before and after it was moved, you can see that the results of distortion differ greatly. However, changes caused by moving / scaling / rotating a smart object are reversible. If you undo the changes (e.g. place the smart object back to its initial position,etc.), its previous state will be restored. The same goes for canvas resizing (provided that the smart object doesn’t go beyond the canvas edges) - if you restore the initial size of the canvas, the smart object will return to its previous state.
Apart from reversible changes, some actions cause irreversible changes to the smart filter grid. Changes become irreversible in case the smart object doesn’t fit into the canvas (goes beyond the canvas edges). In this case the following actions will lead to irreversible changes of the grid:
- Resizing the document canvas. If the canvas is upsized, the grid is stretched to fit the new canvas size. If the canvas is downsized, the grid remains unaffected.
- Making any change to the contents of the smart object (even opening it, saving and closing).
So, let’s sum up what has been said above:
- If it is possible to create a visual effect without using smart filters, avoid using them.
- After a smart object with smart filters appears in the document (not necessarily a user photo region, but any smart object, for example the one you get as a result of dragging a new layer into the document), avoid resizing the document canvas, as well as moving / rotating / scaling the smart object.
- It's not a good idea to use smart filters with smart objects that go beyond the canvas edges. Some smart filters will work correctly in these circumstances, while some others will not. Any way, the result is difficult to predict in this case, and it’s hard to guess what particular action will ruin the visual effect.
The Free Transform tool can be used as an alternative to smart filters for some tasks. If you distort a smart object with this tool, the distortion result is not corrupted (unlike in the cases described above), so it can be safely recommended for your creative purposes.
Why does Photoshop crash when I create / reparse / add user photo regions into the PSD document?
Answer:
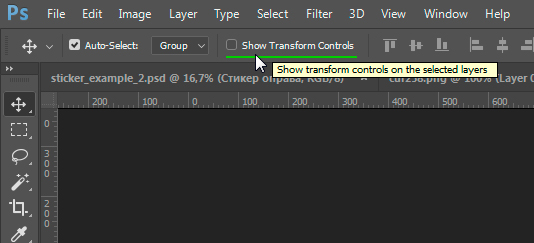
To fix this problem, in most cases it is enough to disable the visibility of transform controls on the selected layers. To do so, select a layer (you can launch Photoshop without the Template Creator), go to the "Move (V)" tool and uncheck the "Show Transform Controls" box.
I've made some changes to a template (edited graphics, filter / neural filter settings etc.), but the result of processing remains unaffected. Why?
Answer:
There may be several reasons why your changes haven’t taken effect:
- You have not reparsed the PSD document, that’s why your changes have not been exported to the Template Creator.
- You have made changes to the PSD document or to filter settings in the Template Creator for one orientation only. However, another orientation was used for the selected test photo. Enable the orientation filter for test photos in the Template Creator and test the template again.
- You made changes to several template orientations, but you reparsed only one orientation of the necessary layer / layers. Then, you selected a test photo that was processed with another template orientation.
Why do I get the ‘Property value is not valid’ message when I enter filter parameter values?
Answer:
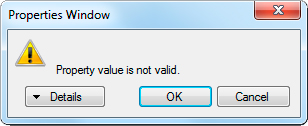
You may get this message if you specified an incorrect / out of range value. First of all, click the Details button in the error message dialog box to make sure that the value you entered lies in the acceptable range.
If the problem persists, there may be another issue. Numerical properties may have both whole-number and decimal values. A period or a comma should be used as a delimiter in decimal values.
A particular delimiter depends on system regional settings; what particular character will be entered when using the sаme key depends on your keyboard layout. So, if you get an error when using a period as a delimiter - use comma instead, and vice versa.
I specified all marker points correctly, but then I got a totally incorrect result, as if my marker points spontaneously changed their position. How come?
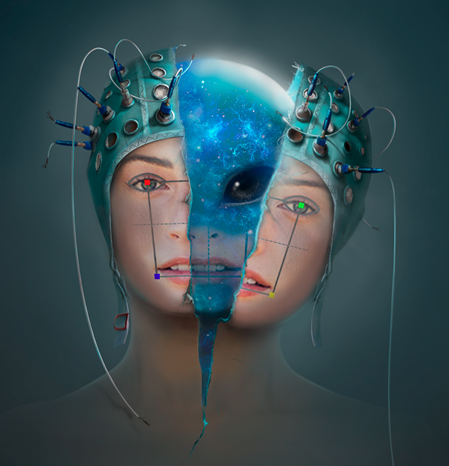 template sketch in Photoshop template sketch in Photoshop |
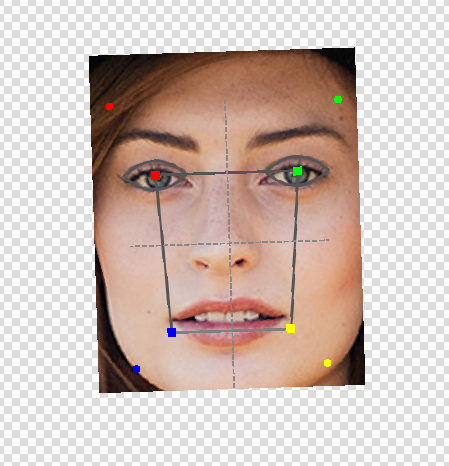 setting marker points in the Template Creator setting marker points in the Template Creator |
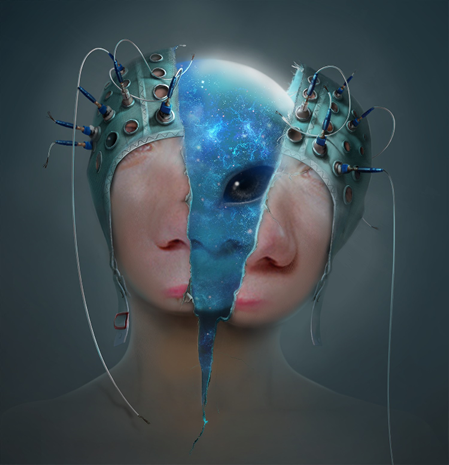 final result (photo was positioned using incorrect position of marker points) final result (photo was positioned using incorrect position of marker points) |
- First of all, make sure that the marker points are in their proper position.
Marker points in the Template Creator are shown as multicolor dots that are not connected with lines.
As can be seen in the second picture above, the marker points from the Template Creator and the marker points from the PSD document smart object do not coincide - this has led to an undesirable result.
If everything is correct in the template, these marker points may be invisible, as they coincide with the marker points from the PSD document. - If in the current project the marker points also changed their position in the Template Creator, delete the old smart object from the PSD document. Then add a new smart object by selecting Insert → Face Region from the Template Creator menu.
- If that did not help, contact the developer and attach your template.
Why do I see a warning message saying that I need to check and fix layer visibility in the PSD file when I add a new template orientation or merge several PSD files into one?
Answer:
You add a new orientation and combine several PSD files into one using the "Duplicate Layer"option in Photoshop. If a project contains linked layers and one or more layers are hidden, all layers will become visible in the duplicate version.
This issue is on Photoshop's side and has long been known about. You can verify this problem yourself.
- Create 2 layers in Photoshop.
- Link them together.
- Hide one of the layers.
- Select the linked layers, right-click one of the layers to open the context menu and select "Duplicate Layer".
- All duplicated layers will now be visible.
To avoid this problem, you should check and fix layer visibility in Photoshop when performing these operations.
This problem does not arise if there are no linked layers in the project, or if you check the "Paste into a new PSD"option in the dialog box when adding a template orientation. In this case, duplicate layers will be created correctly, and the visibility of the layers will be preserved.
When opening a project, I got the following message: "The stickers groups in the project's PSD documents have been updated. During the update, PSD documents were cropped by the canvas borders, and as a result, the graphics outside the canvas bounds (so-called "big data") were destroyed. It is recommended to check the correctness of the template after changes performed. In particular, attention should be paid to the correct position of the stickers." After this the template started producing undesirable results. What should I do?
Answer:
Starting from version 15.0, the Template Creator uses a new way to extract graphics from stickers. Earlier, when processing sticker graphics, parts of a sticker that went beyond the canvas of the PSD file were not exported. Starting from version 15.0, all sticker graphics contained in a group will be processed, including the graphics lying outside the canvas area. Projects created in earlier versions of the Template Creator will have to go through the migration procedure, which will make edits to the project PSD file and allow you to preserve the current position of the stickers.
The origins of the problem
Stickers often have non-transparent parts that extend beyond the PSD file canvas. As a rule, all these parts are redundant. But in the case of animated templates, some important parts of the image may also go beyond the borders of the canvas, due to the movement of objects in frames. This can lead to the need to individually adjust the position of a "cropped" sticker, as well as to unexpected results of processing.
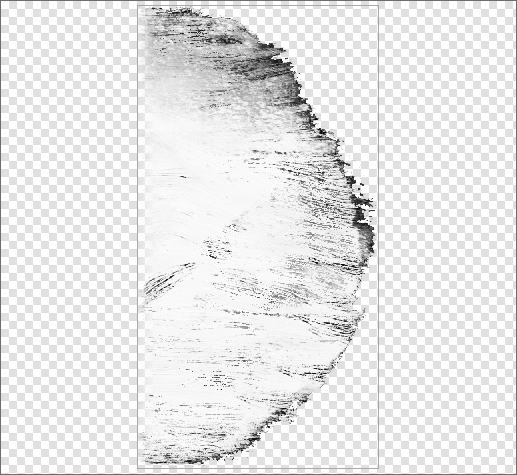
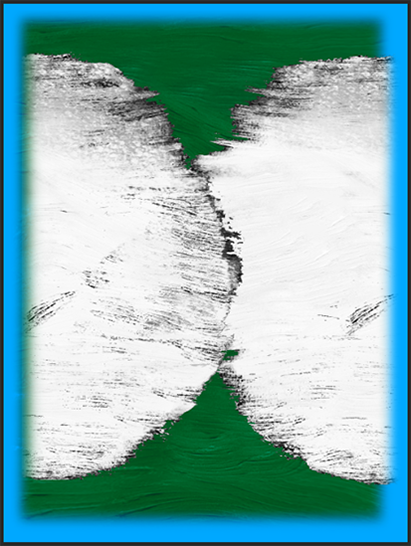 General view of a PSD file General view of a PSD file |
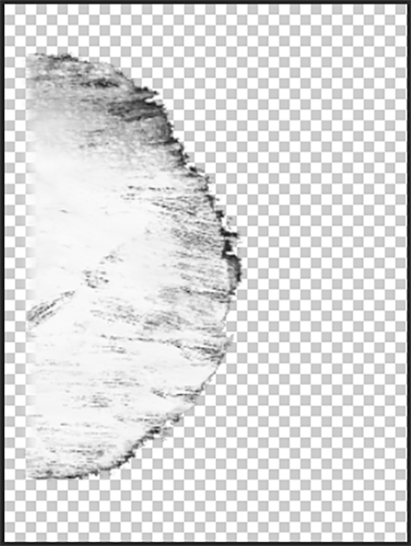 View of one of the stickers View of one of the stickers |
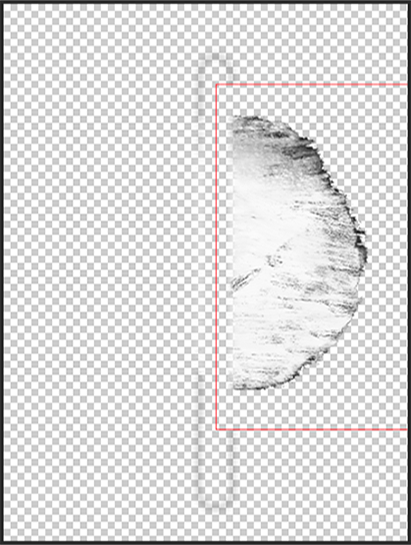 View of the same sticker including the parts that lie outside the canvas (the red frame indicates the original borders of the canvas) View of the same sticker including the parts that lie outside the canvas (the red frame indicates the original borders of the canvas) |
In older versions, when a PSD file was reparsed, a sticker was cropped only within the borders of the canvas. In other words, when exporting a sticker, the canvas was cropped along the borders of the visible part of the sticker. So, exported graphics did not contain the parts that lay outside the canvas. Despite this, the coordinates of the border were calculated with due regard to all the contents, including the contents outside the canvas.
 |
 |
| View of the original sticker in the PSD file | Graphics exported into the template project |
Because of this, the Template Creator had problems positioning the sticker, and the sticker editor displayed incorrect results
 |
Solution to the problem
The current version of the Template Creator exports all of the sticker graphics for new projects, including those parts that lie outside the canvas.
|
 |
| View of the original sticker in the PSD file | Graphics exported into the template project |
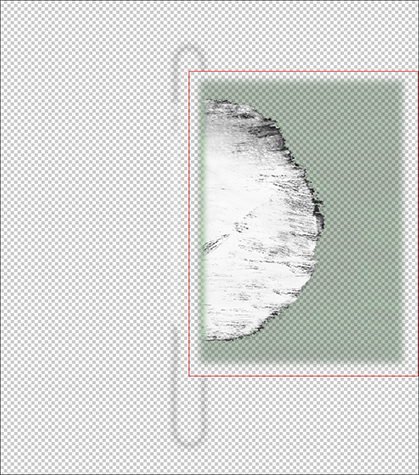
To preserve the position of stickers in older projects, migration process was implemented. It makes changes to a PSD file, cropping the document along the borders of the canvas in order to get rid of excess parts of a sticker.
 |
 |
| View of the original sticker in the PSD file | Graphics exported into the template project |
In most cases, migration should smoothly update all projects to the new format, but in some cases, migration cannot keep the sticker position unchanged due to peculiarities of a specific PSD file. In this case, you will get a migration report listing the names of all problematic stickers that you will have to position manually for the template to work correctly. Also, in some cases, migration may complete successfully, but you will get a message saying that you have to check the position of the stickers.
After the migration process is completed, it is recommended to manually check the positions of the stickers and make sure that the animation is correct.
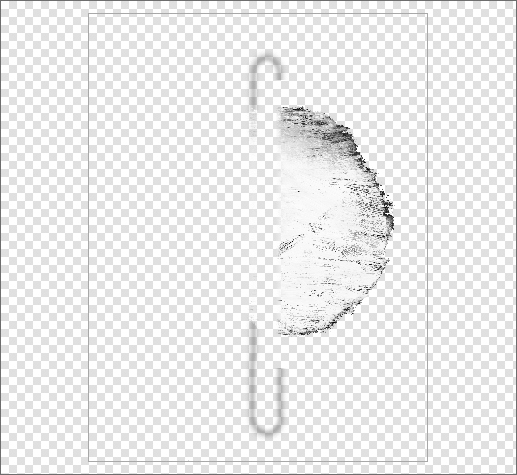
In those groups of stickers whose parts lie outside the borders of the canvas, you can see the appearance of semi-transparent dots in the upper left and/or lower right corner of a sticker. These dots are added as layers in the sticker group called "added by migration to fix sticker position". What is their meaning and origin?
Layers with dots added into the sticker group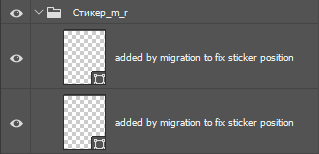
In some cases, new borders of stickers after migration may not coincide with the borders of the canvas on the sides where they went beyond it. In simpler terms, there will be a transparent area between the actual border of the sticker and the border of the canvas after migration. In the case of individual stickers it is of no concern: a sticker will be cropped along the border of the canvas, and all non-transparent pixels will be exported into the Template Creator. But in the case of groups of stickers this method can affect stickers positioning. In order to preserve the sticker position and the size of exported graphics, these points are added to the border of the canvas, as they help maintain the original size.
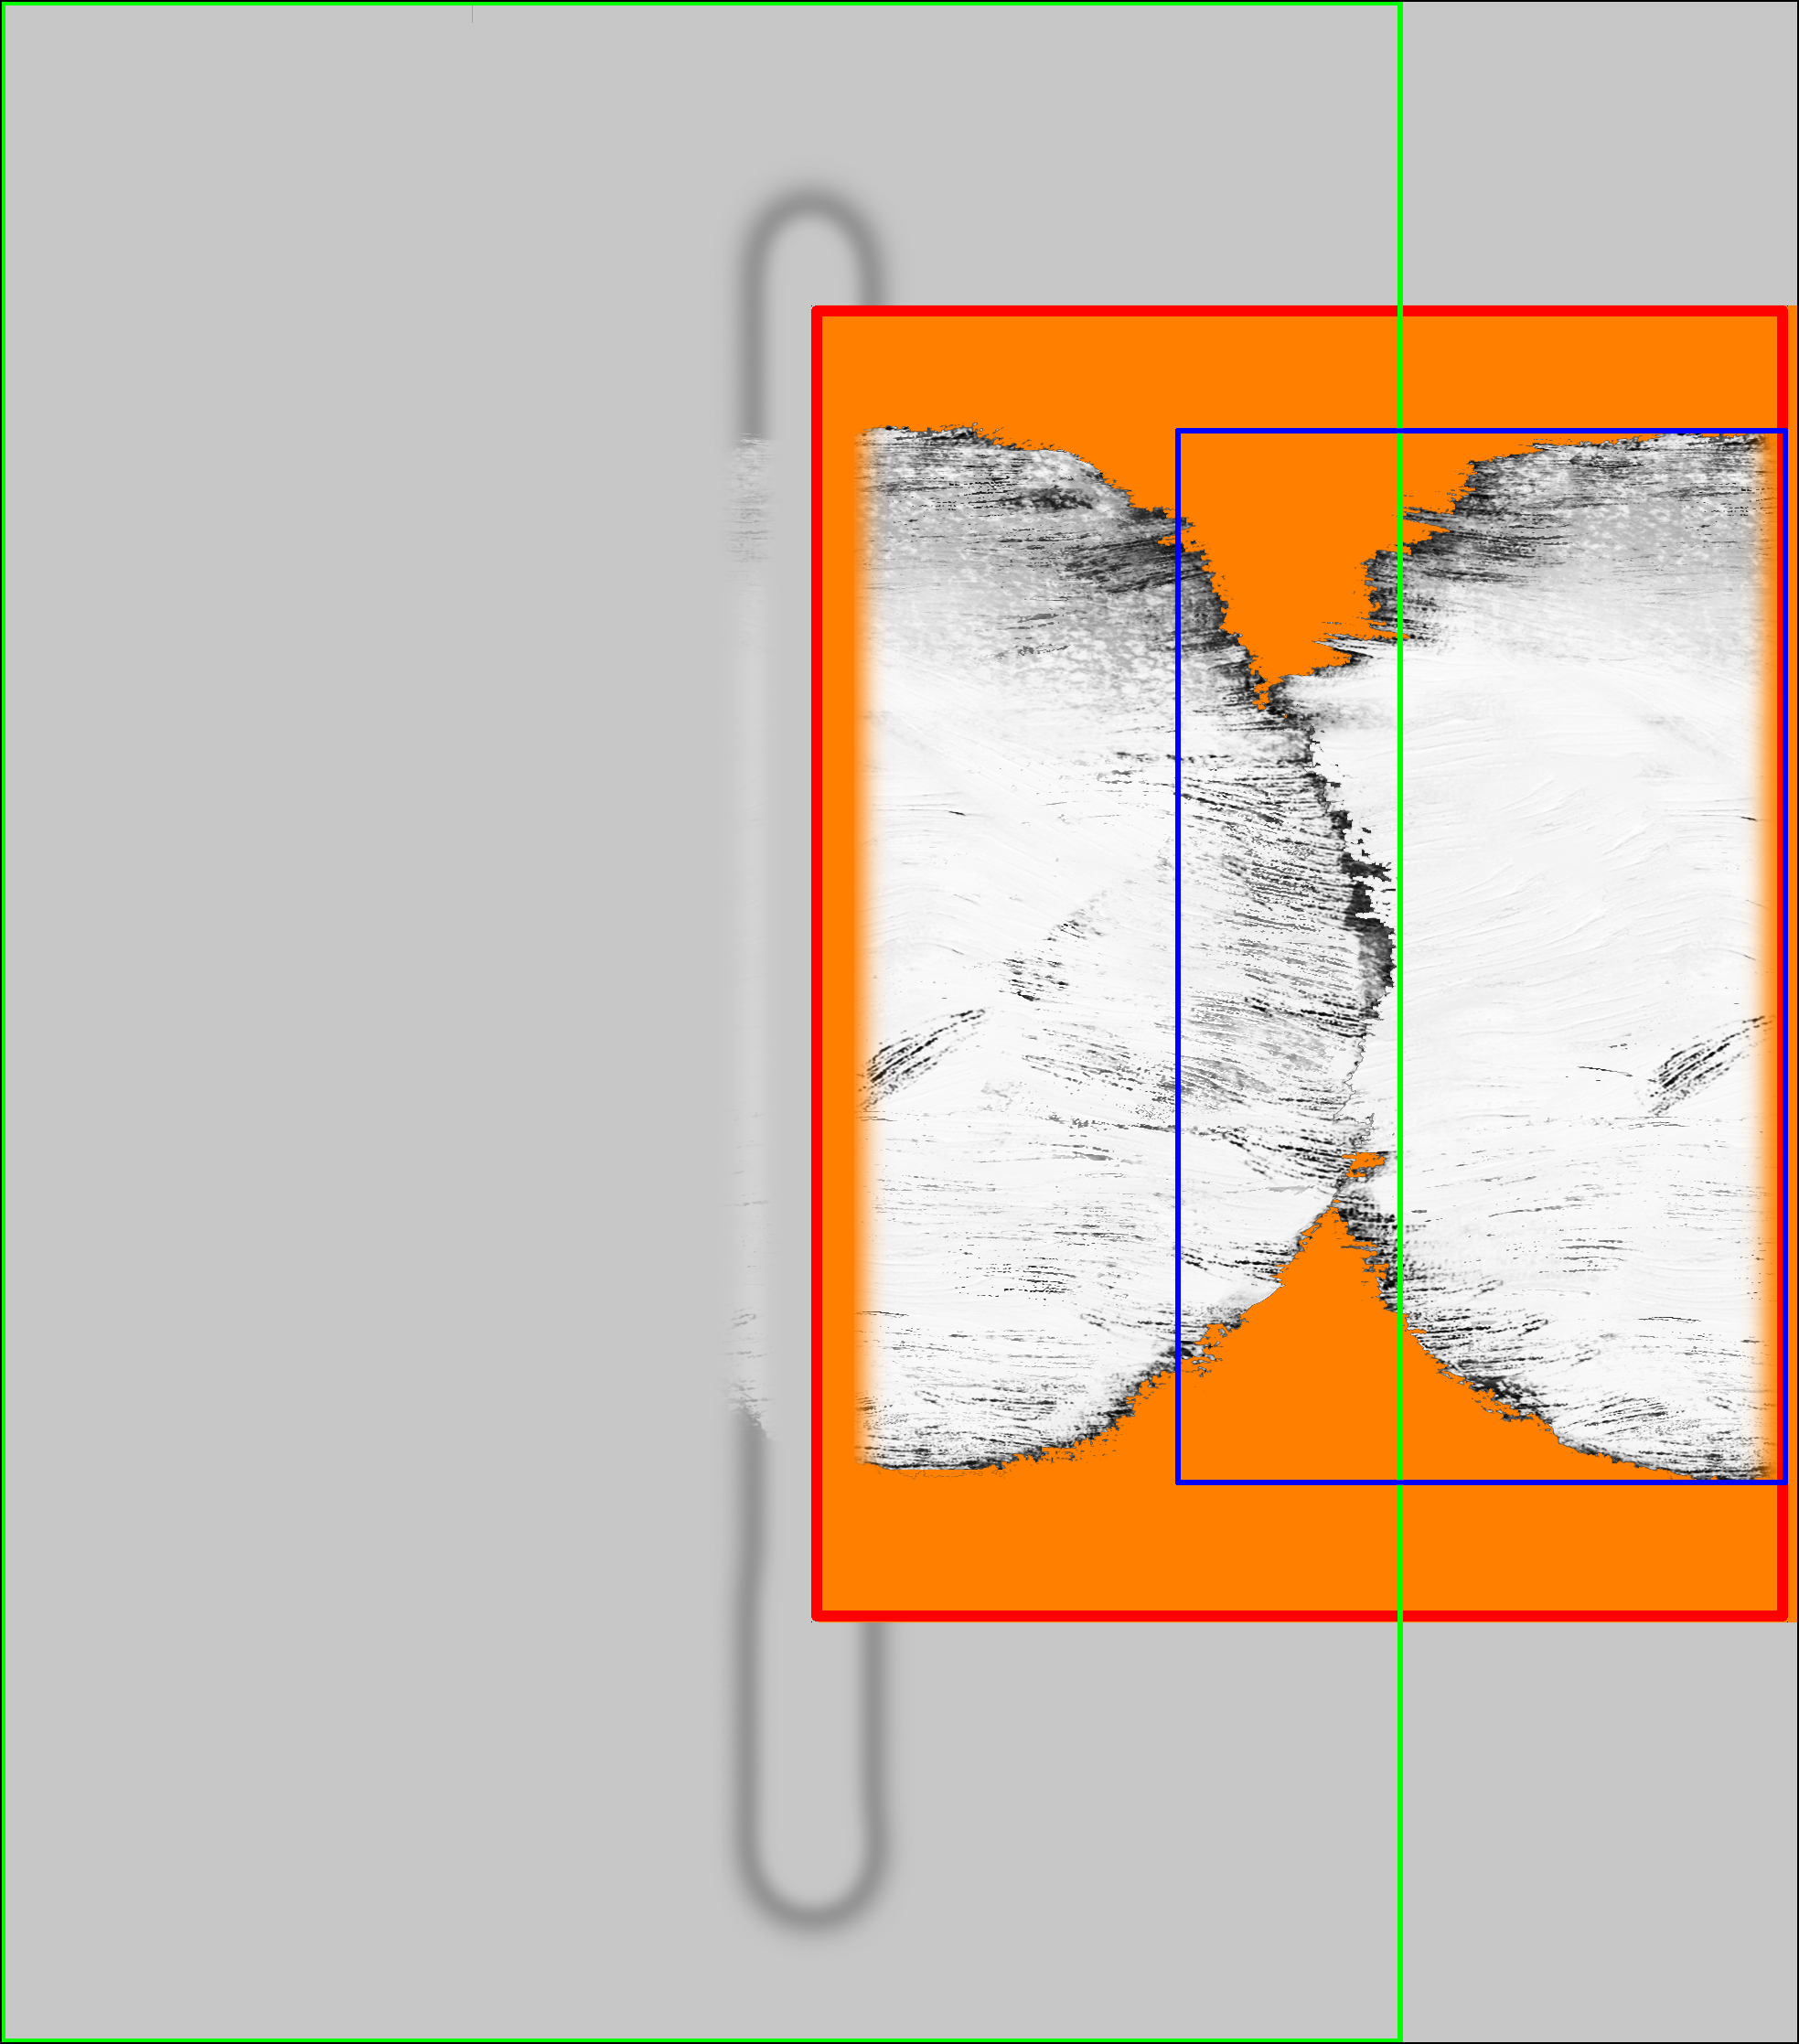
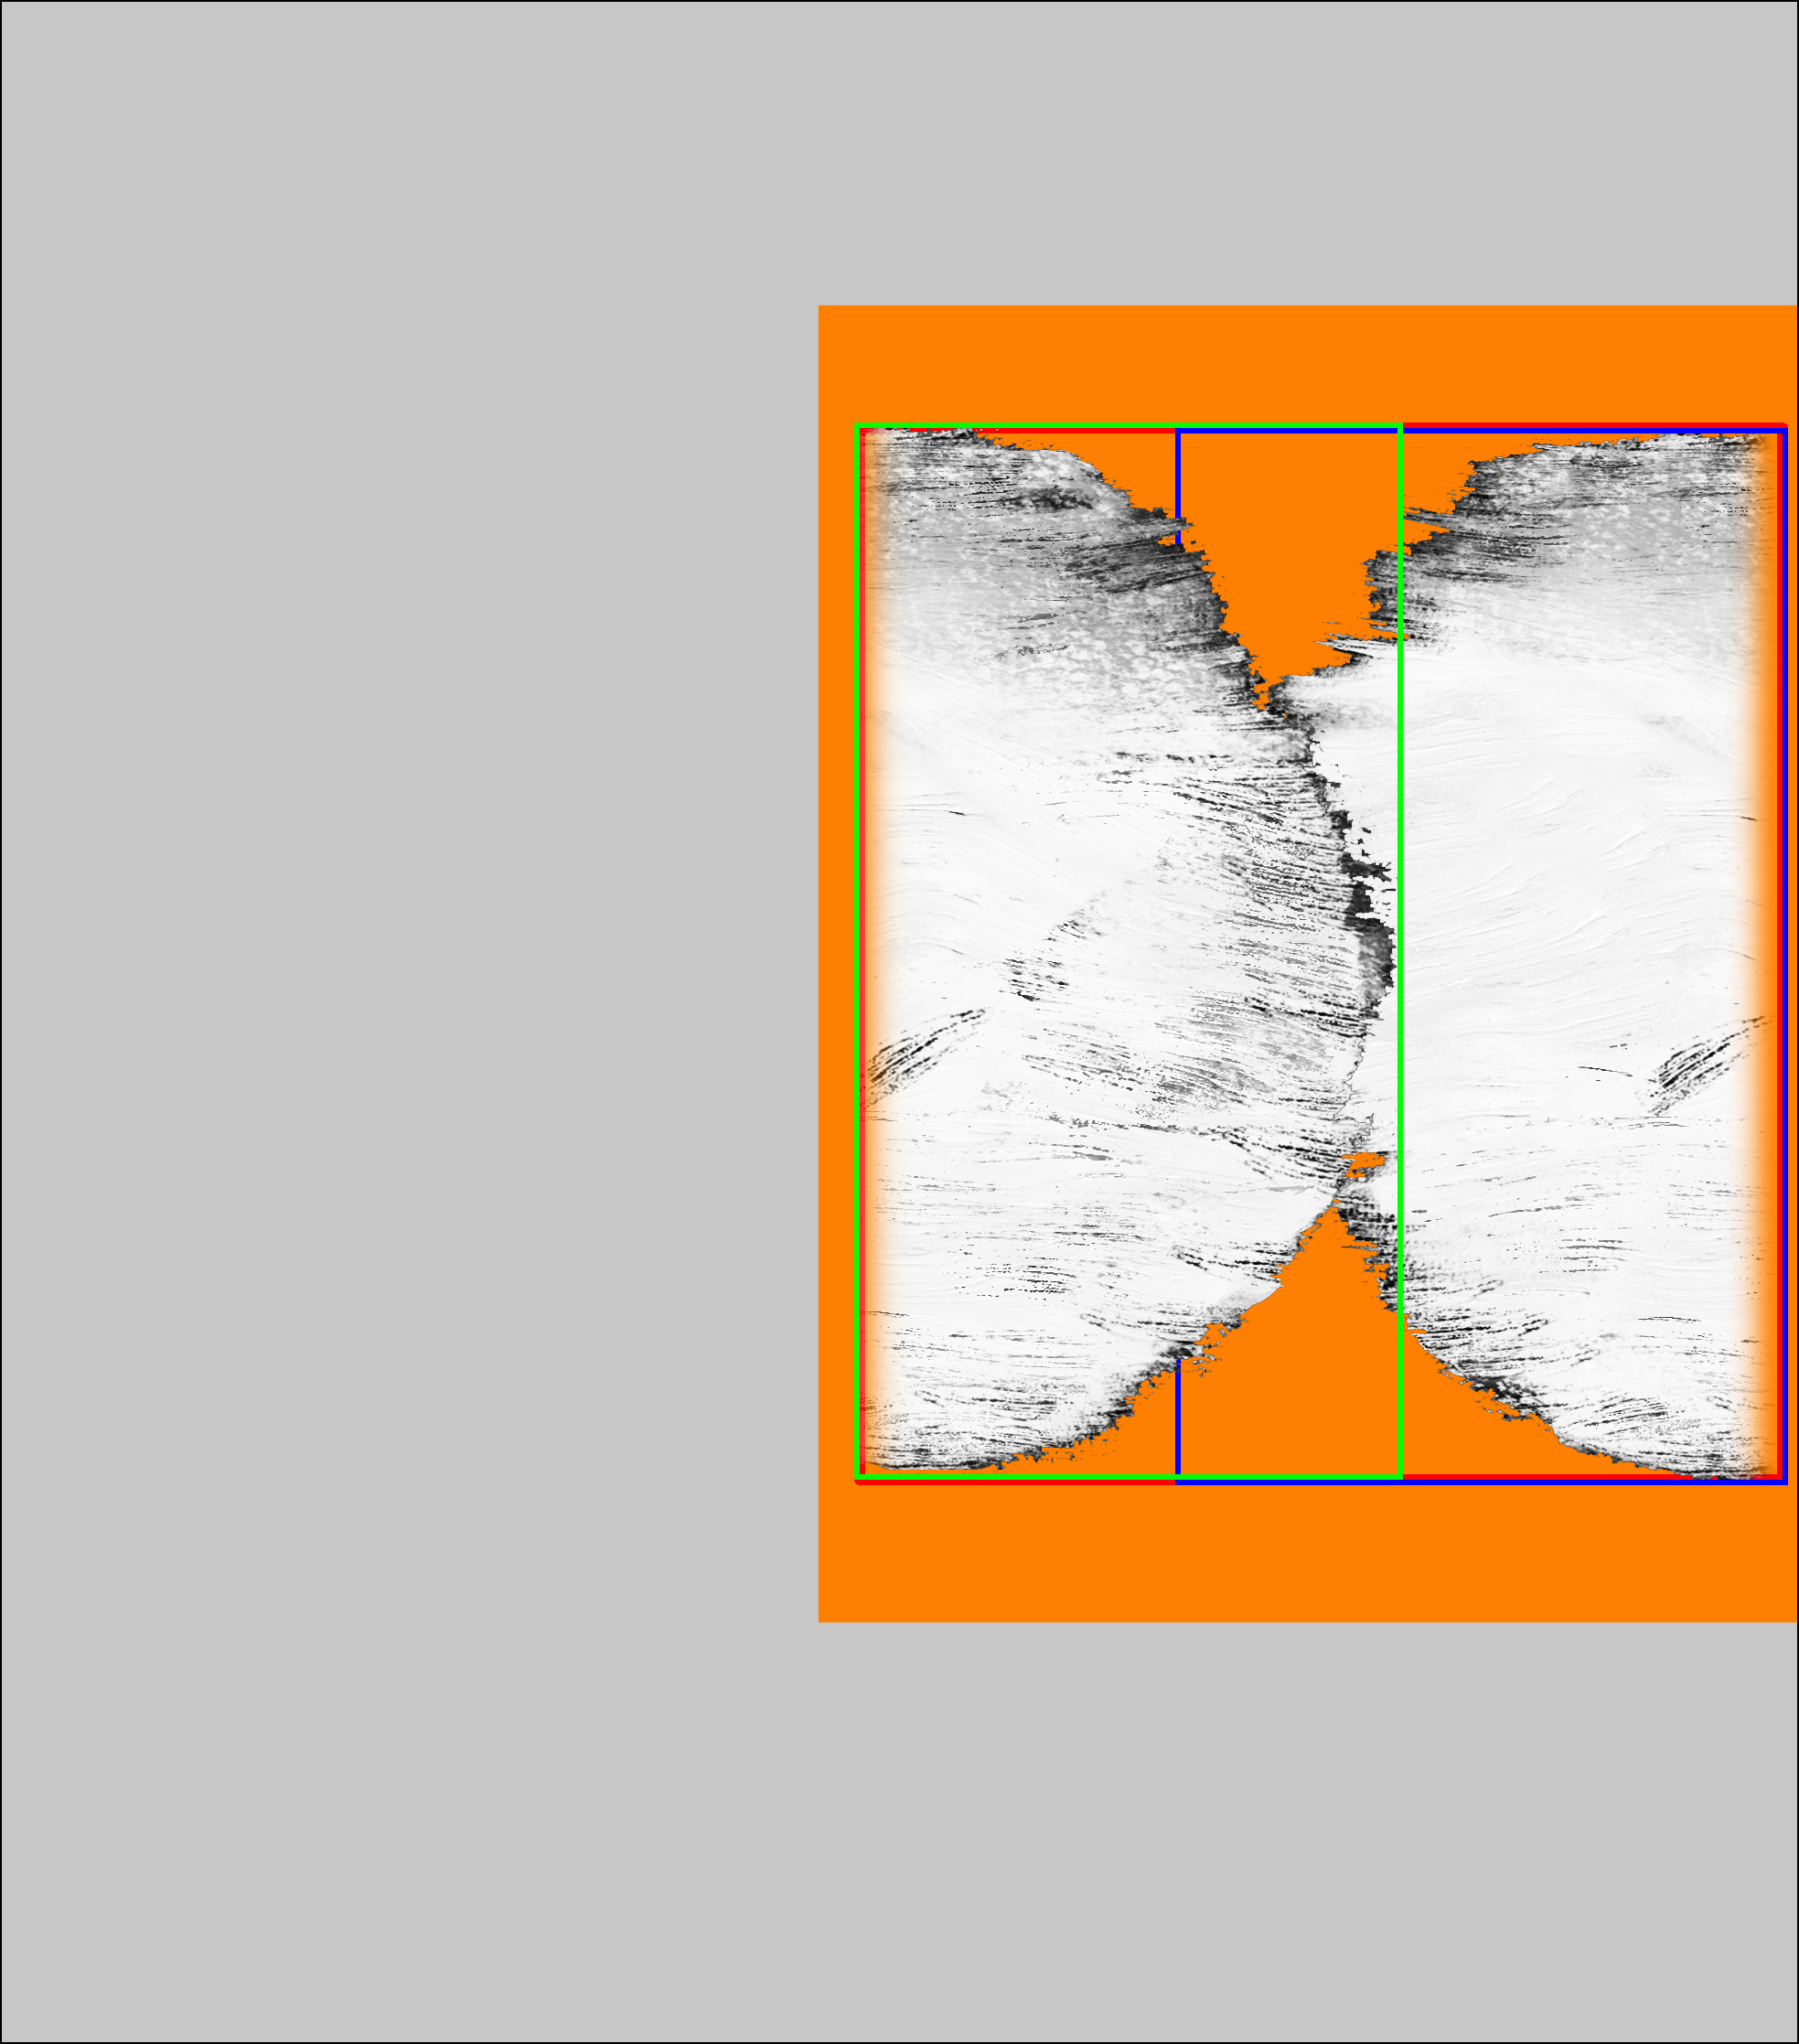
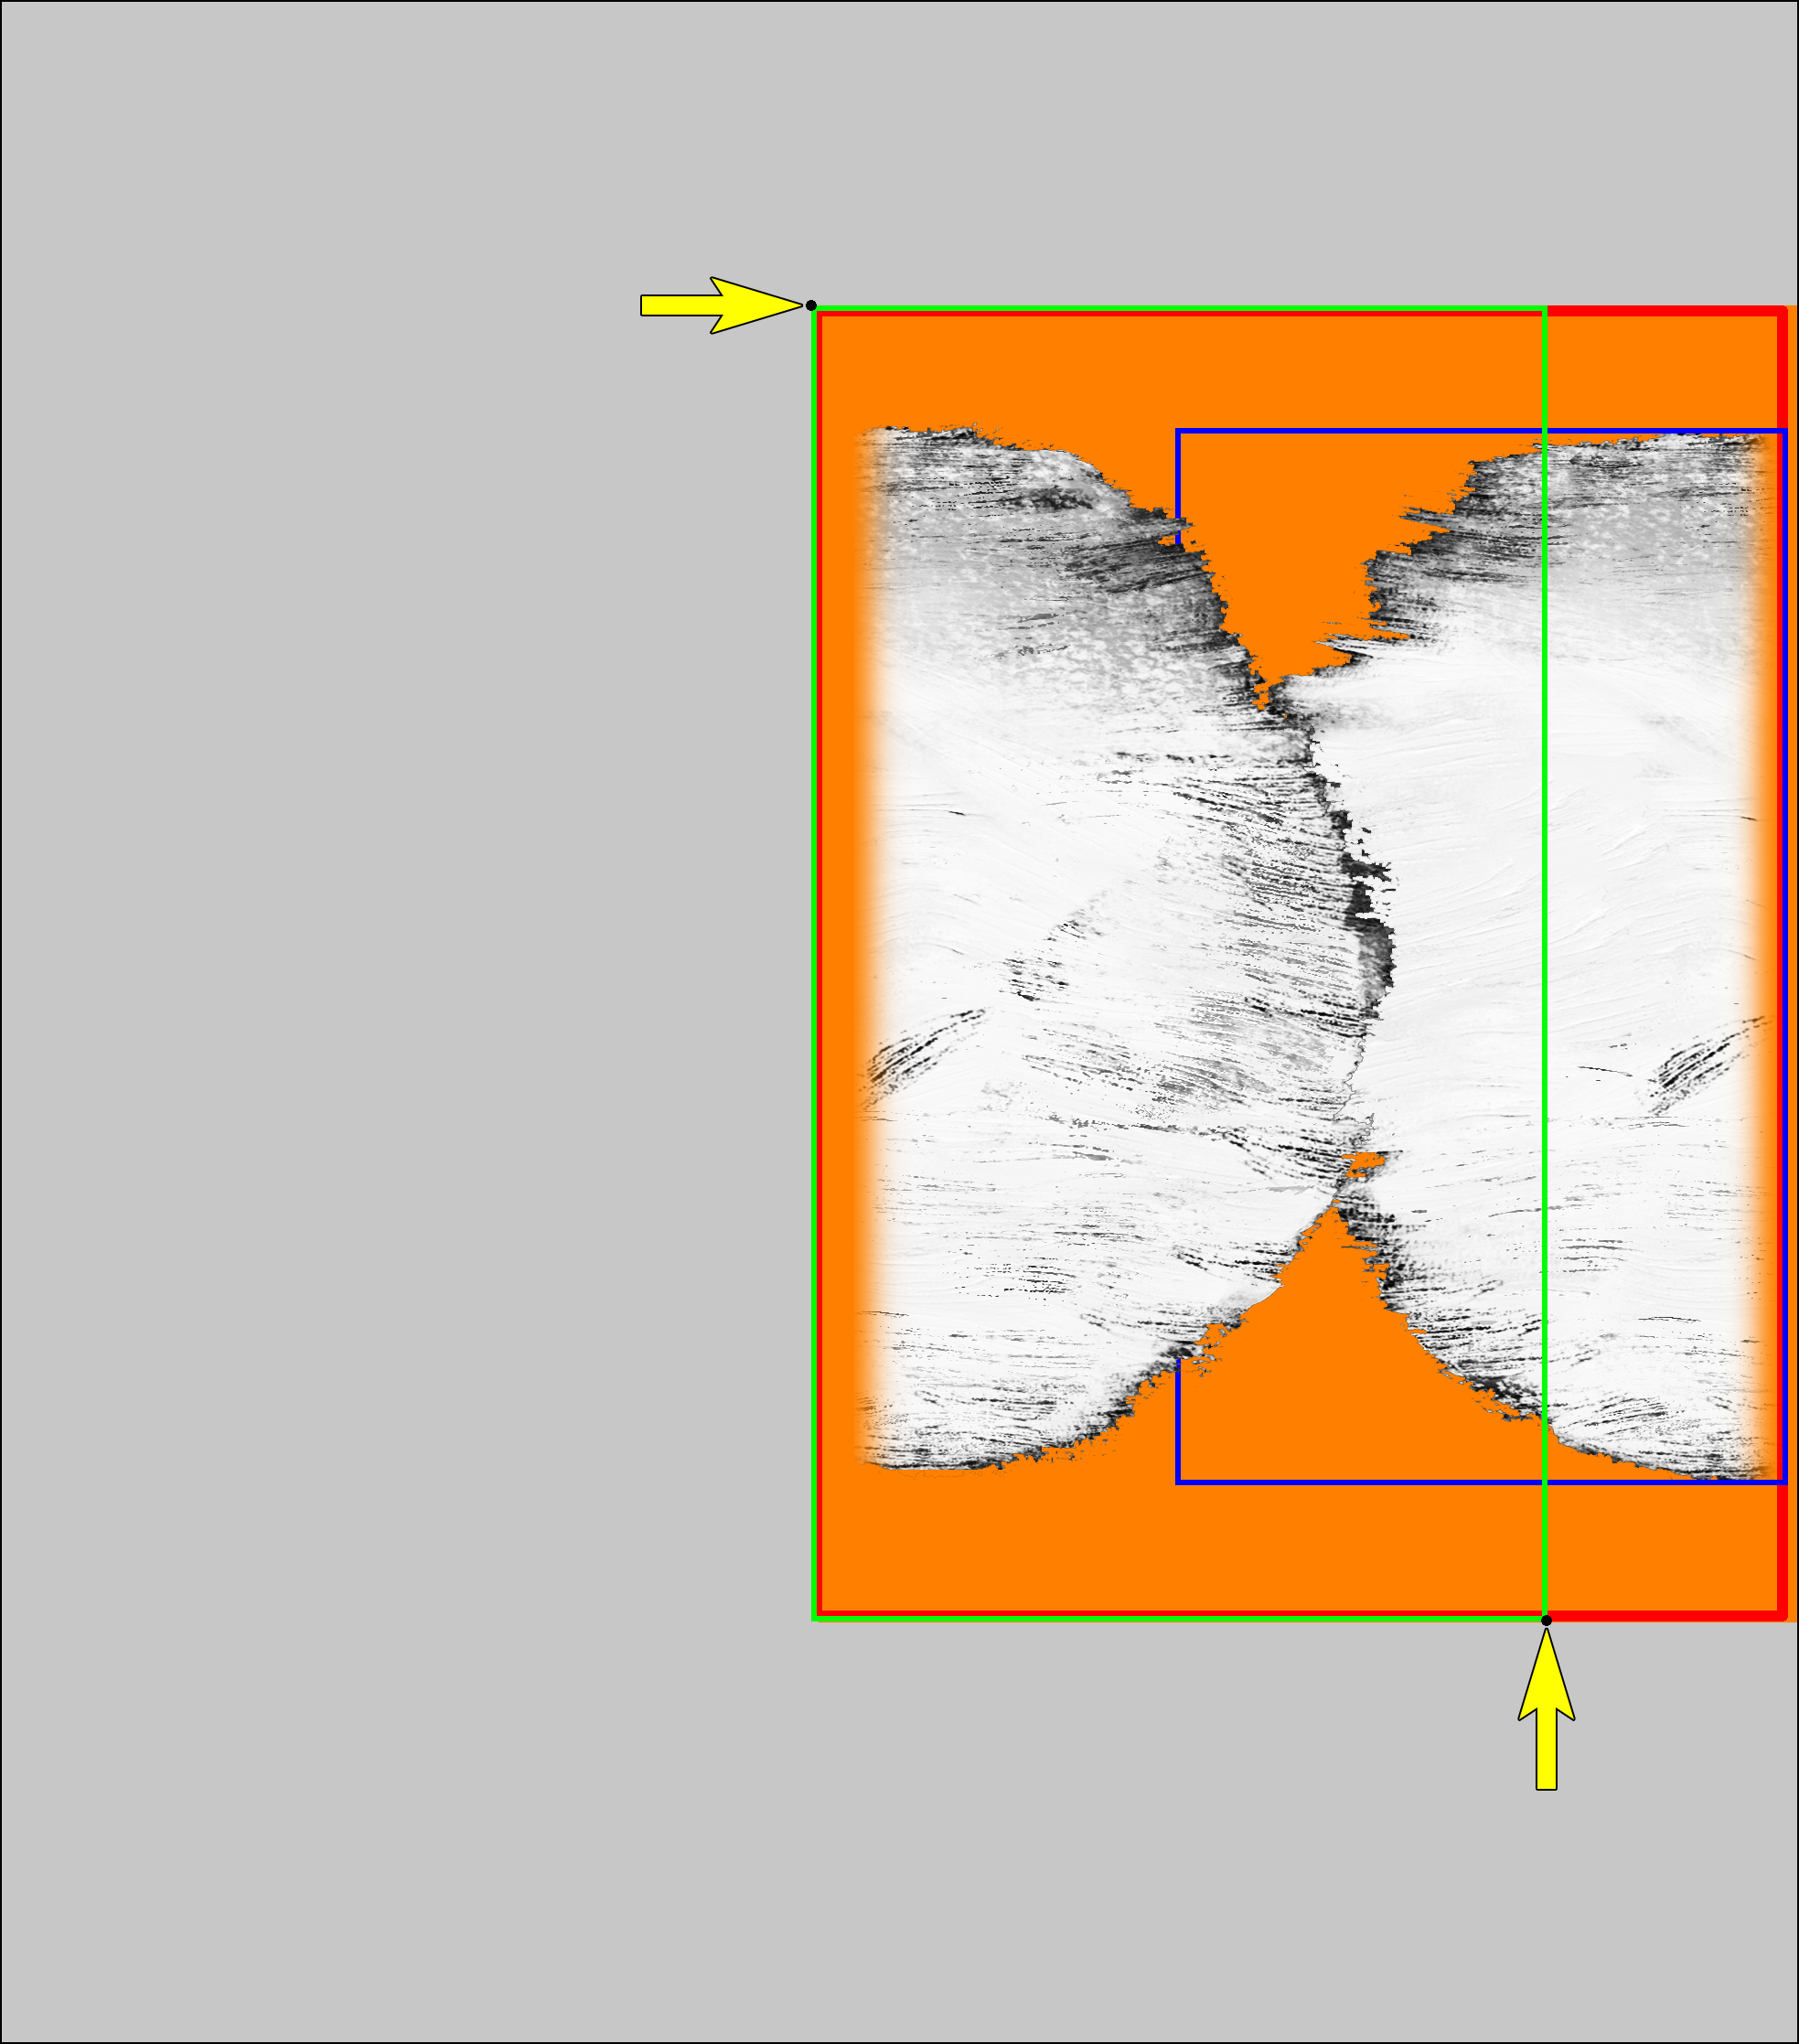
The illustration below shows how the boundaries of individual stickers and groups of stickers change during migration process. If stickers have no dots, migration changes the bounding box of the group of stickers, which causes a change in their positioning. Adding points makes it possible to restore the boundaries of the bounding box in its original size.
| The boundaries of original stickers and exported graphics of the sticker group in the old version of the project | The boundaries of original stickers and exported graphics of the sticker group after migration without dots | The boundaries of original stickers and exported graphics of the sticker group after migration with added dots |
|
|
|
|
The red rectangle indicates the boundaries of exported graphics of the sticker group The green rectangle indicates the boundaries of original sticker 1 Theblue rectangle indicates the boundaries of original sticker 2 The yellowarrows indicate the places where the dots are placed |
||
During migration process, a backup copy of the project and the original PSD file is created in case the result of the migration spoils the project. Backup files are stored in the same folder as the project itself as PSDName.psd.bak and TemplateName.pttp2.bak. In order to use the backup file, you should remove the .bak extension from the file name; it is also recommended to change the name of the file itself in order to avoid name conflict. Then go to the Template Creator and choose the necessary PSD file by selecting File > Edit Project (Ctrl + E). Besides, you can partially restore damaged layers. To do so, copy the correct layer from the backup PSD file and replace the damaged layer in the current PSD file with the one from the backup file.
Photoshop СС 2020 allows to create cloud documents that are compatible with Photoshop for iPad. Can I use my iPad to work in Photoshop when developing templates?
Answer:
Cloud document is Adobe's new cloud-native document file type that is optimized for a seamless online or offline work experience across devices. With cloud documents, you can enjoy the security of knowing that your edits get saved and synced to the cloud all the time.
To learn more about cloud documents, see Adobe website.
The Template Creator doesn't support cloud documents, because it is impossible to save project files (.pttp2) to Adobe's cloud.
If, after creating a new template, its PSD was saved to the cloud, you should save it locally and then in Template Creator go to File > Edit Project (Ctrl+E) and attach the document you have saved on your computer.
How can I delete the Template Creator application on macOS?
Answer:
As with any other macOS application you can simply delete it from the Applications folder as usual. However, you should know that during the installation process the Template Creator adds additional files to the Photoshop folder in order to interact with Photoshop and creates some temporary files during working process. These files remain after the app is deleted, but there's nothing to worry about: they have no effect on OS efficiency.
If you want to remove both the app and the additional files from your Mac, we recommend you to use the uninstaller, located in /Applications/Utilities/Uninstall Pho.To Template Creator.app.