Stickers development
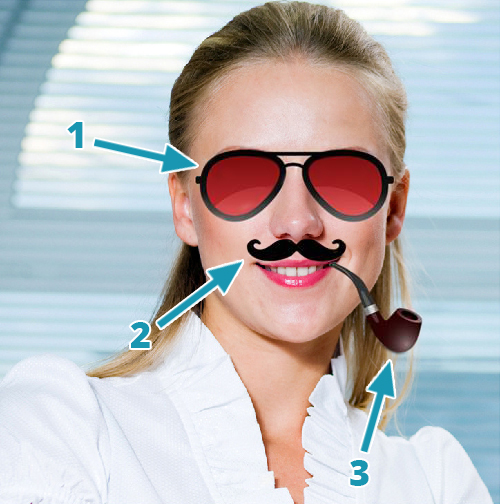
A sticker is an image that is applied to a face found in a user photo. A sticker adapts itself to the face using the marker points found on it; its size is also scaled to fit the size of the face. The original photo is not cropped.


Examples of sticker templates can be found in the Photo Lab app (iTunes, Google Play) in the following categories: Face Photo Props, Flag Face Paint, Hats & Caps Effects and others.
Unlike with frame templates or facial templates, a user photo is not resized when processed with a sticker template, because sticker templates do not aim to insert a user photo into a specified area in a template. They just place images called stickers on faces found in user photos.
In order for a template to be properly processed by the Template Creator, it needs to have a certain structure in Photoshop. Refer to this page to learn about rules and special aspects regarding layers arrangement in a Photoshop document (PSD).
Getting started
Creating a project in the Template Creator
Open the Template Creator when Photoshop is already launched (if Photoshop is not running, it will start automatically when you open the Template Creator). Go to the File menu, and select Create Project:
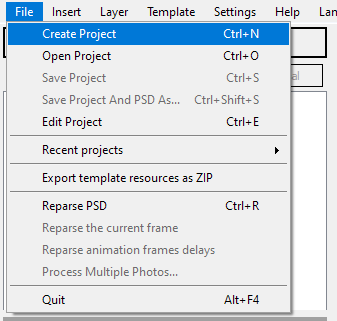
A dialog will open, where you need to select the options for your template and select where you want to save it.
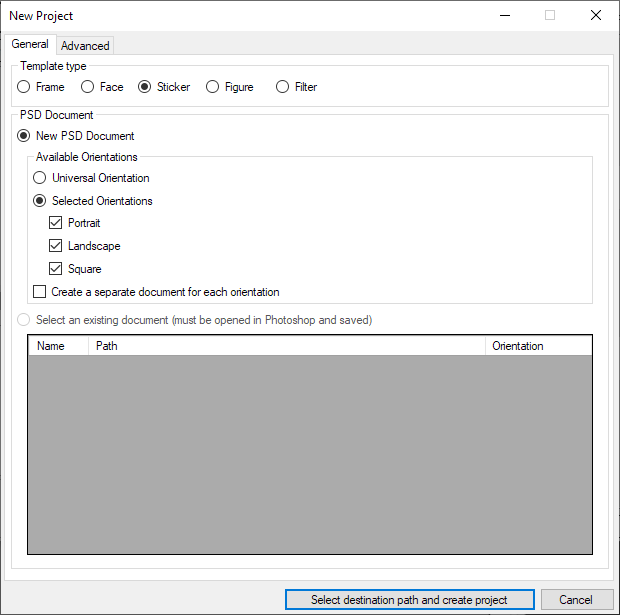
When you are done with the dialog, the Template Creator will generate a new Photoshop document (PSD). This file is associated with the new project and has the necessary structure of groups and subgroups of layers.
If there are open documents in Photoshop, the project creation dialog will allow you to make a project based on an existing document:
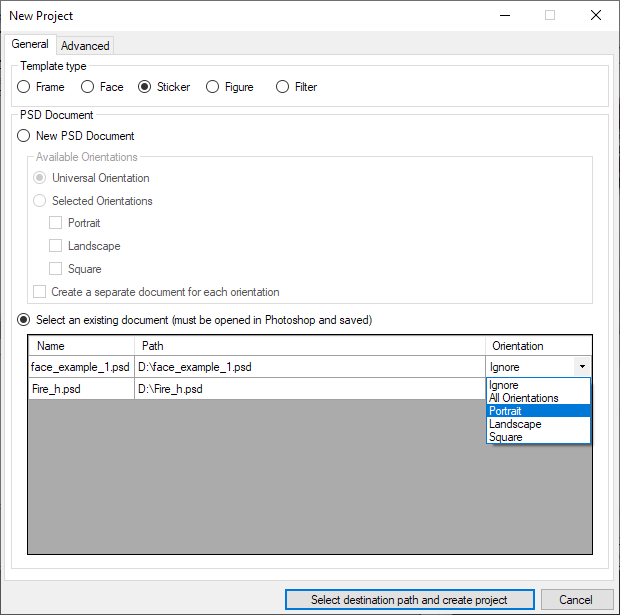
Select a Photoshop document (PSD) to include into the project and check the Use As Sticker box.
You can change the Photoshop document (PSD) associated with a project at any time by clicking File > Edit Project(CTRL + E).
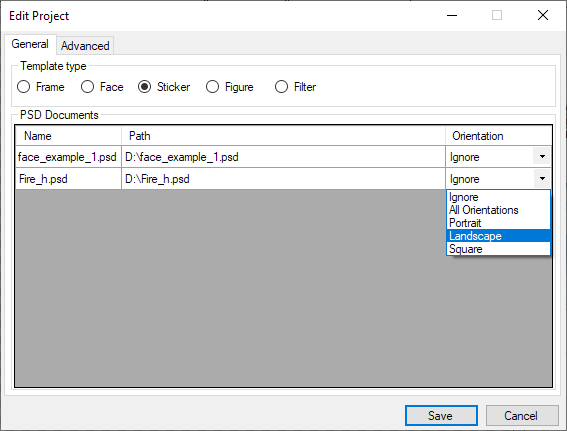
Apart from this, you can also change the project type. Please note that changing the template type can affect the result.
More information about the Template Creator and how to test ready templates can be found in this section.
Adding a sticker into an existing project
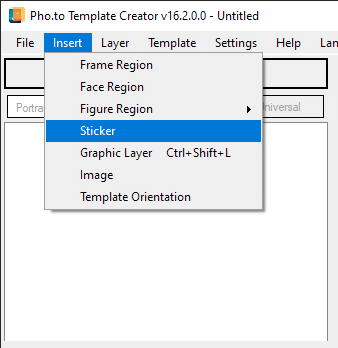
Stickers can also be added to existing projects of any type to create complicated templates. To add a sticker into the project, select Sticker in the Insert menu. Reparse PSD to display the new sticker in the Template Creator.
Structure of a sticker template in Photoshop
A Photoshop document of a sticker template consists of a user photo region and one or several stickers. A sticker in a PSD file is represented by a group of layers, whose name starts with the word Sticker.
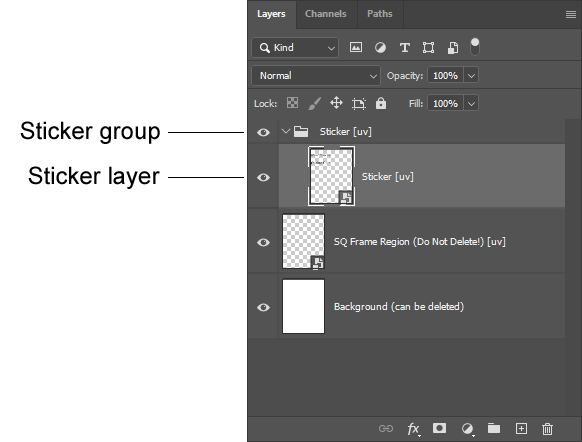
By default, the sticker group contains a layer with a provisional sticker. You only need it to be able to reparse your PSD file in case you have not added the necessary graphics into the sticker group. It should be deleted after you've added your graphics into the sticker group.
All layers of a sticker are rasterized inside its group. You can apply a blending mode to a sticker group (see the list of blending modes), as well as apply a mask to it.
The position of a sticker in a PSD file does not affect its position in the template. The position of a sticker in the template is determined by means of the Template Creator tools.
User photo region
In sticker templates, as well as in other types of templates the smart object — SQ Frame Region (Do Not Delete!) [uv] is used for positioning a user photo. You can also place test photos inside the Smart Object to try them with your template in Photoshop.
Sticker templates support adding several frame user photo regions which you can place at your will. However, you should bear in mind that in this type of project the canvas size adapts to the size of the input user photo and ignores the canvas size specified in Photoshop.
When processing several photos with different image indexes, the canvas size will be equal to the size of the photo which parameter Do Not Upscale is set to true.
The Template Creator lets you flip smart objects of the face region horizontally or vertically.
To flip a smart object of the face region, use standard Photoshop tools. For example, go to Edit menu > Transform > Flip Horizontal / Vertical.
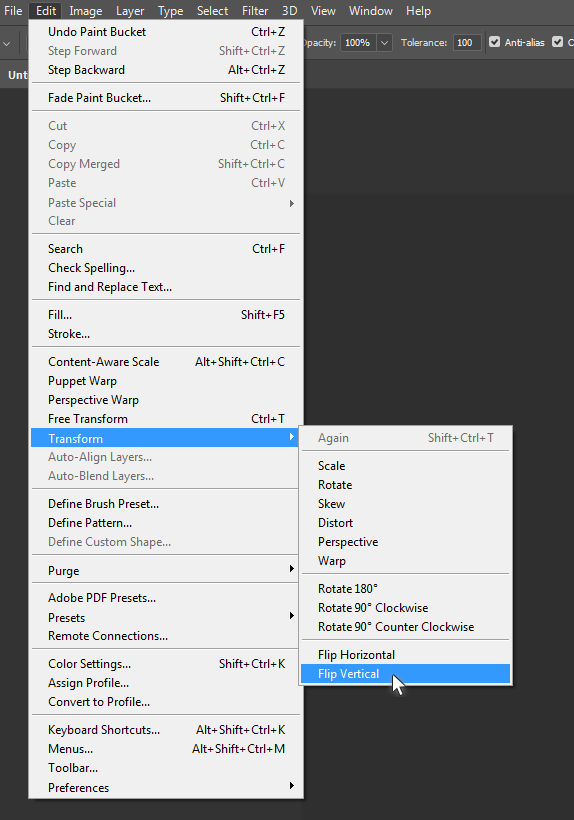
When you reparse your Photoshop document (PSD), you tell the Template Creator that one or several face regions have been flipped. Later, when you process test photos, make notice that images placed into a specified face region are flipped horizontally or vertically.
Flipping works in the same way for all user photo regions regardless of the template type.
Rasterization filter and the position editor
Adding rasterization
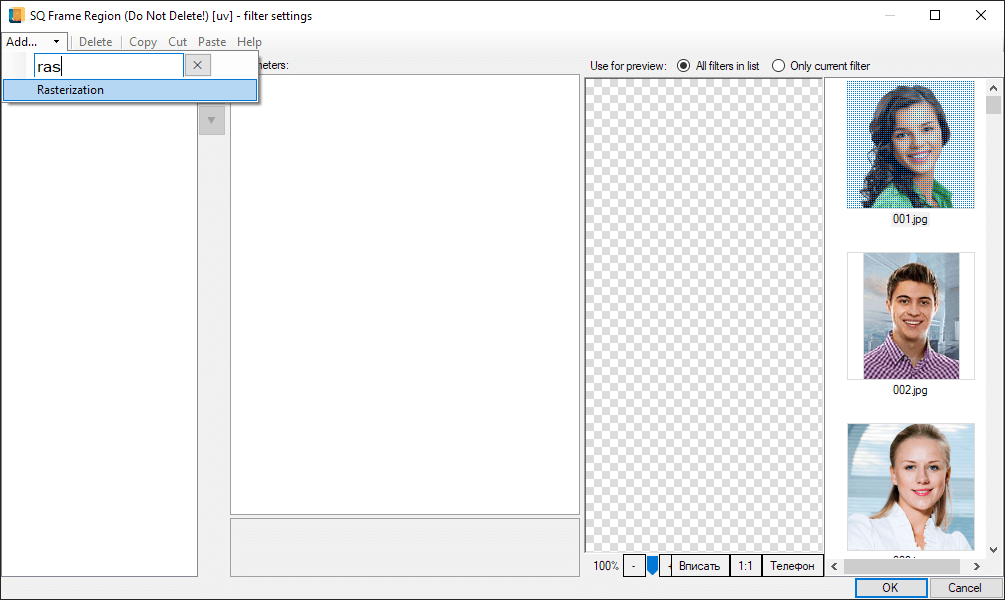
To position a sticker on a user photo, you need to add the Rasterization filter. Rasterization is not a filter in the traditional sense, because unlike other filters that somehow change an image they are applied to, Rasterization allows you to apply stickers to images with faces and customize their parameters.
Rasterization must be added manually using one of the following ways:
-
open the Filter settings for User Photo Region. dialog. You can learn details about how to open this dialog in the Working with filters section,
-
right-click a sticker layer to open the context menu and select Add rasterization,
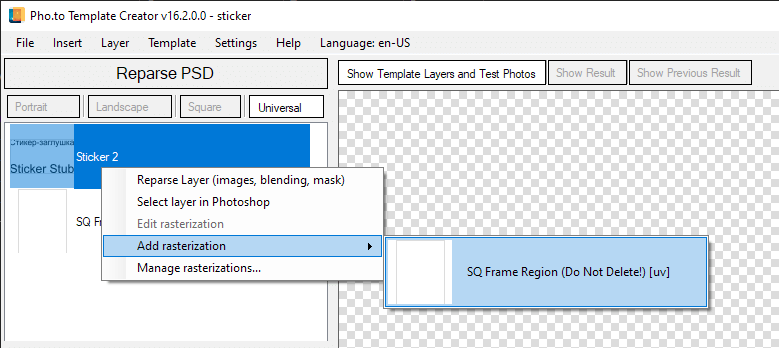
or select Layer > Add rasterization in the menu.
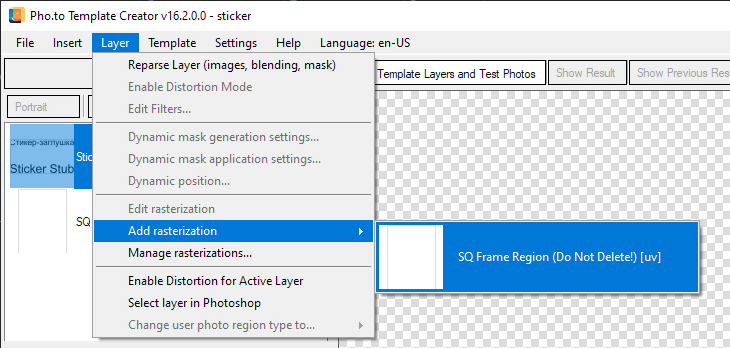
For these options to be active, a sticker must be selected in the list of layers.
If you work with a project containing a large number of stickers, the Rasterization editor will help you manage all your rasterization filters conveniently, from a single dialog box.
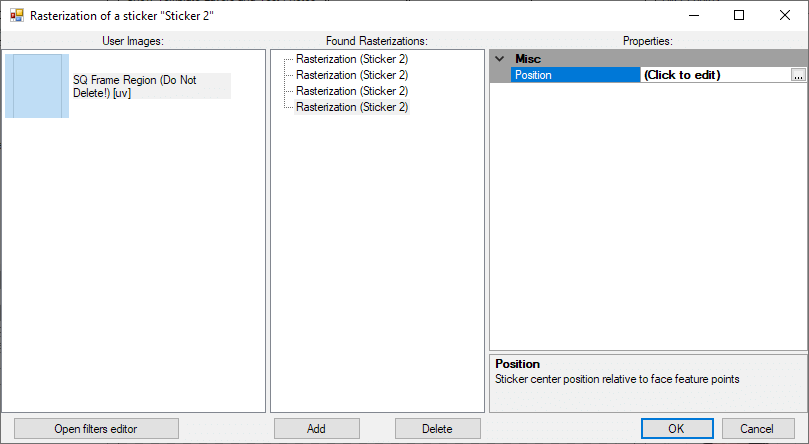
The Rasterization editor can be accessed in one of the following ways:
- right-click a sticker to open its context menu, then select Manage rasterizations…,
- select a sticker, then select Layer > Manage rasterizations… from the menu.
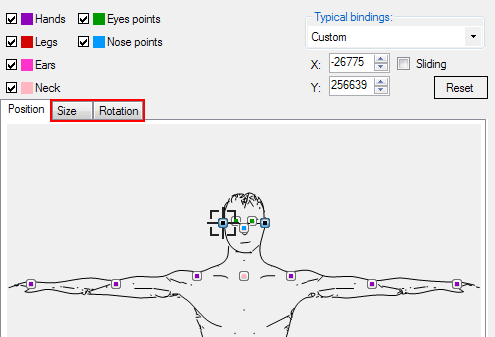
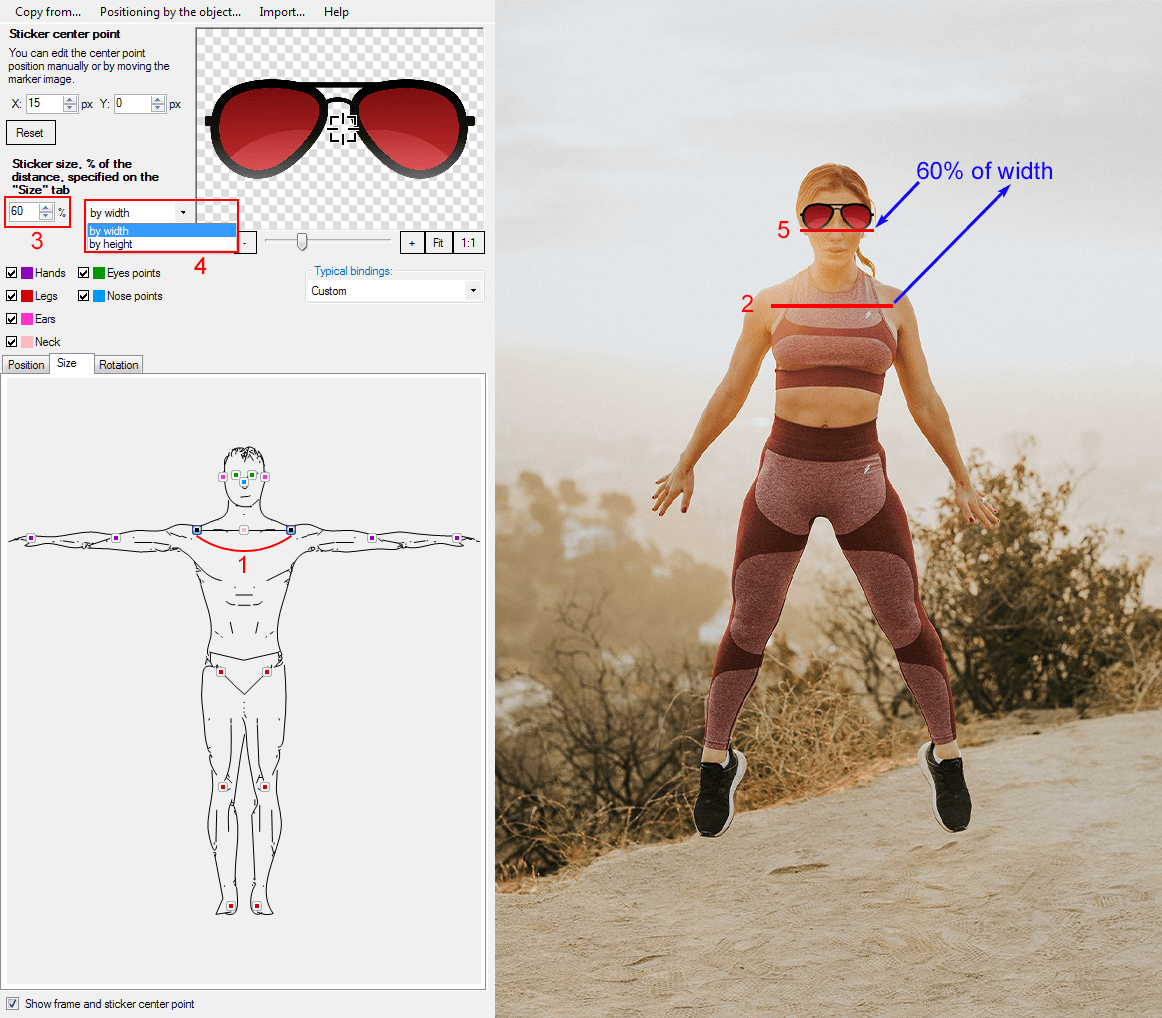
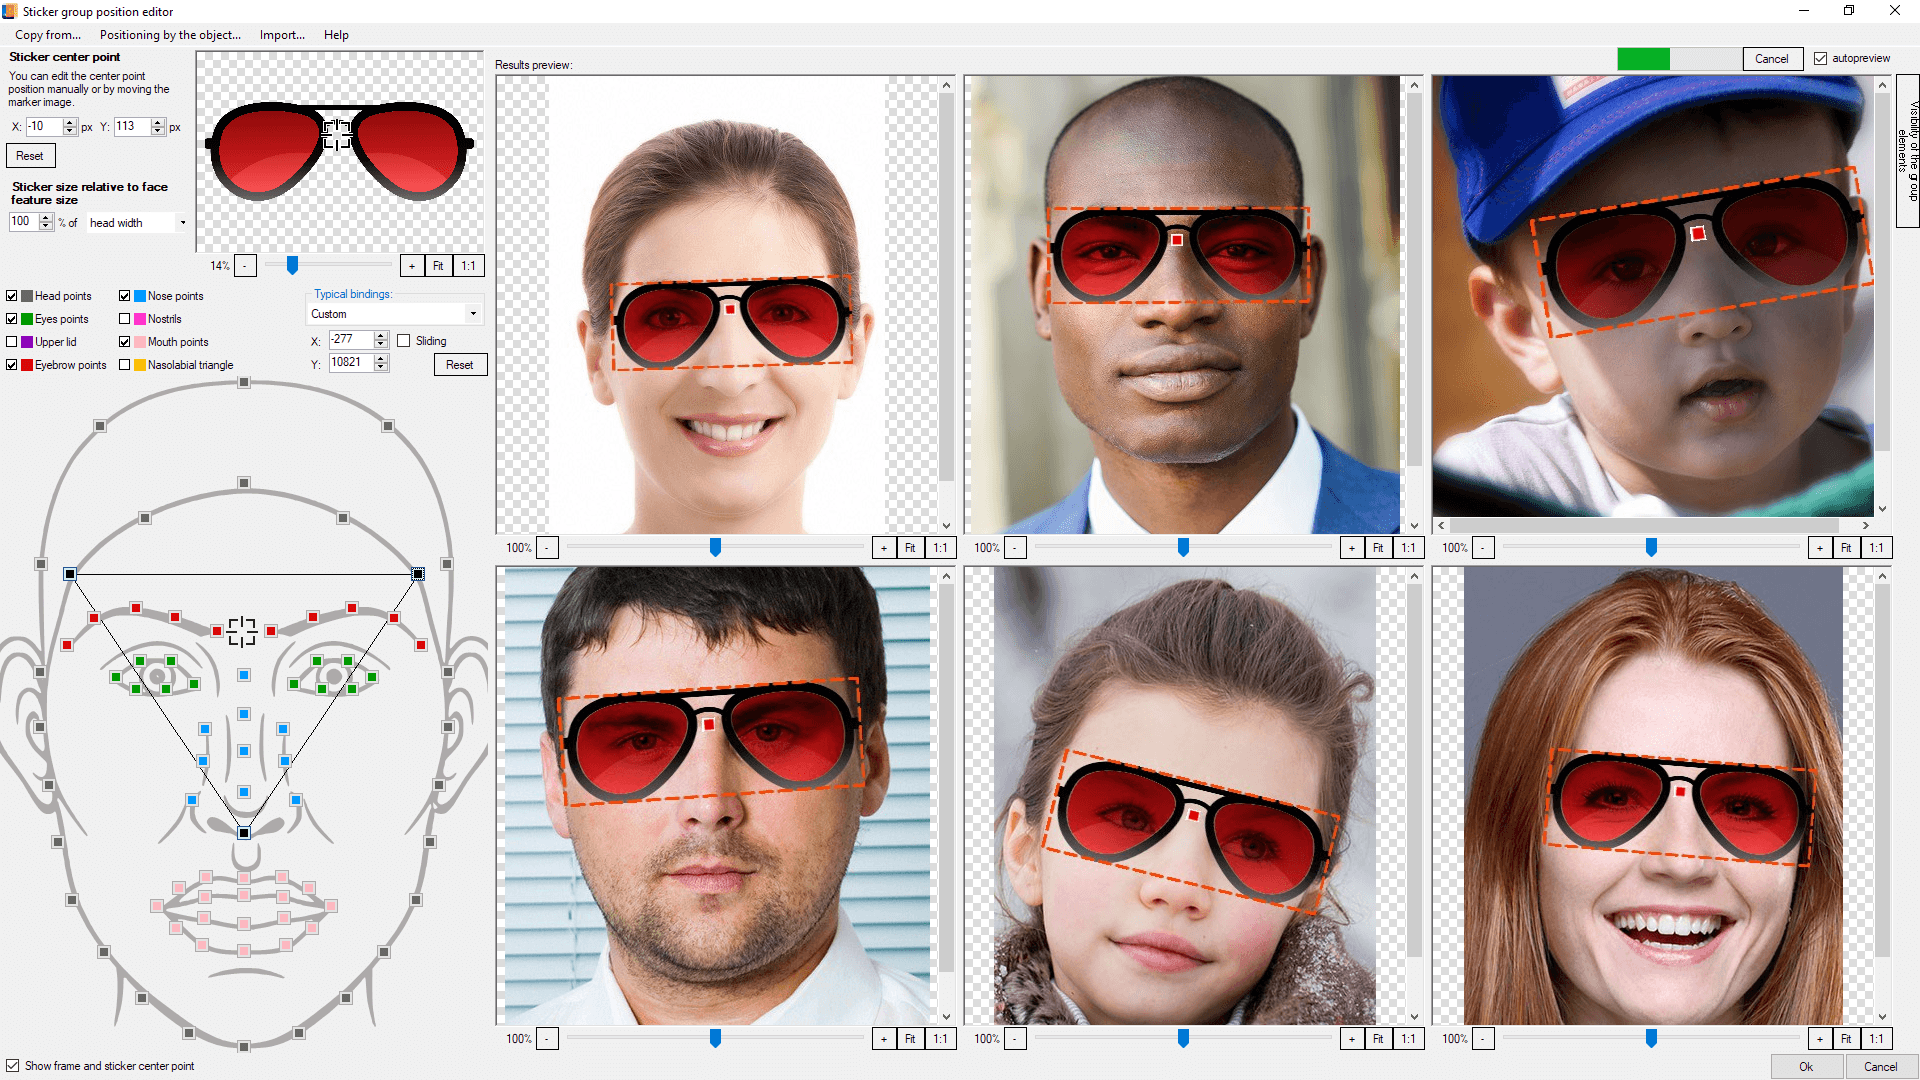
Position editor
As soon as you’ve added rasterization, the sticker Position editor will open.
If you add rasterization via the Filter settings dialog, you’ll have to open the Position editor manually. To do so, click on the marked area in the Position parameter (shown below).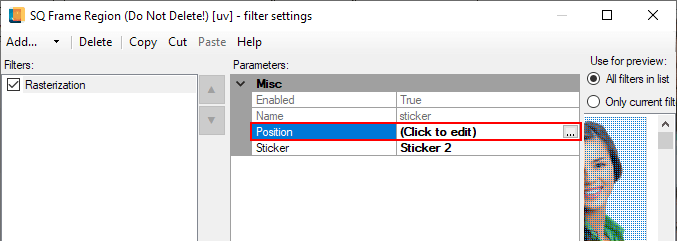
The position editor allows you to accurately determine the sticker position in a user photo, as well as its size relative to the selected object.
Below is the sticker position editor window:
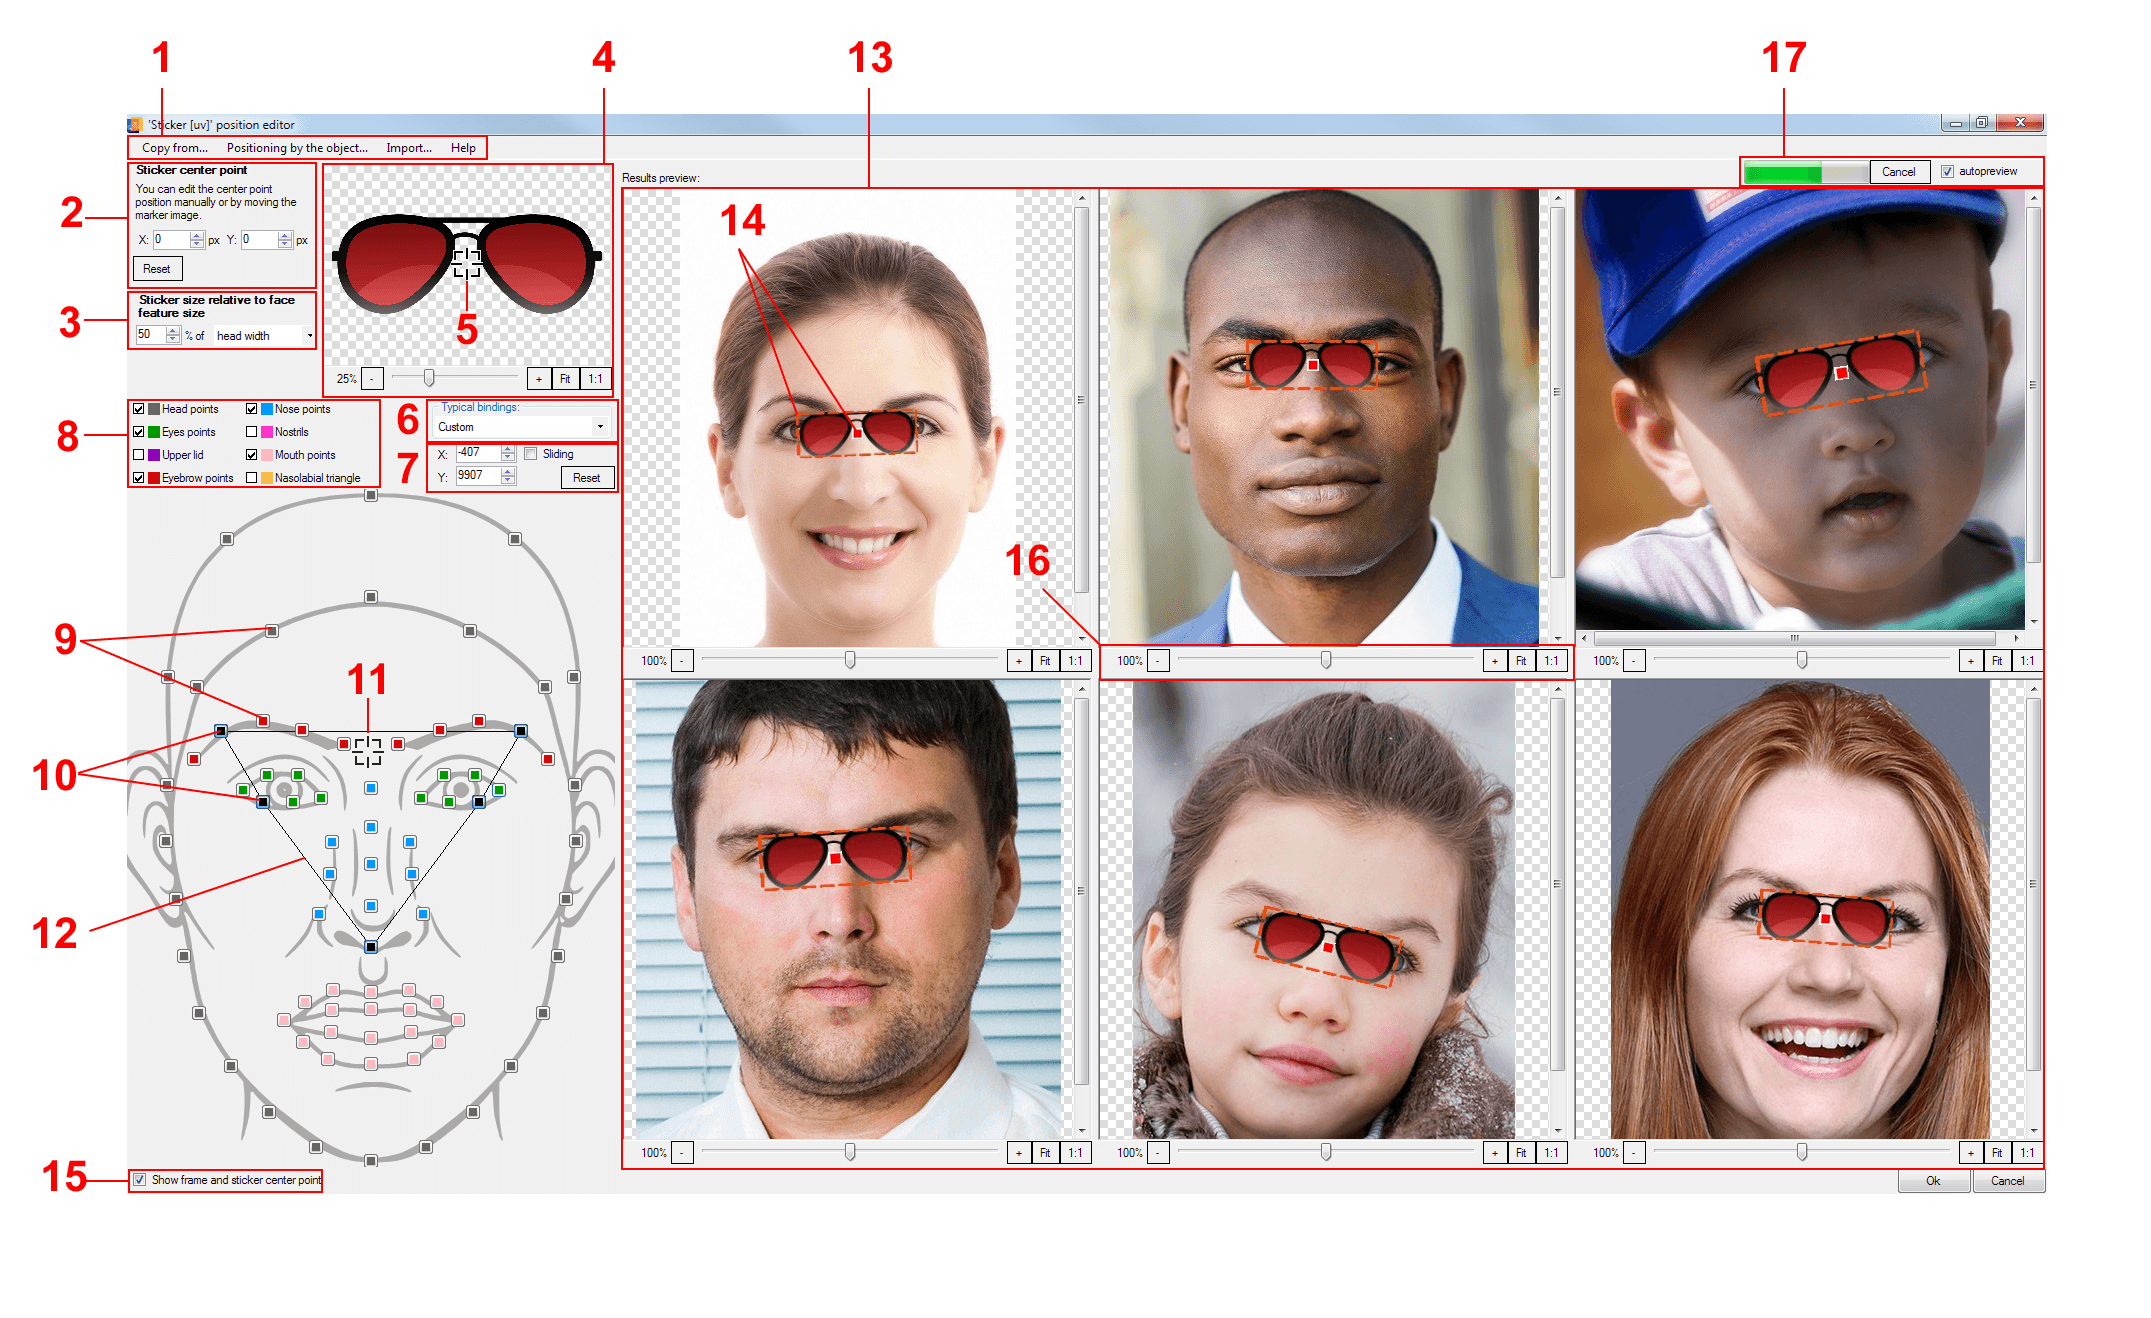
- Position editor menu:
- The Copy From… menu lets you copy the position settings of another sticker.
- Positioning by the object lets you select an object for sticker positioning (human face, human skeleton, animal face), as well as open the object filter.
- The "Import" menu allows you to turn on/off the visibility of additional graphic layers and/or rasterizations in the preview window.
- Edit box letting you adjust the coordinates of the sticker center point.
- Sticker size edit box.
- The sticker preview allowing you to visually adjust the sticker center point.
- The aim marker denoting the sticker center point.
- Typical bindings selection.
- Controls letting you adjust the position of the force of attraction aim icon [11] within a valid area.
- Marker points check boxes.
- Marker points.
- Selected marker points.
- The aim icon of the force of attraction to marker points.
- The boundaries of the valid area of the force of attraction aim icon position.
- Sticker position preview window.
- The bounding box and the sticker center point.
- Check box allowing you to display/hide the bounding box and the sticker center point.
- Options letting you scale an image in the preview window.
- Controls letting you turn on / off automatic preview processing.
Sticker positioning
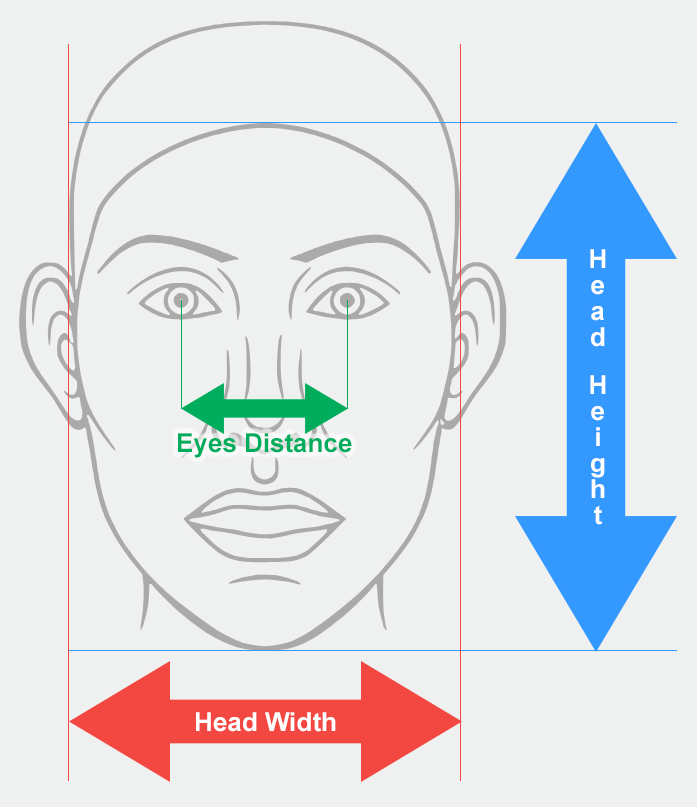
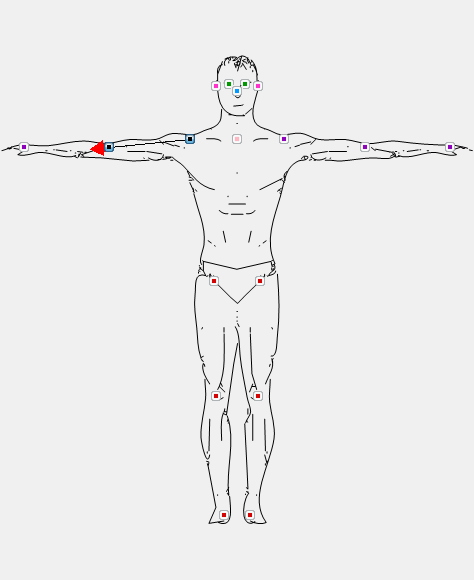
Marker points
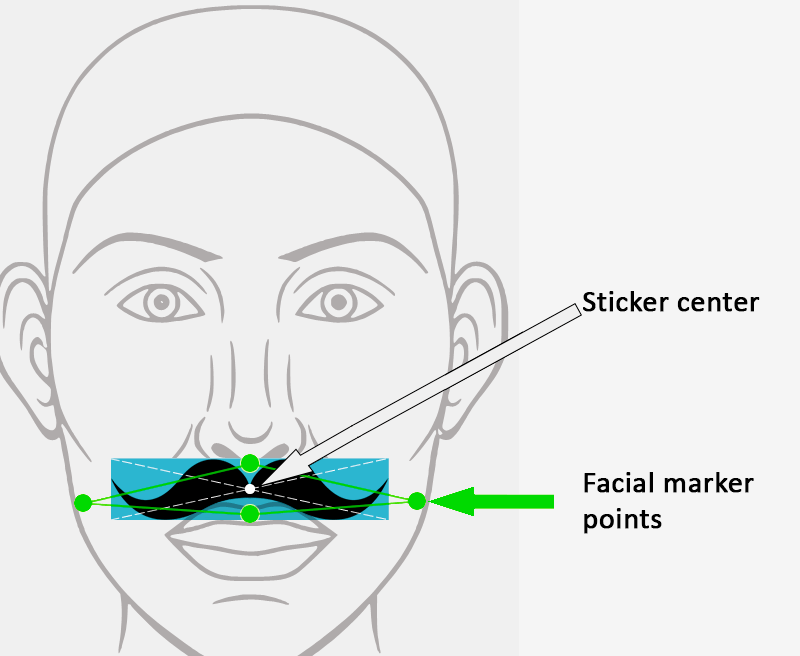
The position of a sticker is defined by specific points of a chosen object of positioning, called marker points. A sticker can be positioned on a human face, human skeleton or an animal face.
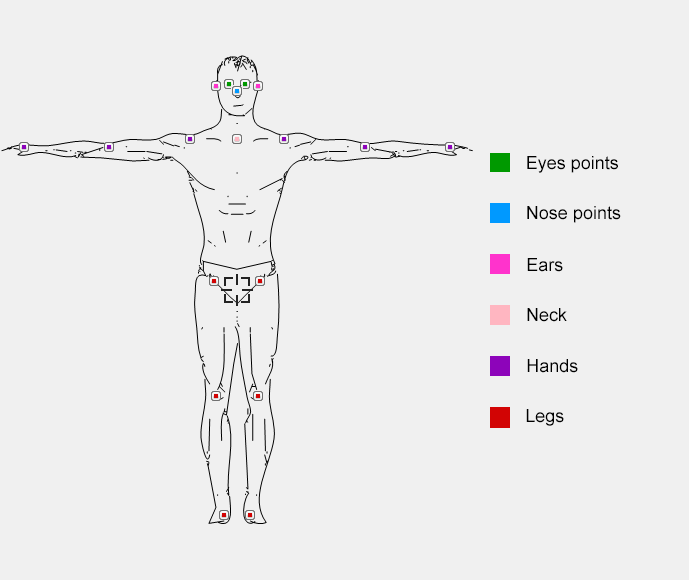
Here is a scheme of marker points on a human face:
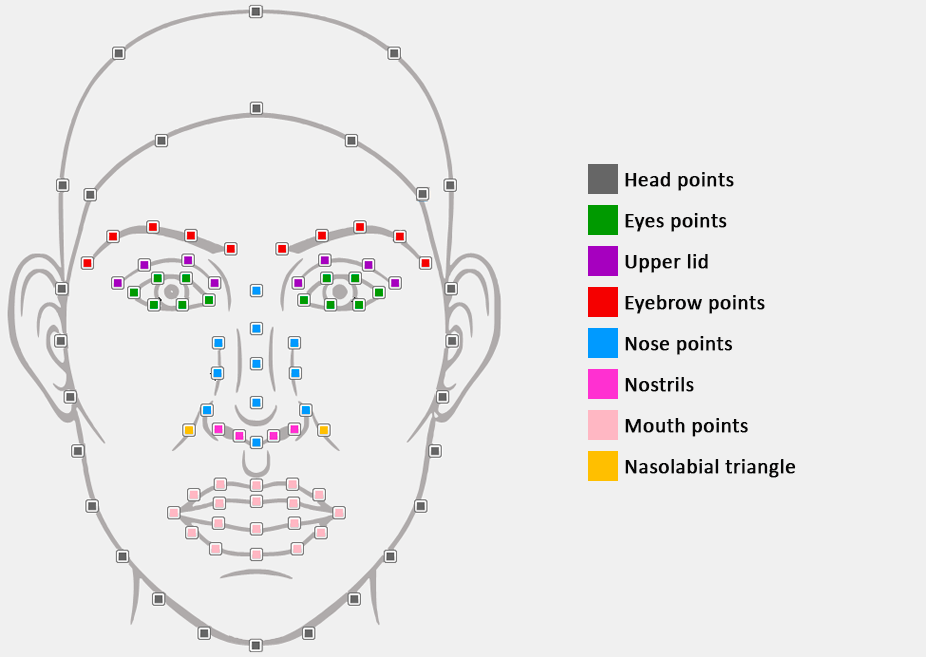
There is a predefined set of marker points used to position a sticker. Each of the marker points has its meaning according to the morphology of a chosen object.
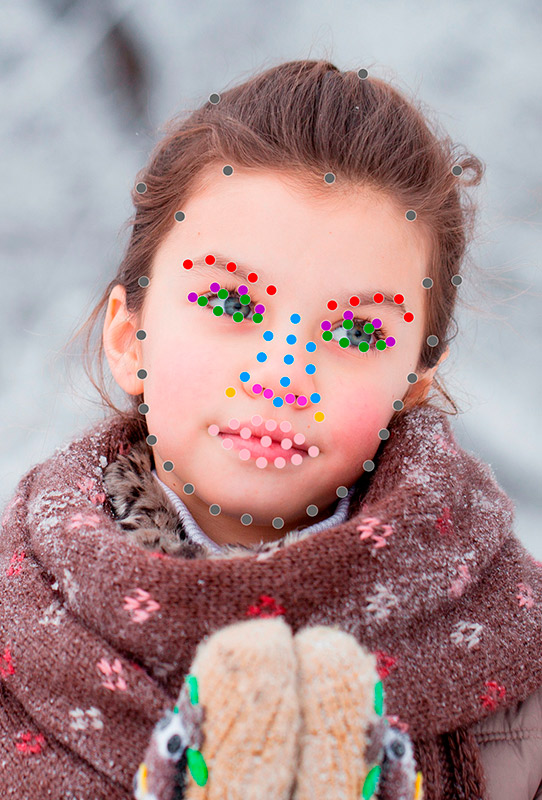
To define a sticker position, you need to select one or several marker points. When a user photo is processed by a sticker template, an object in a photo is analyzed automatically, and the position of each marker point is determined.
 |
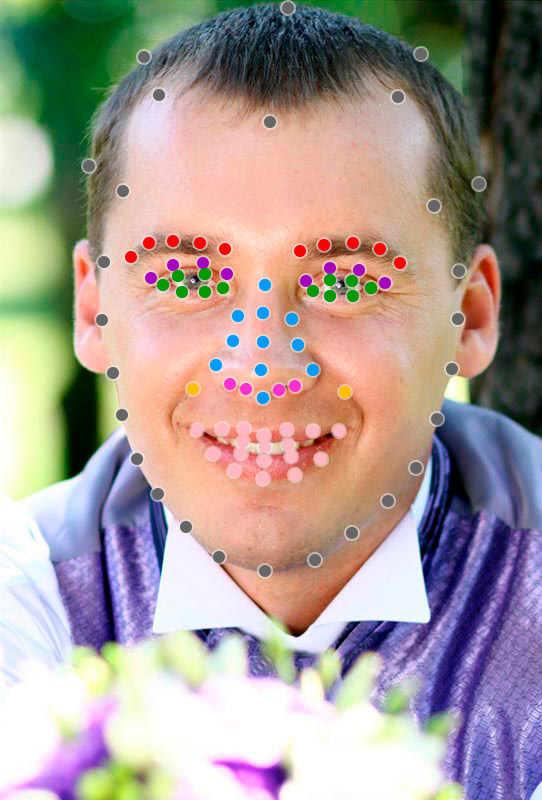 |
Then a sticker is positioned in accordance with the selected marker points and their position on a selected object. A sticker is also automatically rotated according to the position of an object in a user photo.
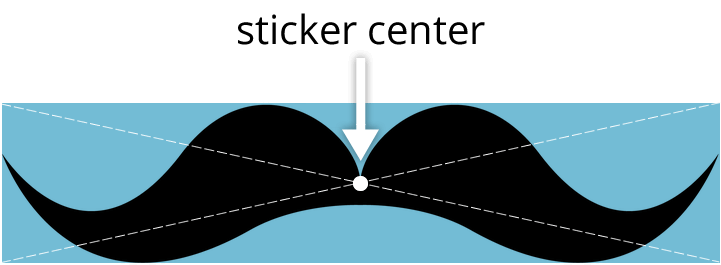
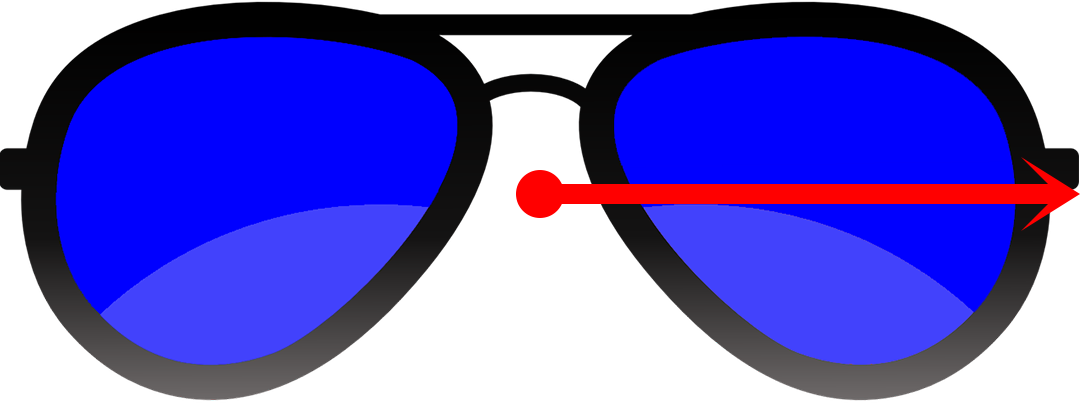
Sticker center point and the force of attraction
When a sticker position has been determined, thesticker center is placed to the found point. A sticker rotation is also performed in relation to its center point. That is, when we position a sticker, we position its center point, to be more exact.
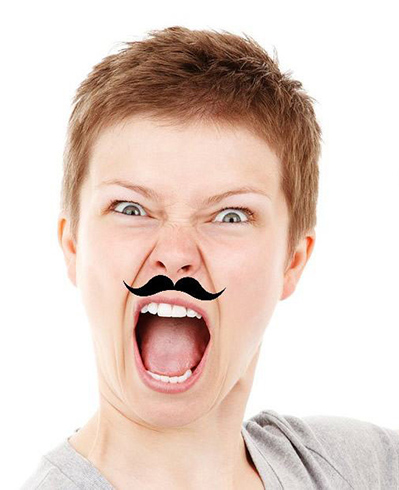
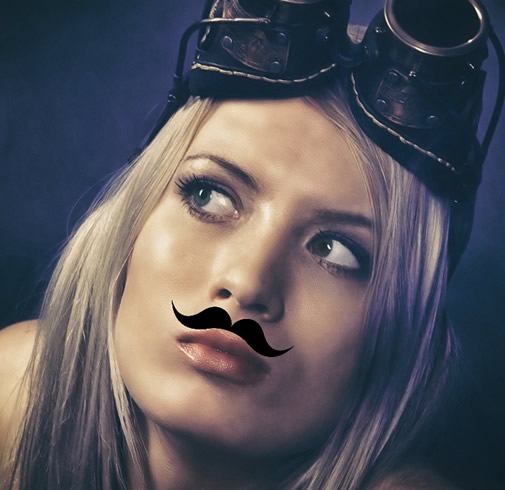
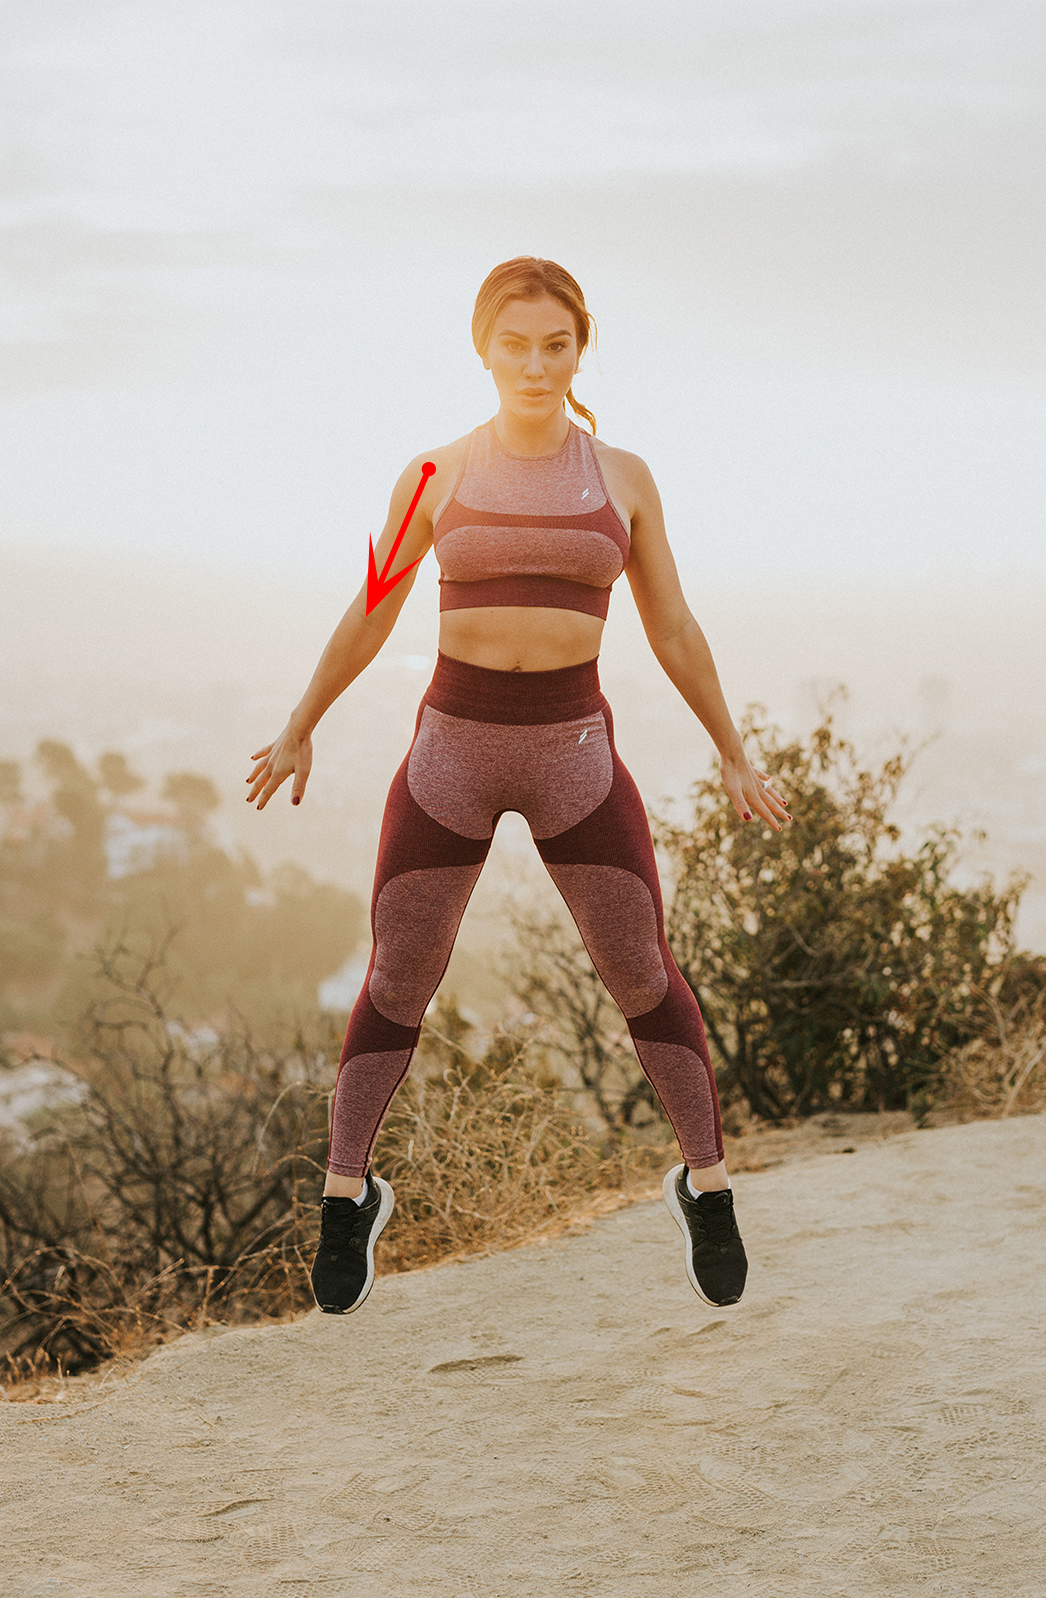
Marker points are positioned differently in different objects due to diversity of these objects. This is why a sticker's position may vary in different photos, as seen in the examples below.

A sticker also has the so called force of attraction of its center to the chosen marker points. The stronger is the force of attraction to a chosen marker point, the closer is the sticker center to that point. So, if you select several marker points, it is important to adjust the force of attraction to each of them accurately for a quality template positioning. The stronger is the force of attraction of one marker point, the less strong is the force of attraction of other points.
The example below demonstrates how the force of attraction to different points affects the position of a sticker center. 4 marker points in the nasolabial area have been used to position this sticker. The marker points have the following coefficients of the force of attraction:
- the coefficient of the two outer marker points is 1,
- the coefficient of the lower point is 5;
- the coefficient of the upper point is 10;
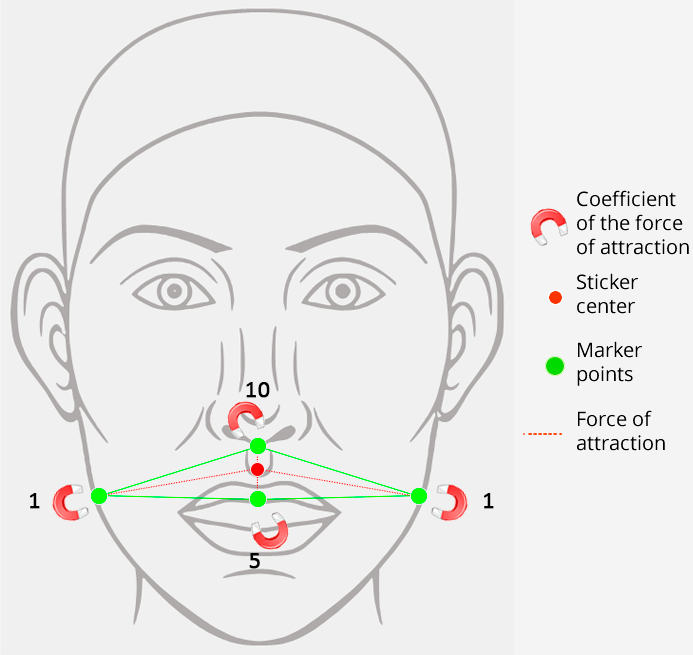
Therefore, the sticker center will be positioned between all 4 marker points, but closer to the upper point (because it has a stronger attraction to the upper point).
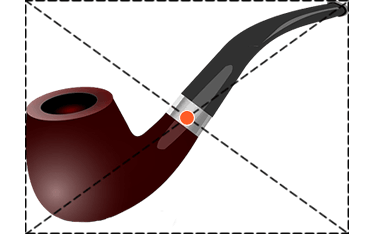
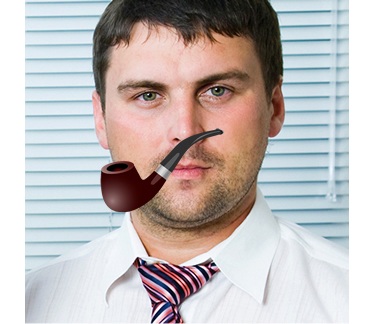
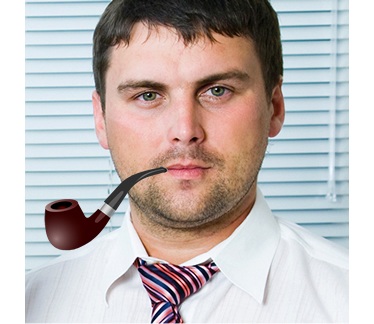
Sometimes, when you create a template, you need to set a position of a particular point of a sticker, which is not its center. For instance, if you create a template with a smoking pipe, you need to attach the mouthpiece to the lips corner. Since it is the sticker center that is attached to the specified position (which is determined by a set of marker points and the force of attraction), you need to reposition the center point placing it to the mouthpiece. Then the mouthpiece (not the visual center of the sticker) will be attached to the lips.
| Default position of the sticker center | Changed position of the sticker center |
|---|---|
 |
 |
|
Result you will get with the default position of the sticker center |
Result you will get if the sticker center position has been changed |
|---|---|
 |
 |
Positioning by the human face
Marker points
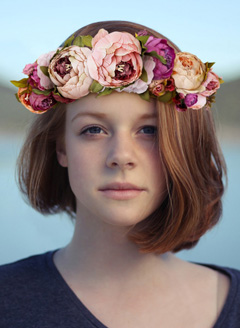
Sticker size relative to a facial feature
Besides being positioned on a face, a sticker can also adapt itself to a selected facial feature, which allows you to adjust its size to individual features of different faces.
Below is an example of sticker scaling relative to the width of the head.
| 50% | 100% |
|---|---|
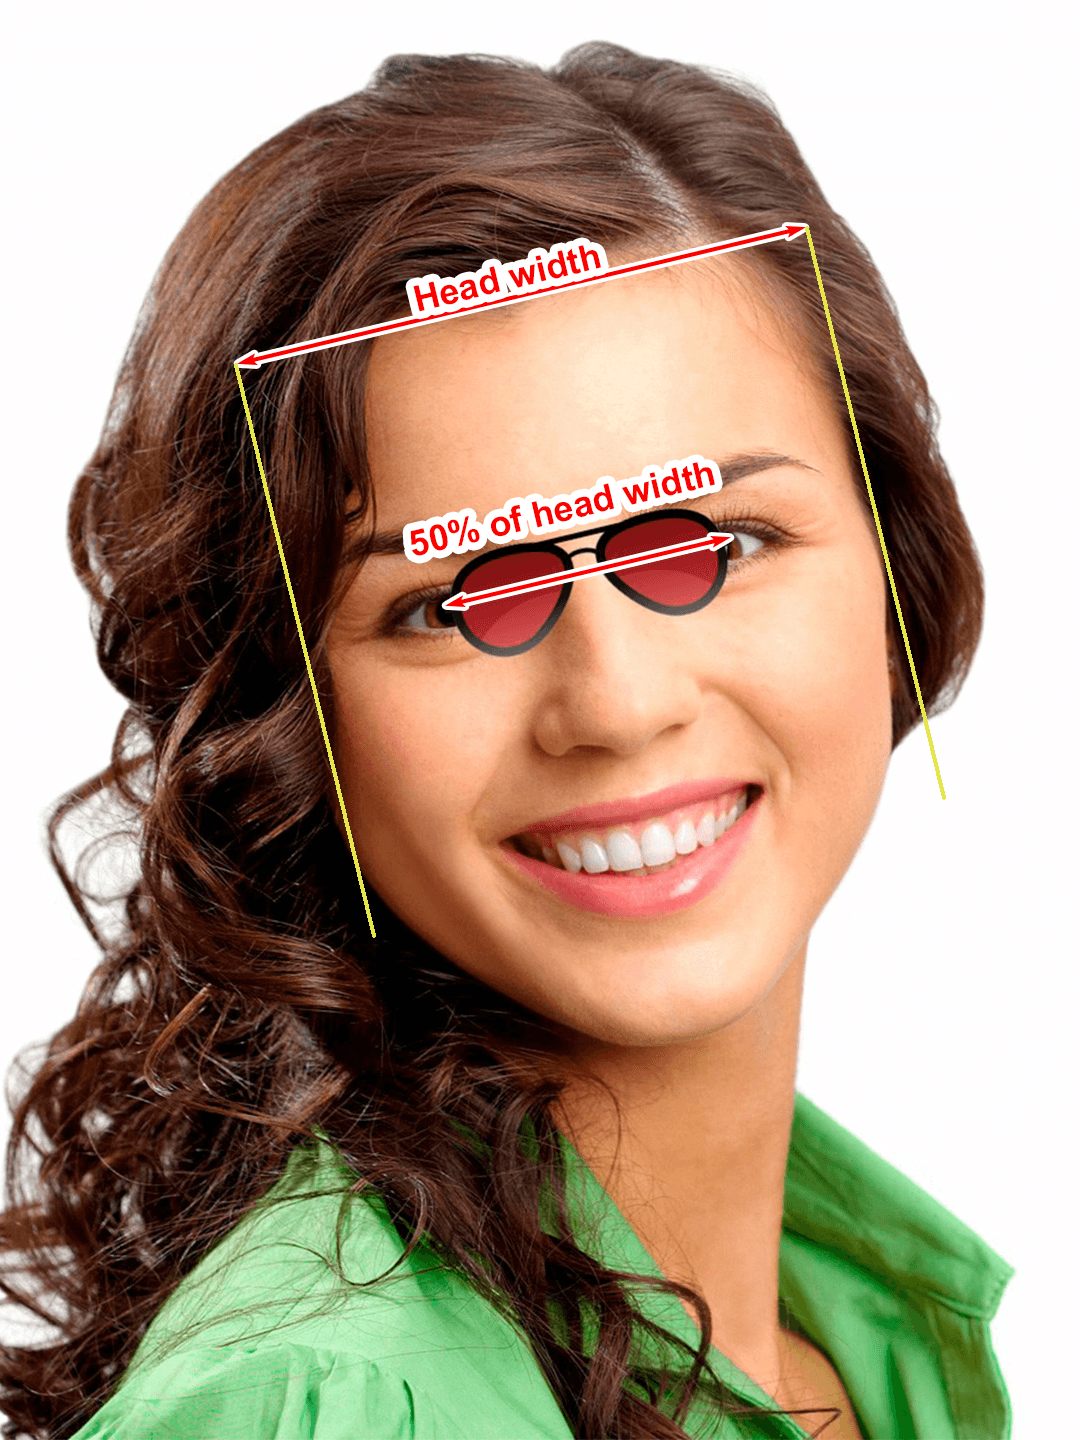
|
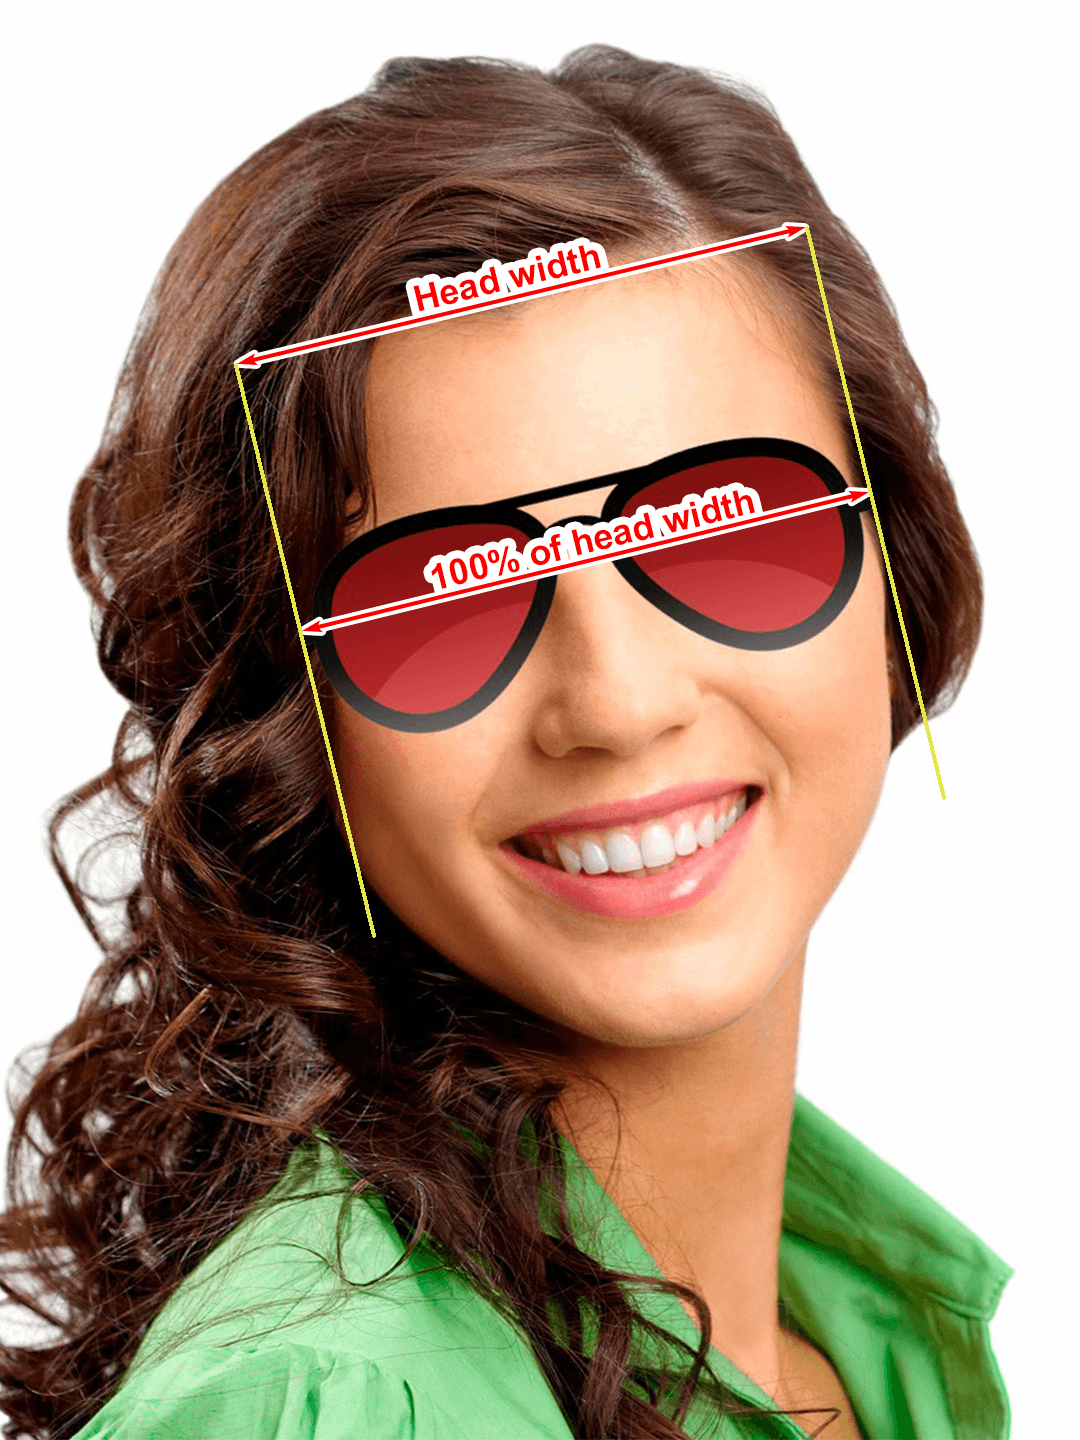
|
As well as the height of the head.
| 50% | 100% |
|---|---|
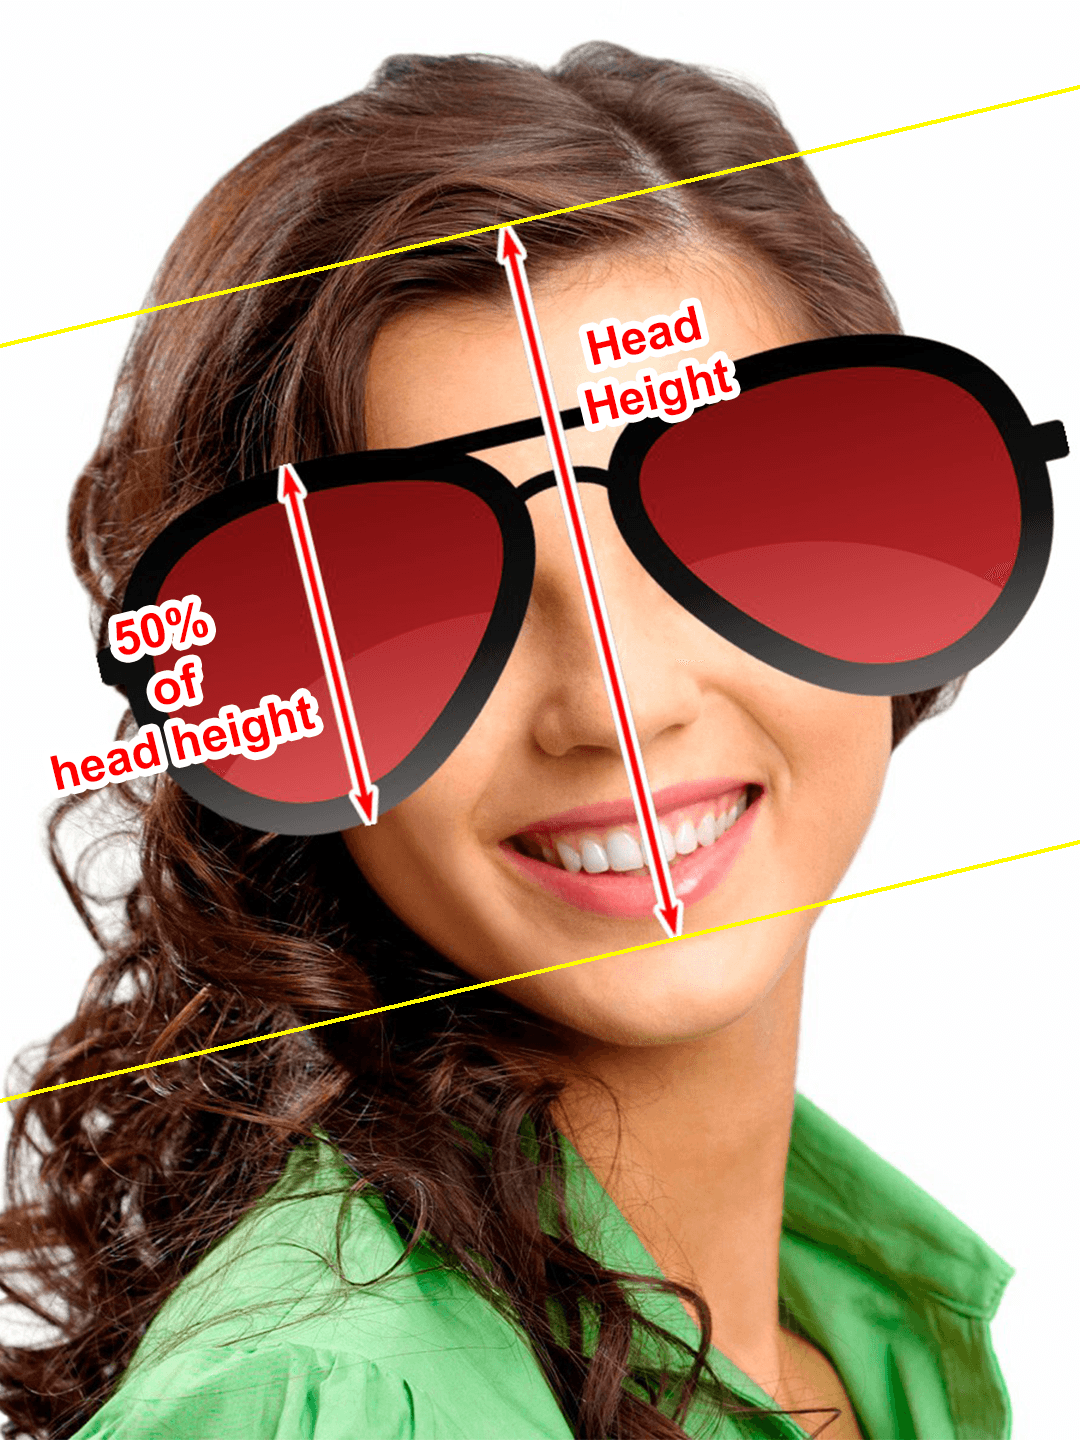
|
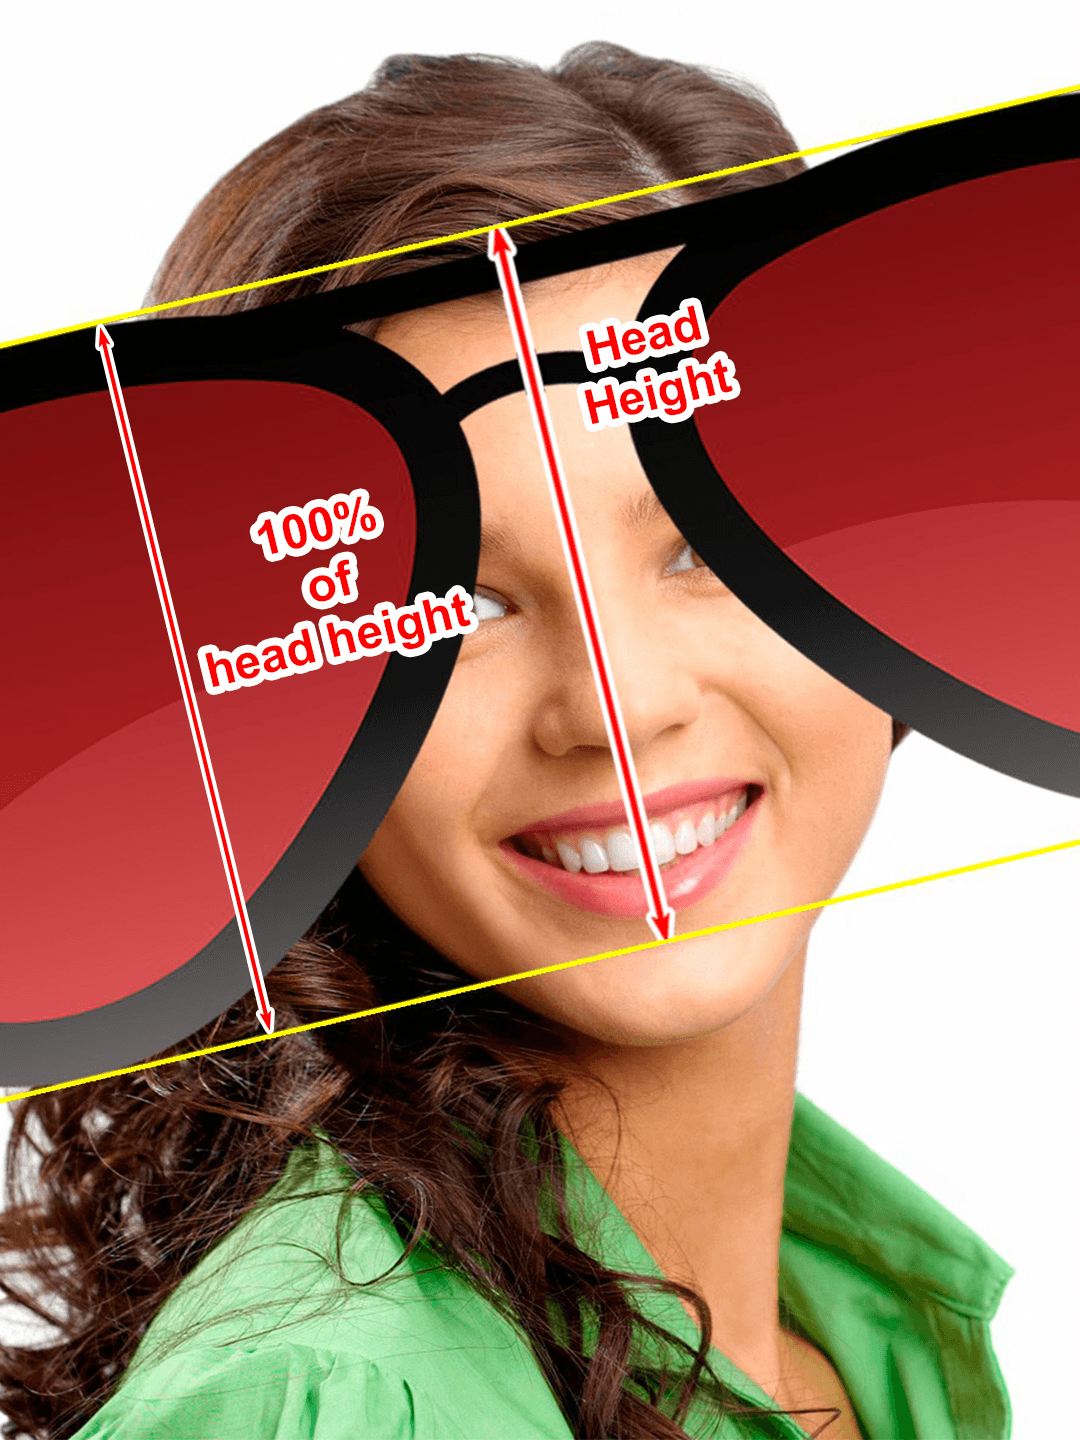
|
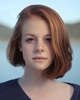
Please note that a sticker size does not depend on its position. A sticker will retain its size relative to a
selected facial feature, no matter where it is located in a user photo. The example below shows that the sticker
retains the scale of 100% of the head width, even when placed near the left ear.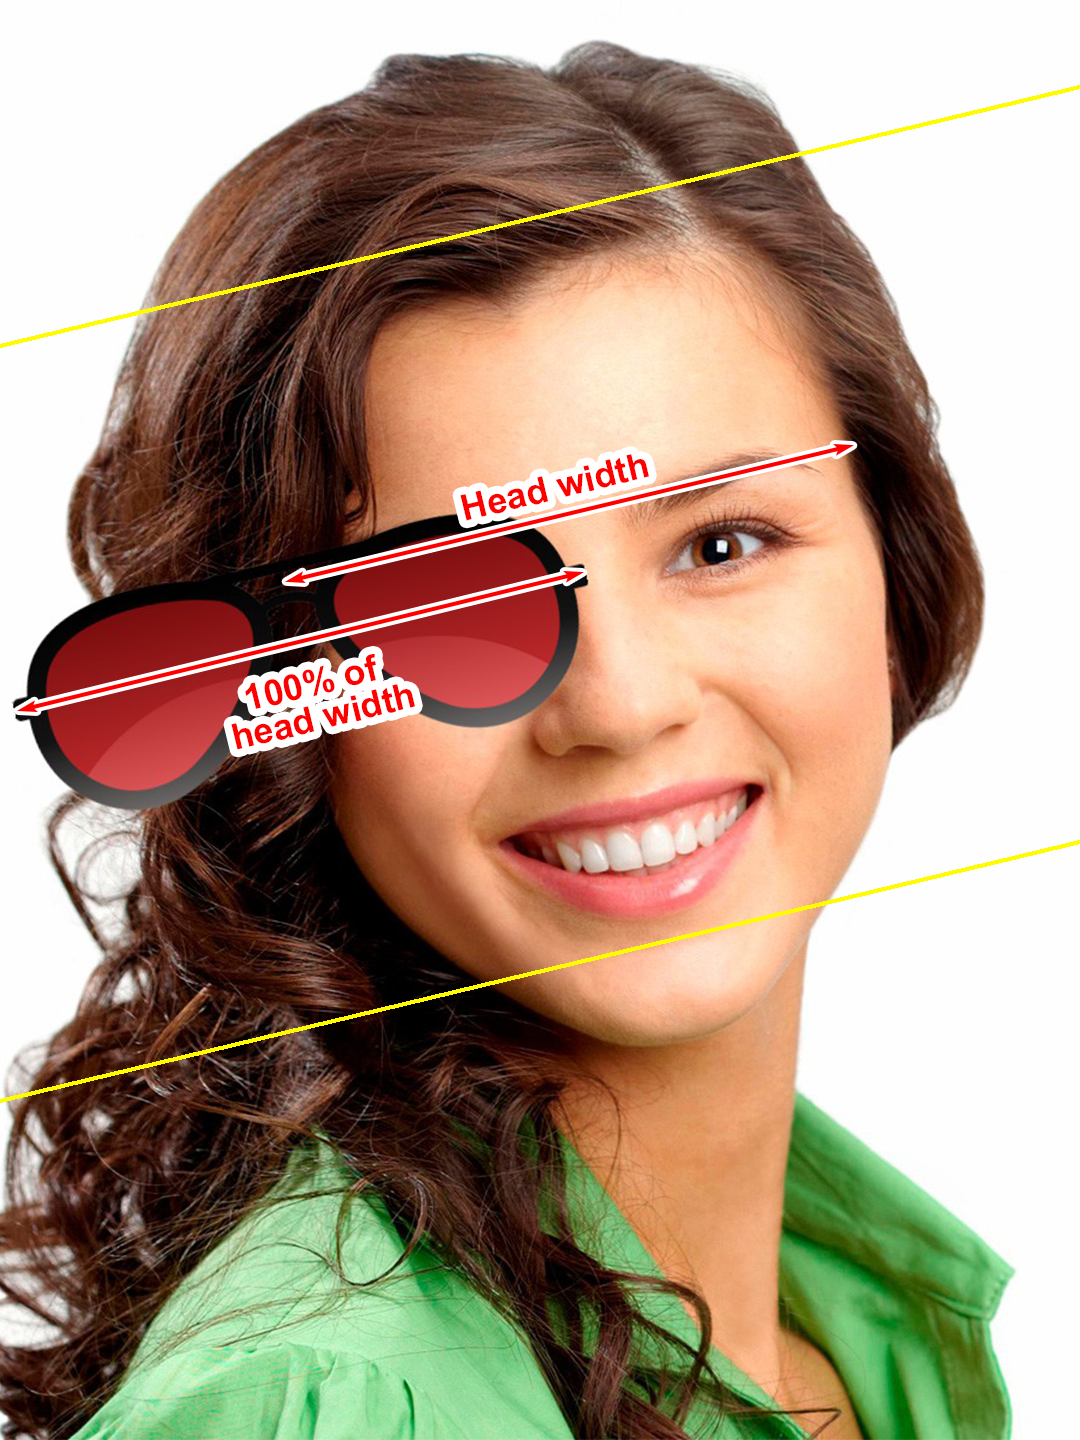
Please also note that if a sticker is scaled to 100% relative to the width or height of the head, its certain parts may go beyond the working area in some user photos, depending on the sticker position.
When scaling a sticker in a user photo, the Template Creator takes into account the following:
- Different size of faces in photos. A sticker is automatically upscaled or downscaled to fit the face size.
- Head tilt. A sticker is rotated automatically by the necessary angle.
- Different face expressions in photos. Marker points can be located differently in user photos due to the difference in facial expressions. Nevertheless, a sticker will still be located in the selected area in all photos.
Positioning by the human skeleton
Marker points
Unlike with positioning by the human face, positioning by the skeleton requires you to select additional parameters for positioning: Size and Rotation. To configure the settings, you must select two marker points in the corresponding tabs.
The marker points in the Size tab determine the actual size of a sticker in a user photo. For this purpose, the distance in pixels in a user photo [2] is measured between the selected marker points [1]. The obtained value is multiplied by the sticker size coefficient [3] relative to the distance between the marker points [2]. The result of multiplication is applied to the selected sticker side [4] which determines the sticker scale in the user photo [5] while maintaining the original aspect ratio of the sticker. So, the length of the segment line [5] will be 60% of the length of the segment line [2].
The Rotation tab is responsible for sticker rotation in a user photo. Rotation is performed relative to the horizontal axis of a sticker.
Rotation is configured with the help of two marker points that determine the direction of the vector.
The Template Creator determines the immediate position of the selected marker points in a user photo and calculates the direction of the vector on their basis.
The sticker is then rotated, based on the data received.

You can change the direction of the vector by right-clicking on the skeleton scheme. In this case, the sticker will be rotated by 180°.
Objects filter and error handling
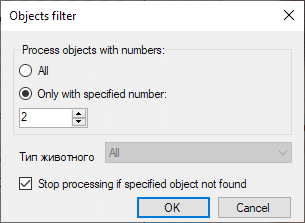
This dialog box allows you to filter skeletons in a user photo by numbers and apply different stickers to them individually, as well as different rasterizations of the same sticker.
To open this dialog, select Positioning by the object > Objects filter and error handling.

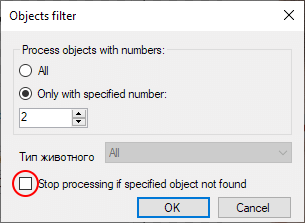
Skeletons are usually numbered in random order. If there is no skeleton with a given number in a user photo, photo processing will fail with an error message saying that the necessary skeleton has not been found in the image. To ignore this error, you need to uncheck the box next to the option Stop processing if specified object not found in the object filter window. In this case, the Template Creator will not apply the specified sticker.
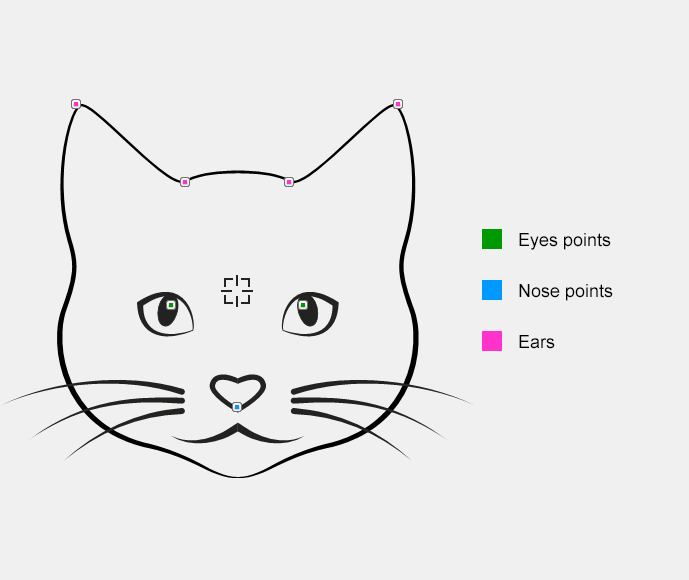
Positioning by the animal face
Marker points
Size and rotation
You can read more about the Size and Rotation tabs in the section on positioning by the human skeleton.
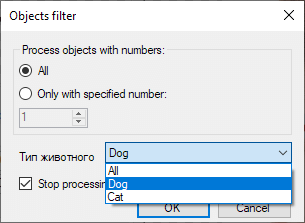
Objects filter and error handling
When you position stickers by the animal face or by the human skeleton, the same object filter is used. You can read more about it in the previous section. The only difference is that, during positioning by the animal face, the filter also contains filtering by the type of animal, in addition to filtering by the object number.
Several stickers in one template
Sticker templates allow you to use several stickers in one template. You can adjust each of them individually (choose the necessary position, scale, etc.).
Besides, you can use one sticker several times in one template. Each duplicate of the sticker can be positioned and scaled individually.
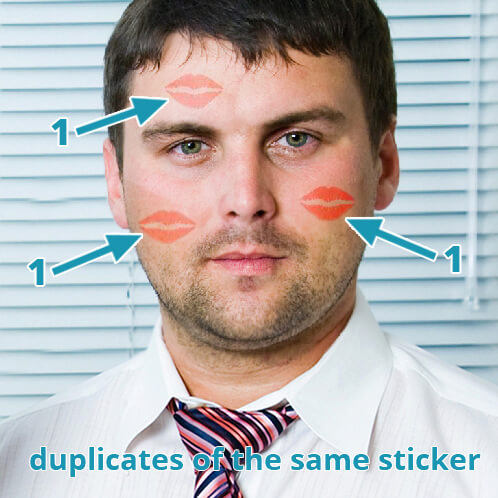
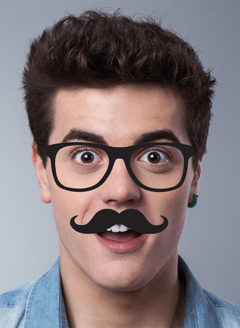
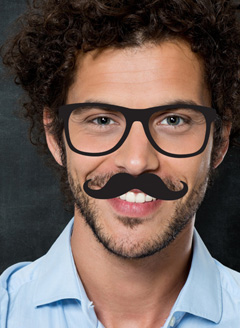
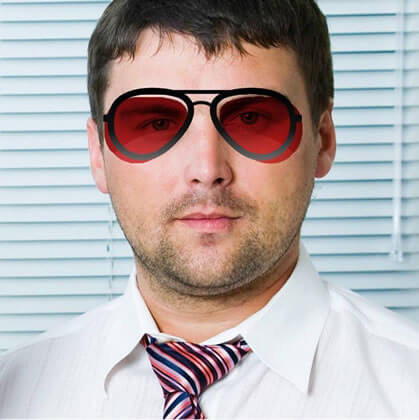
One and the same sticker, positioned differently, is used in the example above. However, its duplicates look different thanks to the soft_light blending mode applied to all of them. Blending modes are used to add a more realistic look to stickers - e.g. to preserve the skin texture, and more.
Combining stickers into groups
Sometimes we may want to make some particular parts of a sticker transparent or apply a blending mode to them. This effect can be achieved by combining several stickers.
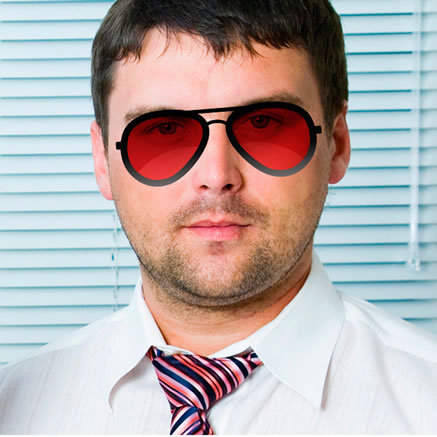
A template like the one shown above can be created with the help of two stickers (one sticker with the glasses frame and the other with the lenses), by combining them together and applying the “Multiply” blending mode to the lenses sticker.
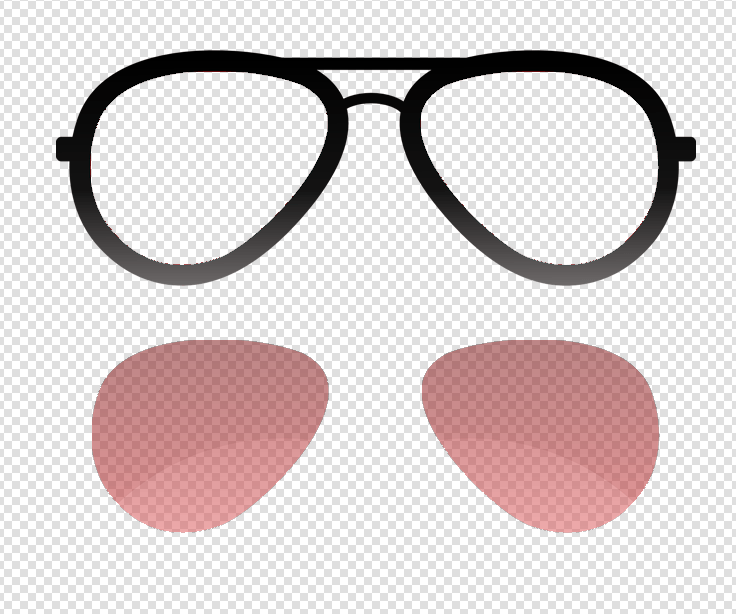
This brings up the question: how should we position both stickers so that they look as a single whole? If we position each sticker separately, the result may be unsatisfactory (even if they have the same scaling settings, selected marker points and force of attraction), because the two stickers may have different original sizes.
We got the result like shown above because we applied the same scaling settings to different-sized stickers. If you try to combine stickers into a single whole ‘manually’, using an independent Rasterization filter for each of them, you can encounter a number of problems.
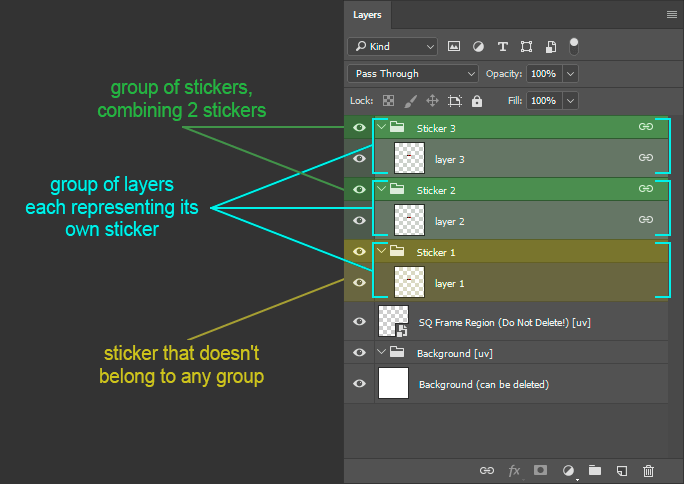
The best and most correct way to position several stickers meant to look as a single whole is to combine them into a group of stickers.
It is important to distinguish between the two terms group of layers and group of stickers. A group of layers is comprised of several layers combined in Photoshop into a group with a certain name. Each sticker is represented in Photoshop with its group of layers. A group of stickers is a group without a name that consists of stickers whose groups of layers are linked together via the Link layers option in Photoshop.
While working in Photoshop, you need to create a PSD structure that suits your creative plan: split your sticker into parts if you want to apply independent blending modes to them or make some of them transparent. Each part should, in fact, be an independent sticker.
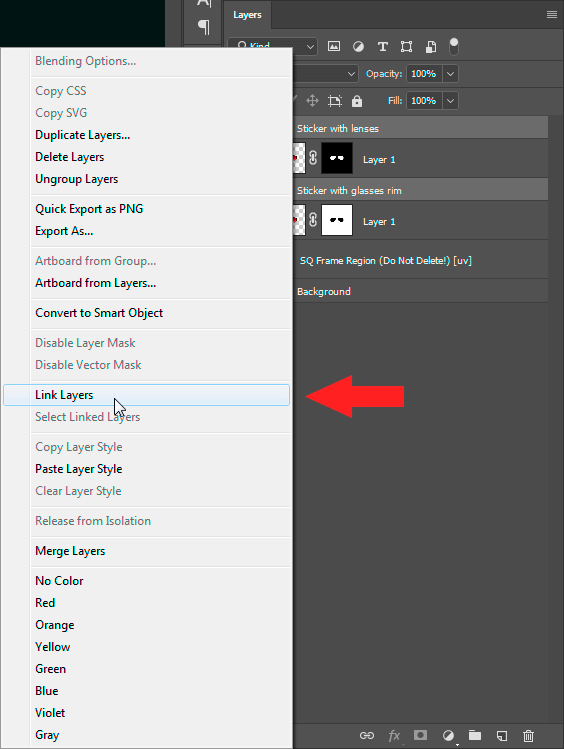
Then press and hold the CTRL Ctrl key and select all stickers that are meant to compose a single whole; then right-click one of them and select Link layers from the context menu. After this you will see special icons to the right of the layer names.
Linking layers and groups of layers in Photoshop has some peculiarities: if you select several groups of stickers using the Shift button, all layers inside them will also be selected (even if groups of sticker layers are collapsed). Thus, the inside of each group (except for the last / lowest one) will be affected, and all contents inside linked layers will be modified.
Alternatively, you can select groups of layers using the Ctrl button, thus their contents will not be affected, and only groups of layers will be linked. Then if you need to move, rotate or scale all of them together, you can do so by selecting only one group of layers. That said, the contents of each particular sticker can be modified individually.
You can learn more about selecting and grouping layers in Photoshop User Guide: https://helpx.adobe.com/ru/photoshop/using/selecting-grouping-linking-layers.html
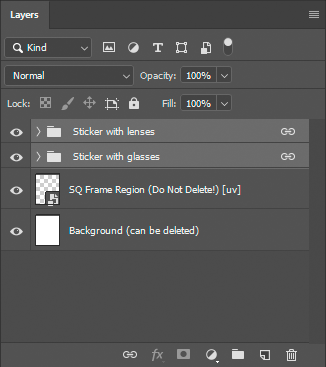
Now, after you reparse the PSD document, the Template Creator will treat these stickers as a group of stickers.
When reparsing PSD for the first time after grouping stickers together, you may get the following message:

Particular reasons why you may get this message can be different. However, in all cases you need to check the position settings for the group of stickers (most probably, it was set using the position of one of the stickers in this group). This question is considered in detail in the following section: Conflicts occuring while working with sticker groups.
Select the Rasterization filter for either of the two stickers to open the sticker group position editor. Both stickers will be positioned as a single whole; their position relative to each other will be the same as in Photoshop.
There are two things that distinguish a sticker position editor from a sticker group position editor:
- the editor dialog title,
- the latter contains a block allowing to control the visibility of stickers inside the group.
The "Visibility of the group elements" block lets you control the visibility and blendings for the stickers inside the group.
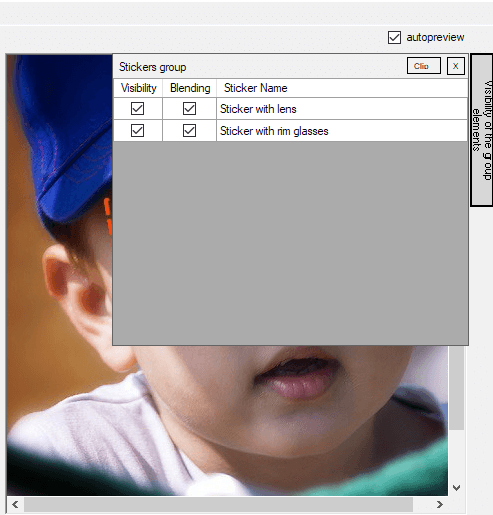
You can learn more about the sticker editor interface here.
If a conflict of stickers arises, you can solve the problem using the Visibility of the group elements control block we talked about earlier. It allows you to switch on/off positioning/scaling, visibility and blending settings of a sticker and a group of stickers that conflict with each other. More information about all possible reasons of conflicts regarding groups of stickers can be found here: Conflicts occuring while working with sticker groups
Restrictions regarding manipulations with groups of stickers
There are the following restrictions when working with groups of stickers:
- It is not allowed to group together stickers from different orientation.
- It is not allowed to add layers or group of layers which are not stickers into a group of stickers.
- If a sticker has been added into a group, it is not allowed to use it by itself. If you need to use it, create its independent copy, add it into the PSD file and work with it individually.
- It is not allowed to include a sticker into several groups at the same time.
Non-obvious aspects regarding groups of stickers
- A group of stickers can contain more than two stickers.
- A document can contain an unlimited number of groups of stickers - as many as you need.
- The order in which stickers are applied to a user photo is defined by the order of Rasterization filters. The order of stickers in Photoshop doesn't affect the order they are applied to a user photo.
Conflicts occuring while working with sticker groups
Certain sequences of actions with groups of stickers may result in some unobvious changes in sticker position or its other parameters. Such cases require designer interference and adjusting the position setting. The table below describes possible cases that lead to such conflicts.
| # | Action | Error | Warning | Solution |
| 1 | You have grouped together stickers that already have Rasterization filters with different parameters. | - | In the following groups of stickers the bounding box has changed. The bounding box determines an area to be exported from the PSD document, that’s why the position of the stickers has changed. You will have to edit their position manually. | Check the position of the sticker / group of stickers if the bounding box has changed.* |
| You have grouped together stickers that already had Rasterization filters. You will have to edit their position in order to synchronize the parameters. | Edit the stickers parameters if a position conflict arises.** | |||
| 2 | You have added a sticker that already had a Rasterization filter into an existing group of stickers, or combined several groups of stickers | — | In the following groups of stickers the bounding box has changed. The the bounding box determines an area to be exported from the PSD document, that’s why the position of the stickers has changed. You will have to edit their position manually. | Check the position of the sticker / group of stickers if the bounding box has changed.* |
| You have grouped together stickers that already had Rasterization filters. You will have to edit their position in order to synchronize the parameters. | Edit the stickers parameters if a position conflict arises.** | |||
| 3 | Stickers have been redesigned or added into a group / removed so that the bounding box of the group has changed. | — | In the following groups of stickers the bounding box has changed. The the bounding box determines an area to be exported from the Photoshop document (PSD), that’s why the position of the stickers has changed. You will have to edit their position manually. | Check the position of the sticker / group of stickers if the bounding box has changed.* |
| 4 | You detached a sticker from one group, and instantly included it into another group. After that you tried to reparse that sticker layer only. | The sticker now belongs to another group of stickers. Reparse PSD. | — | Reparse PSD. |
| 5 | You detached a sticker from its current group and created a new group for it. After that you tried to reparse the sticker layer. | The sticker now belongs to another group of stickers. Reparse PSD. | — | Reparse PSD. |
| 6 | You detached a sticker from its current group. After that you tried to reparse the sticker layer. | The sticker does not belong to a group of stickers. Reparse PSD. | — | Reparse PSD. |
* Check the position of the sticker / group of stickers if the bounding box has changed.
Open the sticker / group of stickers editor via the Rasterization filter. Check the sticker position. If the sticker position has changed, adjust it and save changes.
** Edit the stickers parameters if a position conflict arises.
Open the group of stickers editor via the Rasterization filter of any of the conflicting stickers. Use the conflict resolution tool in the upper right corner of the
editor window.
Toggle the checkboxes in the Subgroup column in the conflict resolution dialog to select the correct position of the group of stickers. Note that sometimes several stickers will be switched over at once when you toggle the checkboxes. This happens when stickers have the same position parameters.
E.g., in the scheme below stickers highlighted with blue color have the same position parameters. Stickers highlighted with. orange and green have their own unique position.
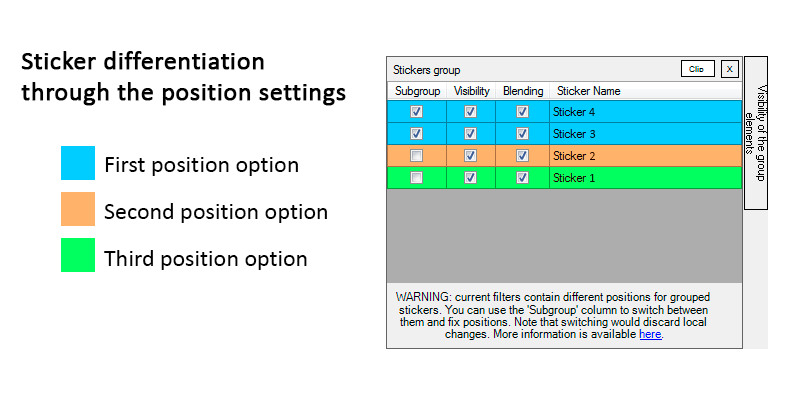
If none of the position settings turns out correct, select one of them and adjust it manually.
When the conflict is solved, save the settings. You will see the following warning:
You chose to group stickers with different position settings. Their original positions will be lost and replaced with the currently selected one. Do you want to continue?”
Confirm changes.
Creating sub-sizes for stickers
User photos processed by templates can be of distinctly different sizes. As we said before, stickers are automatically scaled to fit the size of uploaded user photos.
If the initial size of a sticker is large, but a user photo is small, the resulting image will contain noticeable artifacts due to sticker downscaling - the sticker edges will look jagged.
In the opposite case, if a sticker dimensions are noticeably smaller than the dimensions of a user photo, the sticker will look blurred and low quality because it has been stretched.
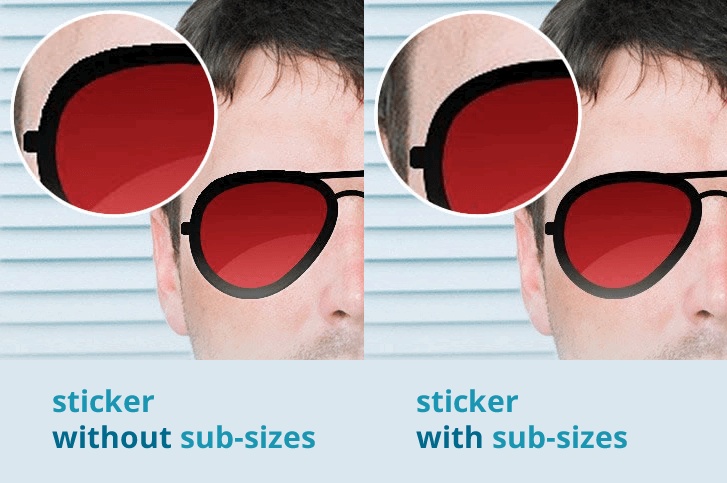
If the difference between the original sticker size and its size after scaling is minimal, the artifacts will be insignificant and hardly noticeable.
To minimize the appearance of artifacts during scaling, the Template Creator lets you create sub-sizes for quality sticker scaling.
Each sub-size is actually a copy of the original sticker graphics that has been resized to a specified size using quality image resampling. This option makes it possible to pick the closest sub-size for each user photo, and avoid extensive graphics scaling.
Sub-sizes are usually created by halving the size values. That is, you can create the following sub-sizes for the original size of 5000 px: 2500 px, 1250 px, 625 px. Also, the following set of sub-sizes is commonly used: 3200 px, 1600 px and 800 px. For some templates you may need to experiment with the choice of optimal sub-sizes to achieve high-quality results of user photo processing. The template Creator lets you edit your sub-sizes at any moment.
When a user photo is processed, the closest sub-size is chosen (a bigger or equal size to a given user photo, on the long side). Therefore, if you’ve created a template with 5000 px on the long side and with the following sub-sizes: 3200, 1600 and 800 pixels, they will be applied to different user photos as shown in the table below:
| 800 px sub-size | A photo with the long side up to and including 800 px |
| 1600 px sub-size | A photo with the long side ranging from 801 px up to and including 1600 px |
| 3200 px sub-size | A photo with the long side ranging from 1601 up to and including 3200 px |
| Original template graphics (5000 px) | A photo with the long side exceeding 3200 px |
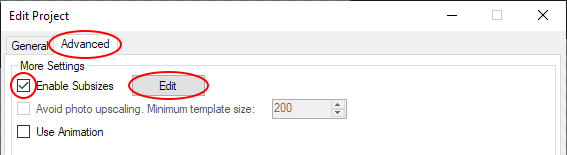
You can specify sub-sizes either when you create a new project, or when you edit an existing one. To do so, select File > Edit Project, or use the Ctrl+E shortcut.
Then, go to the Advanced tab, check the Enable Subsizes checkbox and click the Edit button to open the Subsize Editor.
Use the arrow buttons to the right of the specified size to change its value in increments of 100 pixels. If you need to choose a more specific number (like 1920), you can enter it manually. It is allowed to add up to 5 sub-sizes in a project.
You can find a practical how-to on creating a sticker template with sub-sizes here.
Additional information
Animated templates
This template type can be animated. More information on animated templates development can be found here.
There are some temporary restrictions regarding using animation in templates. Learn more about them here.
Examples of sticker templates development
This page offers several step-by-step examples of sticker templates creation and illustrates some special aspects of their development. We strongly recommend to study that page as it covers many important points.
Examples
- Creating a basic sticker template
- Creating a sticker template with sub-sizes
- Creating a multi-layer sticker template
- Creating stickers that contain symmetric objects
- Modifying Sticker Color To Match Skin Color From User Photo Using Filter "Eyedropper By Mask"
Important video tutorials
- Creating templates with stickers: introduction
- Creating templates with stickers: several stickers and matching their sizes
- Creating templates with stickers: symmetry, order of applying, some aspects regarding manipulations with groups
Other video tutorials (e.g. on templates with several user photo areas or work with filters) can be found here.