Filter templates development
Sometimes you may need to create a template that changes color parameters of a user photo, applies neural filters to it, adds semi-transparent graphic layers with blending modes, and the like, but does not resize or crop a photo.
Frame templates cannot be used to implement our idea, as we do not want to crop or resize a user photo and want our template to be nothing more than a ‘filter’ for a user photo.
The Template Creator makes it possible to create a special type of templates for such purposes - filter templates. These templates adapt to a user photo size and orientation. In addition, compared to sticker templates (that also adapt to a user photo size), filter templates allow you to employ a bigger number of different artistic means.
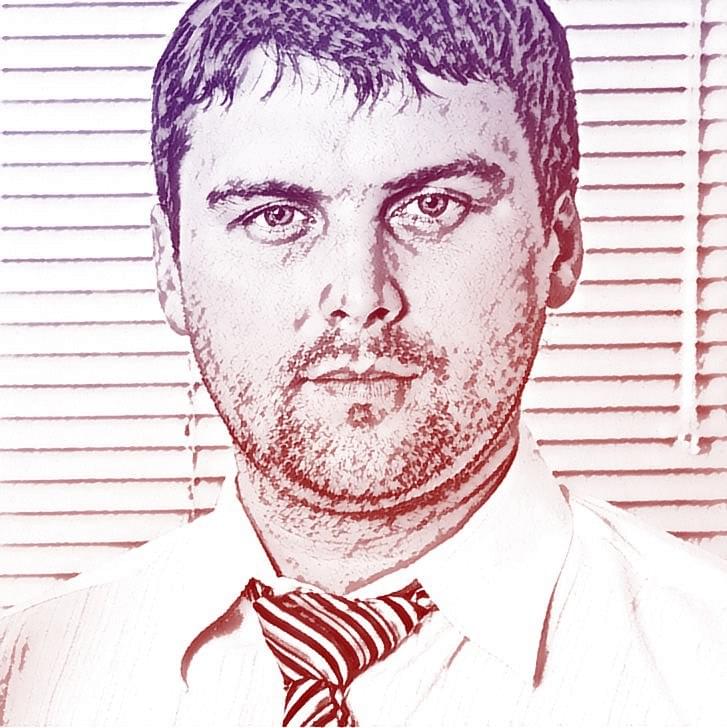
| Original photo | Photo processed with a filter template |
|---|---|
Filter templates have a number of peculiarities that make them different from other types of templates:
- Original and resulting photos always have the same size. A user photo is never cropped or resized.
- You can use structural elements that are typical of templates of other types: different types of user photo regions, graphics, stickers, etc.
- If a template uses graphic layers, they will be upscaled or downscaled to fit the size of a user photo without keeping their proportions constrained.
- Filter templates need to have a particular orientation only in case they use specifiс graphics that depends on a user photo orientation.
Creating a project in the Template Creator
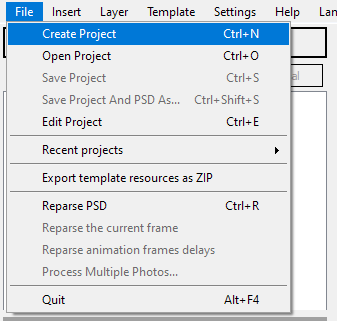
Open the Template Creator when Photoshop is already launched (if Photoshop is not running, it will start automatically when you open the Template Creator). Go to the File menu and select Create Project:
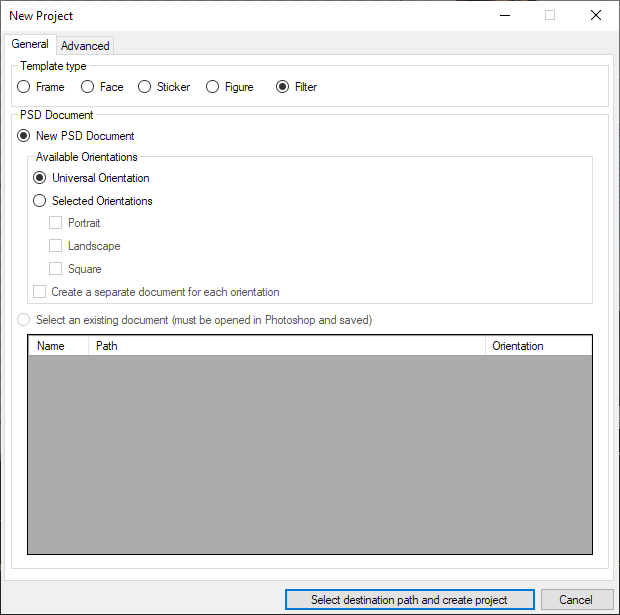
A dialog will open, where you need to fill the parameters of your template and save it in a selected directory. Select ‘Filter’ in ‘Template type’, then select ‘New PSD Document’ and specify the template orientation (if there is no need to use different graphic layers for user photos with different orientations, select Universal Orientation).
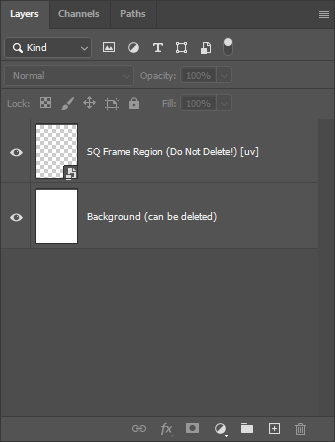
When you are done with the dialog, the Template Creator will generate a new PSD file in Photoshop. This file is associated with a new project and has the correct structure of layers:
If there are open documents in Photoshop, the project creation dialog will allow you to make a project based on an existing document:
Select one or several PSD documents from the list and specify a desired orientation for them.
You can change the binding of a PSD document to the project at any time by clicking File > Edit Project (CTRL + E). This dialog also lets you change the project type.
Rasterization filter and Position editor
To start working with filters, open the ‘Filter settings for User Photo Region’ dialog in the Template Creator. To open the dialog, use one of the methods below:
- Double-click a user photo region layer:
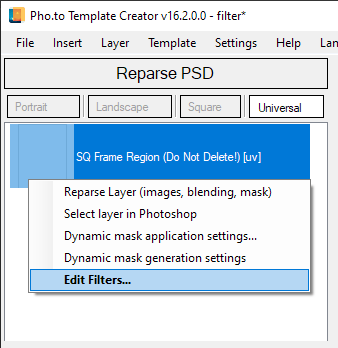
- Right-click a user photo region layer and select Edit filters... from the context menu:
- Find the filters list in the selected layer info panel:
- Go to the Layer menu and select Edit filters…:
The filter settings dialog contains 3 columns:
- The left column shows filters added to the current user photo region.
- The middle column displays parameters of a filter selected in the left column.
- The right column contains preview area of all filters in the list or only current filter.
You can add filters using one of the methods below:
- Click the Add... button to open the ‘Add new filter’ dialog.
- Click the small arrow to the right of the Add... button and select a filter from the context menu (the context menu can also be opened by right-clicking the Add... button)
The ‘Add new filter’ dialog contains two columns. The left column shows the list of filters; the right column displays information on the current filter.
Filters can be searched by name. To do so, start typing a filter name in the search field in the left column. Selecting a filter in the left column and clicking OK in the bottom right corner will add the filter to the current user photo region.
Filters are added in sequence, one after another, but you can shuffle them (change their order), as well as add, remove, copy and move them in the way you want it.
Filters can be copied and moved:
- inside one orientation;
- from one orientation into another;
- from one project into another.
You can perform different operations on added filters using the following:
- use the arrows to the right of the list of added filters to change the order of the filters (move a filter up or down in the list);
- use the buttons above the filters list to remove, copy, cut and paste filters;
- use your mouse to drag and drop, as well as copy, paste and remove via the context menu;
- use the ‘Add’ context menu to add filters;
- use the check boxes in the list of added filters to temporarily disable a filter / filters.
Changing the order of filters application affects the eventual result.
Talking about copying and disabling filters, we must pay special attention to Face Insertion, Figure Extraction and Rasterization filters.
The copying filters option cannot be applied to the Face Insertion and Figure Extraction filters. Instead of copying the Face Insertion filter, you can copy the face region in the PSD document or create a new face region with the help of the Template Creator. The Face insertion filter will be added automatically when you reparse the document.
In a similar way, instead of copying the Figure Extraction filter, you can copy the figure region in the PSD document or create a new figure region with the help of the Template Creator. The Figure Extraction filter will be added automatically when you reparse the document.
As for disabling filters, it should be kept in mind that the Face insertion and Figure Extraction filters cannot be disabled since they act as important structural components of a template and determine its composition.
When copying the Rasterization filter, make sure that the correct sticker is specified in the copied filter settings.
You can edit the settings of a selected filter in the middle column. At the bottom of the column you can see brief context help messages for a selected parameter.
If you want to specify a non-integral value in one of the filter parameters, please use decimals. A comma or a period are used as a delimiter, depending on system regional settings. In case you use an invalid delimiter, the Template Creator will warn you about that with an error message. If you have trouble using a a period as a delimiter, try using a comma instead, and vice versa.
The right side of the filter settings dialog contains preview area.
The preview area has several limitations:
- The preview area does not display the whole template, but only a user photo with applied filters from the list. No other settings of user photo region are used.
- The preview area only supports local processing of whitelisted photos.
- The Use for preview radio buttons on top of the window let you switch between showing all filters from the list and only one filter selected in the list.
- Some filters require internet connection for processing.
Click the Help button (or press the F1 key) to display the filters on-line documentation on the Template Creator website.
If you need help regarding a particular filter, select it in the list first. In this case a built-in help section dedicated to this particular filter will open.
User photo region
Filter templates can contain user photo regions of any type: frame regions, face regions or figures.
In Filter templates, as well as in other types of templates the smart object — SQ Frame Region (Do Not Delete!) [uv] is used for positioning a user photo. You can also place test photos inside the Smart Object to try them with your template in Photoshop.
Filter templates support adding several frame user photo regions which you can place at your will. However, you should bear in mind that in this type of project the canvas size adapts to the size of the input user photo and ignores the canvas size specified in Photoshop.
When processing several photos with different image indexes, the canvas size will be equal to the size of the photo which parameter Do Not Upscale is set to true.

